Map Examples
Map Examples
Map Display
The TomTomOnlineSDKMaps contains a variety of options like various map layers: map tiles and traffic tiles.
Map tiles
Important
|
In May 2020 methods used for switching to between vector and raster tiles got deprecated and will be removed after one year. From that point to display raster tiles it will be required to reload the style to one which contains raster layers. Before deprecation period is over map is still going to be initialized with the style that contains Raster and Vector tiles. However to prepare yourself for the migration please check how to init map that is described here. |
In order to display a map, you need to provide a map style file which includes information required to render a map. Sources include information about types of tiles (e.g. raster or vector) and the URL(s) for the tile service(s), for more information have look at Map Style Specification. The default map display in Maps SDK is based on vector tiles, so it utilizes a map style file which sets the URL to Vector Tile endpoint. The default style file for the map and traffic display is fetched from the Style Merger. It is also possible to display a map with raster tiles in Maps SDK. In order to do that, you need to provide a map style defining the raster type and the raster tiles endpoint URL. This style must be loaded into the Maps SDK. This example provides a simple map JSON style file sheet that can be used to display TomTom raster tiles and shows how to use a style in Maps SDK.
Allow your users to display the map in either raster or vector format:
-
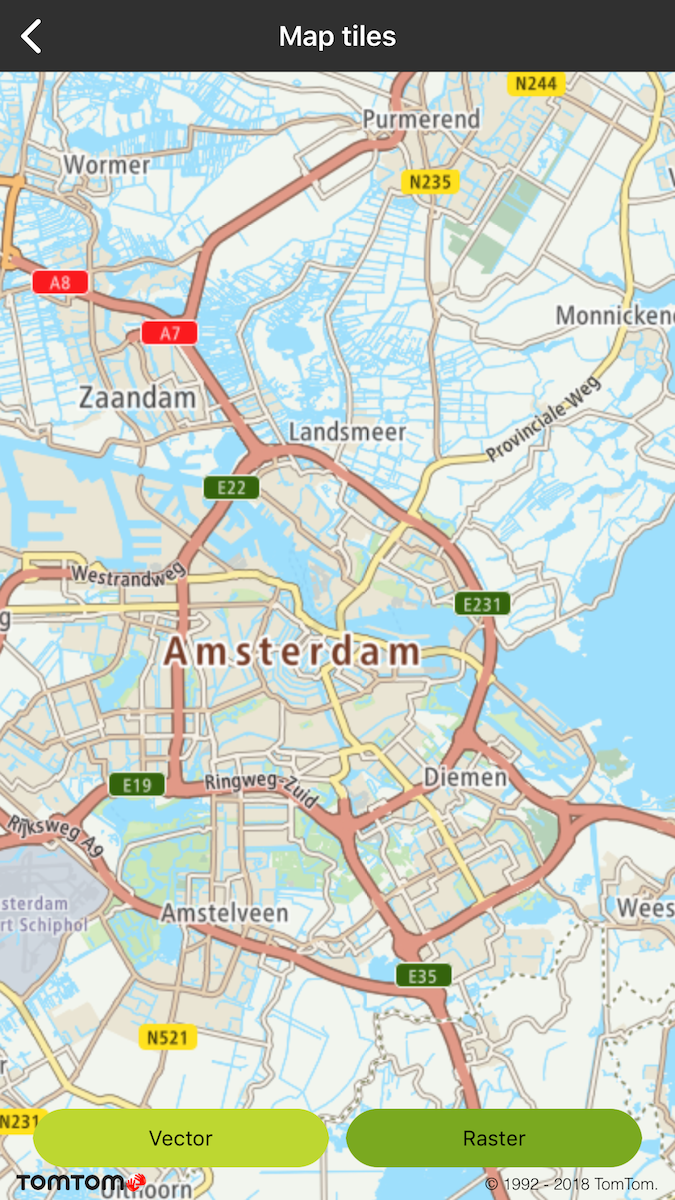
Raster tiles are served as images. They require less processing power and memory to render, but have a larger file size than vector tiles.
-
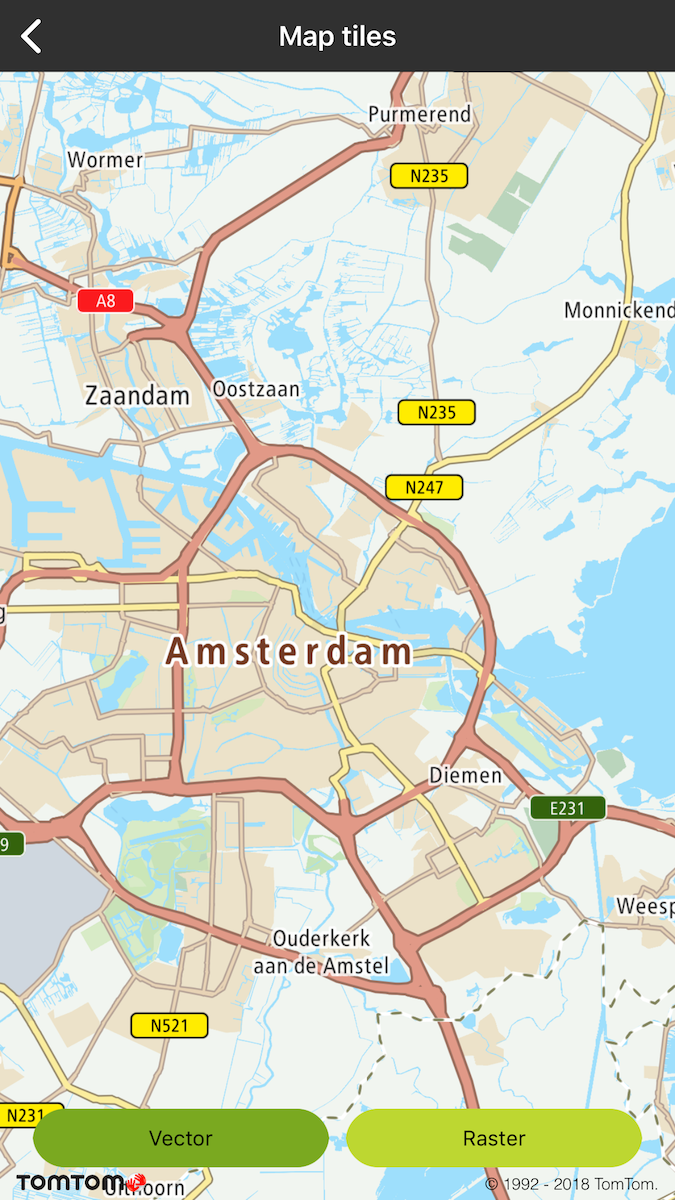
Vector tiles take the form of data that describe map entries such as geographic points, forests, lakes, built up areas (as polygons), and roads (as lines). They are styled by means of a style sheet. Vector tiles can be scaled to different sizes without losing quality. The file size of vector tiles is smaller than that of raster tiles.
Sample use case 1: Your app is designed to use raster tiles for map display. You want to update the app with the TomTom Map Display API raster tiles.
Sample use case 2: You want to take advantage of vector tile features such as map 2.5 D perspective, custom map styles, etc.
Sample use case 3: Your app runs on devices with different capabilities. You want to use vector tiles for map display on powerful devices and raster tiles on devices with less processing power.
Use the following code snippets in your app to display the map with raster or vector tiles.
![]() Raster tiles.
|
![]() Vector tiles.
|
Traffic layers
Give your users the ability to see real time traffic in your mobile apps.
With Traffic API Flow tiles your users will have information about congestion, the speed of traffic on different road segments, and the difference between that speed and the free-flow speed on the same road segments. You can find more information and details about Traffic API Flow tile parameters on Online Vector Traffic Flow tiles, or Online Raster Traffic Flow tiles.
To turn on/off traffic flow or incidents use these methods:
_
mapView.trafficIncidentsOn = true
mapView.trafficFlowOn = true
self.mapView.trafficIncidentsOn = YES;
self.mapView.trafficFlowOn = YES;
Vector Traffic Flow Tiles Delegate
Additionally, you can get details about the specific traffic flow or incident of the road fragment (e.g., current speed, travel times, etc.) from the Flow Segment Data service which is integrated in the Maps SDK. This service is designed to work alongside the traffic to support clickable flow and incidents data visualizations. This is handled for you in the Maps SDK. The SDK provides default implementation of trafficDelegate which is TTMapTrafficDelegateDefault.
_
mapView.trafficDelegate = TTMapTrafficDelegateDefault()
self.mapView.trafficDelegate = [[TTMapTrafficDelegateDefault alloc] init];
By the default implementation, when you click on the specific traffic incident, a balloon with details is shown for incident flows:
_
let callout = TTMapTrafficCalloutFactory.create(with: trafficIncidentPoi)
mapView.display(callout, atPosition: coordinate)
TTMapTrafficCallout* callout = [TTMapTrafficCalloutFactory createWithIncidentPoi:trafficIncidentPoi];
[mapView displayTrafficCallout:callout atPosition:position];
The default implementation of an incident click listener zooms the map when the traffic cluster is clicked:
_
let newZoom = mapView.zoom + 1
mapView.closeTrafficCallout()
if(newZoom < mapView.maxZoom) {
mapView.center(on: position, withZoom: newZoom)
}
double newZoom = mapView.zoom + 1;
[mapView closeTrafficCallout];
if(newZoom < mapView.maxZoom) {
[mapView centerOnCoordinate:position withZoom:newZoom];
}
Traffic type style
Important
|
I In May 2020 methods used for switching between vector and raster tiles got deprecated and will be removed after one year. From that point to display raster tiles it will be required to reload the style to one which contains raster layers. Before deprecation period is over map is still going to be initialized with the style that contains raster and vector tiles. However to prepare yourself for the migration please check how to init map that is described here. |
When Maps SDK is launched with a style containing raster sources for Traffic Flow appropriately set according to style definition then you can switch to Raster Traffic The available traffic flow styles are the following:
_
.relative,
.absolute,
.relativeDelay,
.reducedSensitivity
TTRasterStyleRelative,
TTRasterStyleAbsolute,
TTRasterStyleRelativeDelay,
TTRasterStyleReducedSensitivity
![]() Traffic vector flow layer on vector map |
![]() Traffic raster flow shown on raster map |
![]() Traffic vector incidents layer on vector map |
![]() Traffic raster incidents layer on vector map |
![]() Traffic vector incidents and vector flow layer on vector map |
![]() Traffic raster incidents and raster flow layer on raster map |
Map language
Allow your user to see the map in different languages to make your app international. The language parameter determines the language of labels on the map. It does not affect any proper nouns, like the names of streets, plazas, etc. The list of the supported languages can be found at Default View Mapping.
Sample use case: You want to have all labels only in British English.
To change the language for the map:
![]() Map labels in English
|
![]() Map labels in Russian
|
![]() Map labels in Dutch
|
Geopolitical view
Allow your user to see the map boundaries based on international or local country views. The local view is available for a particular area of the world that is considered as disputed by two or more countries. As a result, each country can show this area as a part of his country. List of the supported views can be found at Default View Mapping.
Sample use case: You want to display the local map view for Israel.
To change the geopolitical view for the map:
![]() Israel international view
|
![]() Israel local view
|
Custom styles
Allow your user to create and provide the map with one or more custom styles for vector map tiles.
Modify the default TomTom style
The best way to create a custom style is to modify the default TomTom style for vector maps using the Maputnik editor. You can find the JSON map style in the resources directory. The tutorial on how to modify the style is available for all Maps SDKs (for Android, iOS, and Web) at Creating custom vector map style. Note that after step 9 of the linked tutorial, you need to save the JSON file and place it in the resources directory of your app project.
Provide your style You can provide an external map style file on the server and provide the URL. Sprites and fonts should be stored locally in the application. Currently, we don’t support loading resources and fonts from a server.
Sample use case: You want to display a night-styled map at night or in a tunnel.
To change the style of the map:
_
let customStyle = Bundle.main.path(forResource: "style", ofType: "json")
mapView.setStylePath(customStyle)
mapView.applyInvertedLogo()
NSString *customStyle = [NSBundle.mainBundle pathForResource:@"style" ofType:@"json"];
[self.mapView setStylePath:customStyle];
[self.mapView applyInvertedLogo];
![]() Basic style |
![]() Night custom style |
Switching Map Layers
Allow your users to dynamically toggle the visibility of map entities. You can hide map layers to get the level of detail you need and highlight the layers that are important for your use case.
Sample use case: You want to provide a clear map view for driving that focuses on the road network in your app. You can achieve this by switching off some map layers e.g., woodland, build-up areas, etc. You can turn these layers back on at run time to bring back the details for a better map viewing experience.
The following articles provide more information on map layer visibility and map layers available in the default style: Map layers, and Default style.
You can retrieve all layers available in the style or only those that match a provided regex. To filter, you can use the layer ID or source layer ID properties, as shown in the following examples:
![]() Map Road network layers
|
![]() Map woodland layers
|
![]() Map No Build-Up layers
|
Dynamic map sources
Add layers and sources (e.g., GeoJSON, images) to the map in real time. This will allow you to dynamically change a map’s style in response to user interaction and context.
Sample use case 1: You want to add extra layers with building plans from your custom source.
Sample use case 2: You want to dynamically modify source parameters (e.g., the URL).
The Maps SDK for iOS allows you to create a layer and dynamically add it to the style, as shown in the following examples:
_
let layerMap = TTMapLayer.create(withStyleJSON: layerJSON, withMap: mapView)
currentStyle.add(layerMap!)
TTMapLayer *layerMap = [TTMapLayer createWithStyleJSON:layerJSON withMap:self.mapView];
[self.currentStyle addLayer:layerMap];
To create an Image source:
_
let image = UIImage(named: "buckingham_palace")
let quad = TTLatLngQuad(topLeft: TTCoordinate.BUCKINGHAM_PALACE_TOP_LEFT(),
withTopRight: TTCoordinate.BUCKINGHAM_PALACE_TOP_RIGHT(),
withBottomRight: TTCoordinate.BUCKINGHAM_PALACE_BOTTOM_LEFT(),
withBottomLeft: TTCoordinate.BUCKINGHAM_PALACE_BOTTOM_RIGHT())
let sourceMap = TTMapImageSource.create(withID: IMG_SOURCE, image: image!, coordinates: quad)
currentStyle.add(sourceMap)
let path = Bundle.main.path(forResource: "layer_raster", ofType: "json") let layerJSON = try! String(contentsOfFile: path!, encoding: .utf8) let layerMap = TTMapLayer.create(withStyleJSON: layerJSON, withMap: mapView) currentStyle.add(layerMap!)
UIImage *image = [UIImage imageNamed:@"buckingham_palace"];
TTLatLngQuad *quad = [[TTLatLngQuad alloc] initWithTopLeft:TTCoordinate.BUCKINGHAM_PALACE_TOP_LEFT withTopRight:TTCoordinate.BUCKINGHAM_PALACE_TOP_RIGHT withBottomRight:TTCoordinate.BUCKINGHAM_PALACE_BOTTOM_LEFT withBottomLeft:TTCoordinate.BUCKINGHAM_PALACE_BOTTOM_RIGHT];
TTMapImageSource *sourceMap = [TTMapImageSource createWithID:IMG_SOURCE image:image coordinates:quad];
[self.currentStyle addSource:sourceMap];
NSString *path = [[NSBundle mainBundle] pathForResource:@"layer_raster" ofType:@"json"]; NSString *layerJSON = [NSString stringWithContentsOfFile:path encoding:NSUTF8StringEncoding error:nil]; TTMapLayer *layerMap = [TTMapLayer createWithStyleJSON:layerJSON withMap:self.mapView]; [self.currentStyle addLayer:layerMap];
To hide a source or a layer from the style:
_
let layerMap = TTMapLayer.create(withStyleJSON: layerJSON, withMap: mapView)
currentStyle.add(layerMap!)
TTMapLayer *layerMap = [TTMapLayer createWithStyleJSON:layerJSON withMap:self.mapView];
[self.currentStyle addLayer:layerMap];
The Maps SDK for iOS makes it possible to select a visible feature within a GeoJSON layer. As a result you will get an object feature’s collection.
_
let geoJSONFeatures = mapView.features(at: tap, inStyleLayerIdentifiers: [GEO_LAYER_ID])
NSArray *geoJSONFeatures = [self.mapView featuresAtPoint:tap inStyleLayerIdentifiers:[NSSet setWithObject:GEO_LAYER_ID]].features;
![]() Custom image source |
![]() Custom GeoJSON source |
Dynamic Layer Ordering
You can dynamically change the z-order of the layers on the map to make the layers important to your use case visible on top of other layers.
Sample use case : You placed images on the map in your app but your users can bring the route and the road network on top of the images to see what the route looks like in detail.
![]() Images
|
![]() GeoJSON
|
![]() Roads
|
Interactive map layers
Retrieve data of a feature (e.g., ID, geometry) from layers in the style by querying for rendered features at a screen point, coordinates, or the screen rect within a specified layer in the style.
Sample use case 1: You want to display information if the user clicks on a layer that you added.
Sample use case 2: You want to return all visible features in a viewport.
To create a layer and dynamically add it to the style:
_
let layerMap = TTMapLayer.create(withStyleJSON: layerJSON, withMap: mapView)
currentStyle.add(layerMap!)
TTMapLayer *layerMap = [TTMapLayer createWithStyleJSON:layerJSON withMap:self.mapView];
[self.currentStyle addLayer:layerMap];
To query the style for specific layer features at a given coordinates call:
_
let geoJSONFeatures = mapView.features(atCoordinates: coordinate, inStyleLayerIdentifiers: ["IL-test-layer-outline"])
TTGeoJSONFeatureCollection *geoJSONFeatures = [self.mapView featuresAtCoordinates:coordinate inStyleLayerIdentifiers:[NSSet setWithObject:@"IL-test-layer-outline"]];
To query the style for specific layer features in a given screen rect e.g., viewport:
_
let geoJSONFeatures = mapView.features(atScreenRect: mapView.bounds, inStyleLayerIdentifiers: ["IL-test-layer-outline"])
TTGeoJSONFeatureCollection *geoJSONFeatures = [self.mapView featuresAtScreenRect:self.mapView.bounds inStyleLayerIdentifiers:[NSSet setWithObject:@"IL-test-layer-outline"]];
![]() GeoJSON polygon clicked |
![]() Features in viewport |
Image clustering
Allow your users to cluster image annotations for better visualization. By default, clustering is disabled.
Sample use case: You want to cluster images in the FeatureCollection
type provided in GeoJSON.
To enable clustering you need to set:
-
"cluster": true
and set the desired cluster radius:
-
"clusterRadius": 70
Here you can see what the TTMapSource
GeoJSON style file with enabled clustering looks like:
"IC-app-test-source": {
"type": "geojson",
"cluster": true,
"clusterRadius": 70,
"data": {
"type": "FeatureCollection",
"features": [
{
"type": "Feature",
"geometry": {
"type": "Point",
"coordinates": [
4.710759,
52.340415
]
},
"properties": {
"icon": "jet_airplane_landing"
}
}
]
}
}
You also need to add the new TTMapStyle
to the current style, that defines the behaviour when your features do not fulfill clustering contraints.
{
"id": "IC-app-test-layer",
"filter": [
"!has",
"point_count"
],
"type": "symbol",
"layout": {
"icon-image": "{icon}",
"icon-allow-overlap": true
},
"source": "IC-app-test-source"
}
Please also remember if the feature "properties": {"icon": "jet_airplane_landing"}
is set, you need to add the image to TTMapStyle
as follows:
_
let jetAirPlainLanding = UIImage(named: "jet_airplane_landing")
currentStyle.add(jetAirPlainLanding!, withID: "jet_airplane_landing")
UIImage *jetAirPlainLanding = [UIImage imageNamed:@"jet_airplane_landing"];
[self.currentStyle addImage:jetAirPlainLanding withID:@"jet_airplane_landing"];
Sample use case: You want to add a background overlay under the cluster size.
You need to create TTMapLayer
with the given content:
{
"id": "IC-app-test-layer-cluster",
"filter": [
"has",
"point_count"
],
"type": "symbol",
"layout": {
"icon-image": "ic_cluster",
"icon-allow-overlap": true,
"icon-ignore-placement": true
},
"source": "IC-app-test-source"
}
and add it to current map style.
Sample use case: You want to customize the cluster symbol text color, text size, and offset.
You need to define TTMapLayer
with the given JSON content:
{
"filter": [
"has",
"point_count"
],
"id": "IC-app-test-layer-symbol-count",
"source": "IC-app-test-source",
"type": "symbol",
"layout": {
"text-field": "{point_count}",
"text-font": [
"Noto-Bold"
],
"text-size": 14,
"text-offset": [
0.0,
0.0
]
},
"paint": {
"text-color": "#FFFFFF"
}
}
and add it to current map style.
Code Example
Here you can check what an example implementation may look like:
-
Adding a map source
_
let path = Bundle.main.path(forResource: "ic_app_test_source", ofType: "json")
let geojsonJSON = try! String(contentsOfFile: path!, encoding: .utf8)
let sourceMap = TTMapSource.create(withSourceJSON: geojsonJSON)
currentStyle.add(sourceMap!)
NSString *path = [[NSBundle mainBundle] pathForResource:@"ic_app_test_source" ofType:@"json"];
NSString *geojsonJSON = [NSString stringWithContentsOfFile:path encoding:NSUTF8StringEncoding error:nil];
TTMapSource *sourceMap = [TTMapSource createWithSourceJSON:geojsonJSON];
[self.currentStyle addSource:sourceMap];
-
Adding a map layer with a given file name
_
guard let path = Bundle.main.path(forResource: jsonStyleName, ofType: "json") else {
print("Failed to find path for name: \(jsonStyleName).json")
return
}
guard let layerContentJSONString = try? String(contentsOfFile: path, encoding: .utf8) else {
print("Failed to read file at path: \(path)")
return
}
guard let mapLayer = TTMapLayer.create(withStyleJSON: layerContentJSONString, withMap: map) else {
print("Failed to create TTMapLayer from: \(layerContentJSONString)")
return
}
style.add(mapLayer)
NSString *path = [[NSBundle mainBundle] pathForResource:jsonStyleName ofType:@"json"];
NSString *layerContentJSONString = [NSString stringWithContentsOfFile:path encoding:NSUTF8StringEncoding error:nil];
TTMapLayer *mapLayer = [TTMapLayer createWithStyleJSON:layerContentJSONString withMap:map];
[style addLayer:mapLayer];
![]() Clusters and images |
Multiple Maps
Developers are not limited to only attaching a single map. You can put as many map objects as you want on the same page without any issues.
Sample use case: You want to display two independent maps in your app.
If you want to create multiple maps on your project you need to perform the following actions.
Create two separate instances of the TTMapView using:
_
let defaultStyle = TTMapStyleDefaultConfiguration()
let builder = TTMapConfigurationBuilder.create().withTrafficKey(Key.Traffic).withMapKey(Key.Map).withMapStyleConfiguration(defaultStyle)
let map = TTMapView(mapConfiguration: builder.build())
TTMapStyleDefaultConfiguration *style = [[TTMapStyleDefaultConfiguration alloc] init];
TTMapConfiguration *config = [[[[[TTMapConfigurationBuilder createBuilder] withMapKey:Key.Map] withTrafficKey:Key.Traffic] withMapStyleConfiguration:style] build];
TTMapView *mapView = [[TTMapView alloc] initWithMapConfiguration:config];
The next step is to add a second map as a subview of the first map and then set up the proper constraints:
_
mapView.addSubview(secondMap)
let mapSize = super.mapView.bounds.width / 2
secondMap.translatesAutoresizingMaskIntoConstraints = false
secondMap.heightAnchor.constraint(equalToConstant: mapSize).isActive = true
secondMap.widthAnchor.constraint(equalToConstant: mapSize).isActive = true
secondMap.topAnchor.constraint(equalTo: self.mapView.topAnchor, constant: 5).isActive = true
secondMap.rightAnchor.constraint(equalTo: self.mapView.rightAnchor,constant: -5).isActive = true
secondMap.layer.cornerRadius = mapSize / 2
[self.mapView addSubview:self.secondMap];
CGFloat mapSize = self.mapView.bounds.size.width / 2;
self.secondMap.translatesAutoresizingMaskIntoConstraints = NO;
[[self.secondMap.heightAnchor constraintEqualToConstant:mapSize] setActive:YES];
[[self.secondMap.widthAnchor constraintEqualToConstant:mapSize] setActive:YES];
[[self.secondMap.topAnchor constraintEqualToAnchor:self.mapView.topAnchor constant:5] setActive:YES];
[[self.secondMap.rightAnchor constraintEqualToAnchor:self.mapView.rightAnchor constant:-5] setActive:YES];
self.secondMap.layer.cornerRadius = mapSize / 2;
Finally, you can implement a delegate method from the first map view to update the second center view:
_
func mapView(_: TTMapView, onCameraChanged cameraPosition: TTCameraPosition) {
secondMap.setCameraPosition(TTCameraPositionBuilder.create(withCameraPosition: coordinate).build())
}
#pragma mark TTMapViewDelegate
- (void)mapView:(TTMapView *)mapView onCameraChanged:(TTCameraPosition *)cameraPosition {
secondMap setCameraPosition:[[TTCameraPositionBuilder createWithCameraPosition:coordinate] build]];
}

Map with building heights
Allow your users to see the map either in 2.5D with the building heights enabled, or in 2D with building footprints.
Sample use case: Your application provides the possibility to display sophisticated visualization of the map with building heights (2.5D map) as well as display the map with building footprints (2D map).
The building heights data are available in Vector Map Tiles. The default TomTom map styles enable the display of building heights by default, but this can be disabled by switching off layers in the style.
Have a look at the detailed documentation for more information in [https://developer.tomtom.com/maps-api/maps-api-documentation-vector/tile]Vector Map Tiles and Map style.
In order to disable the display of the building heights, you need to switch off corresponding layers in the style. That means that the following layers would need to be switched off in the default TomTom style: "Subway Station 3D", "Place of worship 3D", "Railway Station 3D", "Government Administration Office 3D", "Other building 3D", "School building 3D", "Other town block 3D", "Factory building 3D", "Hospital building 3D", "Hotel building 3D", and "Cultural Facility 3D. This will work in runtime.
Use the following code snippets in your app to display building footprints (i.e., switch building heights off):
_
layers = mapView.styleManager.currentStyle.getLayersByRegexs(["Subway Station 3D",
"Place of worship 3D",
"Railway Station 3D",
"Government Administration Office 3D",
"Other building 3D",
"School building 3D",
"Other town block 3D",
"Factory building 3D",
"Hospital building 3D",
"Hotel building 3D",
"Cultural Facility 3D"])
layers.forEach { layer in
layer.visibility = visibility
}
self.layers = [[self.mapView.styleManager currentStyle] getLayersByRegexs:[NSArray arrayWithObjects:@"Subway Station 3D", @"Place of worship 3D", @"Railway Station 3D", @"Government Administration Office 3D", @"Other building 3D", @"School building 3D", @"Other town block 3D",
@"Factory building 3D", @"Hospital building 3D", @"Hotel building 3D", @"Cultural Facility 3D", nil]];
for (TTMapLayer *layer in layers) {
layer.visibility = visibility;
}
![]() Switching the heights on |
![]() Switching the heights off |
Map UI Extensions
Use default compass, current location buttons, zooming, and panning controls built into the Maps SDK. You can read more on the Map UI extensions page.
Sample use case 1: You want to provide your users with the compass, current location, and panning and zooming controls so they can quickly center the map on their current location, set it to display north at the top of the screen after rotating the map, and pan or zoom the map. You can use the default controls provided with the Maps SDK.
Sample use case 2: You want to provide your users with the compass, current location, panning and zooming controls and you want to use custom icons that are designed for your app style.
Sample use case 3: In some of the screens in your app, you want to remove the compass, current location, and panning and zooming controls.
Since all ui elements are fully customizable because the Android view’s properties are exposed, changing the default icons for them is straight forward:
_
let customControlLeftButton = UIButton()
customControlLeftButton.setImage(UIImage(named: "arrow_left_custom"), for: .normal)
customControlLeftButton.setImage(UIImage(named: "arrow_left_highlighted_custom"), for: .highlighted)
controlView.controlView?.leftControlBtn = customControlLeftButton
UIButton *customControlLeftButton = [UIButton new];
[customControlLeftButton setImage:[UIImage imageNamed:@"arrow_left_custom"] forState:UIControlStateNormal];
[customControlLeftButton setImage:[UIImage imageNamed:@"arrow_left_highlighted_custom"] forState:UIControlStateHighlighted];
self.controlView.controlView.leftControlBtn = customControlLeftButton;
_
let customControlZoomInButton = UIButton()
customControlZoomInButton.setImage(UIImage(named: "zoom_in_custom"), for: .normal)
customControlZoomInButton.setImage(UIImage(named: "zoom_in_highlighted_custom"), for: .highlighted)
controlView.zoomView?.zoomIn = customControlZoomInButton
UIButton *customControlZoomInButton = [UIButton new];
[customControlZoomInButton setImage:[UIImage imageNamed:@"zoom_in_custom"] forState:UIControlStateNormal];
[customControlZoomInButton setImage:[UIImage imageNamed:@"zoom_in_highlighted_custom"] forState:UIControlStateHighlighted];
self.controlView.zoomView.zoomIn = customControlZoomInButton;
![]() Default ui extensions controls |
![]() Default ui extensions controls - Hidden |
![]() Custom ui extensions controls |
Map snapshot image
The snapshot functionality generates a map image with markers, routes, and shapes that are rendered on the map which you can use as:
-
a screen in another app
-
a notification
-
a social media or communicator message
The user may exclude unwanted elements from the map hierarchy of the snapshot with the parameter views.
Sample use case: You would like to take a screenshot of the map with markers, routes, and shapes that are rendered on the map, so you can share this picture in an email, social media, or communicator.
Sample use case: You would like to store the snapshot of the picked place in the storage, so you can display the data with the corresponding snapshot.
Use the following code snippets to try this in your app:
_
// self.snapshotButton - UIButton located on top of map view
guard let image = self.mapView.snapshotWithoutViews([self.snapshotButton]) else { return }
// self.snapshotButton - UIButton located on top of map view
UIImage *image = [self.mapView snapshotWithoutViews:@[ self.snapshotButton ]];
![]() |
![]() |
![]() |
When you use the TomTomOnlineSDKMaps in your application, users will like to play with it in a variety of ways. In this section you will learn how to implement such actions and how to register for their callbacks.
Map centering
Center the map in your mobile app either at the current coordinates or any other location at the zoom level of your choice.
Sample use case: You want to display the maps for selected cities in specific zoom levels. Your users should be able to easily switch between different locations.
Use the following code snippets in your app to display maps of different locations (in this case, the current location and the TomTom offices in Amsterdam and Berlin).
The example shows how to center the map on Amsterdam using TTCameraPositionBuilder
and its create
method:
_
let cameraPosition = TTCameraPositionBuilder.create(withCameraPosition: TTCoordinate.AMSTERDAM()).withZoom(10).build()
mapView.setCameraPosition(cameraPosition)
TTCameraPosition *cameraPosition = [[[TTCameraPositionBuilder createWithCameraPosition:[TTCoordinate AMSTERDAM]] withZoom:10] build];
[self.mapView setCameraPosition:cameraPosition];
The example shows how to center the map on Amsterdam using TTCameraBoundingBoxBuilder
and its create
method:
_
let boundingBox = TTBoundingBox(topLeft: TTCoordinate.AMSTERDAM_BOUNDINGBOX_LT(), withBottomRight: TTCoordinate.AMSTERDAM_BOUNDINGBOX_RB())
let cameraPosition = TTCameraBoundingBoxBuilder.create(with: boundingBox!).build()
mapView.setCameraPosition(cameraPosition)
TTBoundingBox *boundingBox = [[TTBoundingBox alloc] initWithTopLeft:[TTCoordinate AMSTERDAM_BOUNDINGBOX_LT] withBottomRight:[TTCoordinate AMSTERDAM_BOUNDINGBOX_RB]];
TTCameraBoundingBox *cameraPosition = [[TTCameraBoundingBoxBuilder createWithBoundingBox:boundingBox] build];
[self.mapView setCameraPosition:cameraPosition];
![]() Map centered on Amsterdam with 10 zoom level |
![]() Map centered on GPS with 10 zoom level |
Map Initialization
The Maps SDK for iOS allows you to initialize the map with a previously setup configuration.
For this purpose, use the init method TTMapView
with frame and mapConfiguration.
The TTMapConfiguration
object allows you to set initial map values with the following method:
-
viewportTransform: The
TTViewportTransform
object allows you to set an initial viewport transform for the map configuration. -
mapStyleConfiguration: The
TTStyleConfiguration
object allows you to add your own style configuration. -
TomTomLogoPosition: The
TTLogoPosition
object allows you to place the logo on the map where you wish by using enumerations containing positions and Offset information.
Use the following code snippets in your app to display maps of different locations (in this case, the current location by placing a bounding box on Amsterdam and by centering the point to the TomTom office in Łódź).
Centering the map on load using bounding box:
_
let transform = TTCenterOnGeometryBuilder.create(withGeometry: [
.init(TTCoordinate.AMSTERDAM_BOUNDINGBOX_LT()),
.init(TTCoordinate.AMSTERDAM_BOUNDINGBOX_RT()),
.init(TTCoordinate.AMSTERDAM_BOUNDINGBOX_LB()),
.init(TTCoordinate.AMSTERDAM_BOUNDINGBOX_RB()),
], withPadding: .zero)
.withPitch(30)
.withBearing(-90)
.build()
let config = TTMapConfigurationBuilder.create().withViewportTransform(transform).withMapKey(Key.Map).withTrafficKey(Key.Traffic)
NSArray *arrayCoordinates = [NSArray
arrayWithObjects:[[CLLocation alloc] init:[TTCoordinate AMSTERDAM_BOUNDINGBOX_LT]], [[CLLocation alloc] init:[TTCoordinate AMSTERDAM_BOUNDINGBOX_RT]], [[CLLocation alloc] init:[TTCoordinate AMSTERDAM_BOUNDINGBOX_LB]], [[CLLocation alloc] init:[TTCoordinate AMSTERDAM_BOUNDINGBOX_RB]], nil];
TTCenterOnGeometry *transform = [[[[TTCenterOnGeometryBuilder createWithGeometry:arrayCoordinates withPadding:UIEdgeInsetsZero] withPitch:30] withBearing:-90] build];
TTMapConfigurationBuilder *config = [[[[TTMapConfigurationBuilder createBuilder] withViewportTransform:transform] withMapKey:Key.Map] withTrafficKey:Key.Traffic];
Centering the map on load using center on point:
_
let builder = TTMapConfigurationBuilder.create().withTrafficKey(Key.Traffic).withMapKey(Key.Map)
let transform = TTCenterOnPointBuilder.create(withCenter: TTCoordinate.LODZ_ZEROMSKIEGO()).withZoom(15).build()
let config = builder.withViewportTransform(transform)
TTCenterOnPoint *transform = [[[TTCenterOnPointBuilder createWithCenter:[TTCoordinate LODZ_ZEROMSKIEGO]] withZoom:15] build];
TTMapConfigurationBuilder *config = [[[[TTMapConfigurationBuilder createBuilder] withViewportTransform:transform] withMapKey:Key.Map] withTrafficKey:Key.Traffic];
You can also set the positions of the TomTom logo, but remember that the logo must fully fit into the bounds of mapview. Otherwise there is an exception due to an error in displaying the logo on the map.
_
let position = TTLogoPosition(verticalPosition: .bottom, horizontalPosition: .right, verticalOffset: -65, horizontalOffset: -170)
config.withTomTomLogoPosition(position)
TTLogoPosition *position = [[TTLogoPosition alloc] initWithVerticalPosition:bottom horizontalPosition:right verticalOffset:-65 horizontalOffset:-170];
[config withTomTomLogoPosition:position];
Use the configuration object to initialize the map with the following code:
_
let style = TTMapStyleDefaultConfiguration()
config.withMapStyleConfiguration(style)
map = TTMapView(mapConfiguration: config.build())
TTMapStyleDefaultConfiguration *style = [[TTMapStyleDefaultConfiguration alloc] init];
[config withMapStyleConfiguration:style];
self.map = [[TTMapView alloc] initWithMapConfiguration:[config build]];
![]() Bounding Box |
![]() Starting point |
Map perspective
Set either 2D map perspective for typical map view mode, or 2.5D map perspective for custom scenarios such as moving the map.
Sample use case: You want to switch from 2D to 2.5D modes to support and follow the moving of the location in your app. Use the following code snippets in your app to switch between perspectives.
Note that switching between 2D and 3D mode only changes the perspective. The zoom level and map orientation are set with the methods described in the "Map centering" example.
Perspective ratio can be changed in value: false to true.
_
mapView.setPerspective3D(true)
[self.mapView setPerspective3D:YES];
![]() 3D map perspective |
![]() 2D map perspective |
Map events
Implement any action you need to be triggered on one of the following map events:
-
Panning
-
Single press
-
Double press
-
Long press
To receive events you need to register id<TTMapViewDelegate> on map.
Sample use case: In your app, users invoke one behavior with a single press and another with a long press.
Use the following code snippets in your app to catch map events. In this example, the action is simply to display a toast with latitude and longitude on each map event. Of course, you can implement other cool features instead.
_
func mapView(_: TTMapView, didDoubleTap coordinate: CLLocationCoordinate2D) {
- (void)mapView:(TTMapView *)mapView didDoubleTap:(CLLocationCoordinate2D)coordinate {
_
func mapView(_: TTMapView, didSingleTap coordinate: CLLocationCoordinate2D) {
- (void)mapView:(TTMapView *)mapView didSingleTap:(CLLocationCoordinate2D)coordinate {
_
func mapView(_: TTMapView, didLongPress coordinate: CLLocationCoordinate2D) {
- (void)mapView:(TTMapView *)mapView didLongPress:(CLLocationCoordinate2D)coordinate {
_
func mapView(_: TTMapView, didPanning coordinate: CLLocationCoordinate2D, in state: TTMapPanningState) {
- (void)mapView:(TTMapView *)mapView didPanning:(CLLocationCoordinate2D)coordinate inState:(TTMapPanningState)state {
_
func mapView(_: TTMapView, onCenterStatusChanged _: TTMapCenteredState) {
- (void)mapView:(TTMapView *)mapView onCenterStatusChanged:(TTMapCenteredState)centeredState {
_
func mapView(_: TTMapView, onCameraChanged _: TTCameraPosition, with _: TTMapCameraChangeState) {
- (void)mapView:(TTMapView *)mapView onCameraChanged:(TTCameraPosition *)cameraPosition withState:(TTMapCameraChangeState)state {
In this example you will see that a Toast with the latitude and longitude of a point that was clicked on the map, but you can utilize this information in your own manner.
![]() Receive callbacks after the map panning |
Enable and disable gestures
You can disable gestures such as zooming, scrolling, and rotating in your application by setting up an integer mask on properties as shown in the following examples:
Disable zooming gesture
_
self.mapView.disableGesturesMask = TTOptionGesturesDisableZoom;
self.mapView.disableGesturesMask = .zoom;
Disable the rotating gesture
_
self.mapView.disableGesturesMask = .rotate;
self.mapView.disableGesturesMask = TTOptionGesturesDisableRotate;
Disable the scrolling gesture
_
self.mapView.disableGesturesMask = .scroll;
self.mapView.disableGesturesMask = TTOptionGesturesDisableScroll;
You can turn off more than one gesture by setting up the mask on properties as shown in the following examples:
_
self.mapView.disableGesturesMask = [.scroll, .zoom]
self.mapView.disableGesturesMask = TTOptionGesturesDisableScroll | TTOptionGesturesDisableZoom;
If you want to enable gestures, setup the integer mask on a property as shown in the following examples:
_
self.mapView.disableGesturesMask = .none;
self.mapView.disableGesturesMask = TTOptionGesturesDisableNone;
Map annotations
Annotations
You can place custom images on the map using TTAnnotation. You can do that with a TTAnnotationManager which can be obtained from TTMapView. Use one of factory methods from TTAnnotation to create an annotation, then pass it to manager.
You can display icons using two different types:
-
Focal (default): Where the icon always stands vertically even when the map is rotated. All nine callout anchor points are supported with this annotation type.
-
Decal: Where an icon sticks to the map even when the map is rotated. Only one callout anchor point is supported for decal TTAnnotationAnchorBottom.
-
Draggable markers: Allow your users to drag and drop a marker around the map.
Mixing icons of focal and decal modes is generally unsupported and advised against, as there are unresolvable depth-sorting issues and the results will not always look correct. It is safe to mix some modes, however, such as either of the decal modes with any of the standing modes. For performance purposes, it is recommended to use the same tag for the same images so they can be reused from cache.
Sample use case: In your app, you want to display a number of annotations to mark places on the map. Use the following code snippet to display a single annotation at specific coordinates on the map.
![]() Focal annotations examples |
![]() Decal annotations examples |
_
let annotation = TTAnnotation(coordinate: cooridnate)
mapView.annotationManager.add(annotation)
TTAnnotation *annotation = [TTAnnotation annotationWithCoordinate:coordinate];
[self.mapView.annotationManager addAnnotation:annotation];
_
let annotation = TTAnnotation(coordinate: cooridnate)
annotation.selectable = false
annotation.isDraggable = true
mapView.annotationManager.add(annotation)
TTAnnotation *annotation = [TTAnnotation annotationWithCoordinate:coordinate];
annotation.selectable = NO;
annotation.isDraggable = YES;
[self.mapView.annotationManager addAnnotation:annotation];
Animated markers
Thanks to this feature you can use GIFs as marker icons. For this purpose, you need to place your images in the assets folder and then use them in the following way:
_
let customIcon = TTAnnotationImage.createGIF(withName: "gif_annotation")!
let annotation = TTAnnotation(coordinate: cooridnate, annotationImage: customIcon, anchor: .bottom, type: .decal)
annotation.selectable = false
mapView.annotationManager.add(annotation)
TTAnnotationImage *customIcon = [TTAnnotationImage createGIFWithName:@"gif_annotation"];
TTAnnotation *annotation = [TTAnnotation annotationWithCoordinate:coordinate annotationImage:customIcon anchor:TTAnnotationAnchorBottom type:TTAnnotationTypeDecal];
annotation.selectable = NO;
[self.mapView.annotationManager addAnnotation:annotation];
Annotation anchor
You can change the anchoring point for your icon. The anchor specifies which point of an annotation image is attached to the map. The annotation will rotate around this anchoring point when rotating the map. You can use the default image representation of an annotation which is attached to the bottom height center width. You can change this behavior by TTAnnotationAnchor enumeration. For example, if you want to use a crosshair annotation image, you should set the anchor to TTAnnotationAnchorCenter
Annotation selected
You can implement an observable of the annotation selected event. You can do that with the global delegate TTAnnotationDelegate for all annotations that have to be registered on TTAnnotationManager as in the following example:
Annotation click listener
The Maps SDK allows you to observe an annotation selected event. There is one global delegate TTAnnotationDelegate for all annotations that has to be registered on TTAnnotationManager as shown in the following example:
_
mapView.annotationManager.delegate = self
self.mapView.annotationManager.delegate = self;
_
func annotationManager(_: TTAnnotationManager, annotationSelected _: TTAnnotation) {
// handle annotation selected event
}
- (void)annotationManager:(id<TTAnnotationManager>)annotationManager annotationSelected:(TTAnnotation *)annotation {
// handle annotation selected event
}
Annotations clustering
Allow your users to cluster annotations for better visualization. By default, annotations clustering is disabled.
You can decide per each marker if it should be included in the clustering process or not (e.g., you want to have a few
annotations that are never clustered). To manipulate marker clustering, use TTAnnotationManager
obtained
from TTMapView
.
Sample use case: You want to display the distribution of parking spots across the city. Individual parking spots are shown only at higher zoom levels, otherwise data is clustered for better visualization.
To enable annotations clustering:
_
mapView.annotationManager.clustering = true
self.mapView.annotationManager.clustering = YES;
To flag a marker indicating that it should be clustered:
_
annotation.shouldCluster = true
annotation.shouldCluster = YES;
Examples are shown below:
![]() Lower zoom level |
![]() Higher zoom level |
Balloons
Allow your users to display and customize balloons in a few lines of code.
Sample use case: You would like to learn more about a place on the map. Depending on the selected location, the app displays a balloon containing either text or additional information such as icons or pictures.
To display a balloon, attach a callout to a TTAnnotation. The map can display only one annotation at a time.
A callout can be triggered in two ways:
-
Automatically, if the annotation is tapped on the map.
-
Calling TTAnnotationManager:selectAnnotation.
There can be only one selected annotation on the map at a time.
A callout can be closed in the following ways:
-
Automatically, if a user taps on the map.
-
Automatically, if a user taps on another annotation.
-
Calling TTAnnotationManager:deselectAnnotation if the annotation is attached to the map, it is removed from the map.
A callout is an instance of UIView that implements the TTCalloutView protocol. You can use one of the built-in callout views, such as the default TTCalloutViewSimple, or make your own custom balloon.
Default Balloons
The default behavior for an annotation is to display an instance of TTCalloutViewSimple containing the annotation’s coordinates. You can change the following properties:
-
TTAnnotation:canShowCallout determines if the annotation can display a callout. The default value is YES. If it is set to NO, the annotation can still be selected but no callout will appear.
-
TTAnnotation:selectable: determines if the annotation can be selected at all. The default value is YES. If it is set to NO, then no callout will be displayed.
To change the default text of a simple callout, register your delegate on the annotation manager and override the viewForSelectedAnnotation method:
_
mapView.annotationManager.delegate = self
self.mapView.annotationManager.delegate = self;
_
func annotationManager(_: TTAnnotationManager, viewForSelectedAnnotation selectedAnnotation: TTAnnotation) -> UIView & TTCalloutView {
return TTCalloutOutlineView(text: "\(selectedAnnotation.coordinate.latitude),\(selectedAnnotation.coordinate.longitude)")
}
- (UIView<TTCalloutView> *)annotationManager:(id<TTAnnotationManager>)manager viewForSelectedAnnotation:(TTAnnotation *)selectedAnnotation {
return [[TTCalloutOutlineView alloc] initWithText:[NSString stringWithFormat:@"%f,%f", selectedAnnotation.coordinate.latitude, selectedAnnotation.coordinate.longitude]];
}

Custom Balloons
Although you can use default callouts, the SDK also allows you to create fully customizable ones. A callout is nothing more than a Cocoa UIView implementing the TTCalloutView protocol. Callouts can be built by either Interface Builder or programmatically.
This is an example of a custom callout:
_
mapView.annotationManager.delegate = self
self.mapView.annotationManager.delegate = self;
_
var customAnnotation: TTAnnotation?
@interface MapBallonsViewController () <TTAnnotationDelegate>
@property(nonatomic, strong) TTAnnotation *customAnnotation;
@end
_
func annotationManager(_: TTAnnotationManager, viewForSelectedAnnotation selectedAnnotation: TTAnnotation) -> UIView & TTCalloutView {
return CustomCallout(frame: CGRect.zero)
}
- (UIView<TTCalloutView> *)annotationManager:(id<TTAnnotationManager>)manager viewForSelectedAnnotation:(TTAnnotation *)selectedAnnotation {
return [[CustomCallout alloc] initWithFrame:CGRectZero];
}

Shapes
Allow your users to draw shapes like circles, polygons, and polylines on your map to mark different areas on the map.
Sample use case: You are developing an app for a delivery company and need to illustrate ranges of the transportation area around different cities. What you need to do, for example, is to render circles around cities with radiuses indicating zones of deliveries. The details on the example implementation of shapes rendering are described below.
A TTMapView supports several shape overlays. These are:
-
TTCircle
-
TTPolygon
-
TTPolyline
Shape overlays are immutable i.e., once they have been created, their shapes cannot be changed (although you may change their visibility and color). If you want to change a shape, you must remove the existing shape and replace it with a new one.
It is the responsibility of the framework user to be conscientious about performance and how many shape overlays they are using. You should use as few shapes as possible, and hide or dispose of ones that are not being displayed. See the following code examples.
Code examples:
_
let polygon = TTPolygon(coordinates: &coordiantes, count: UInt(pointsCount), opacity: 1, color: color, colorOutline: color)
mapView.annotationManager.add(polygon)
TTPolygon *polygon = [TTPolygon polygonWithCoordinates:coordinates count:pointsCount opacity:1 color:color colorOutline:color];
[self.mapView.annotationManager addOverlay:polygon];
_
let polyline = TTPolyline(coordinates: &coordiantes, count: UInt(pointsCount), opacity: 1, width: 8, color: color)
mapView.annotationManager.add(polyline)
TTPolyline *polyline = [TTPolyline polylineWithCoordinates:coordinates count:pointsCount opacity:1 width:8 color:color];
[self.mapView.annotationManager addOverlay:polyline];
_
let circle = TTCircle(center: TTCoordinate.AMSTERDAM(), radius: 5000, opacity: 1, width: 10, color: color, fill: true, colorOutlet: color)
mapView.annotationManager.add(circle)
TTCircle *circle = [TTCircle circleWithCenterCoordinate:[TTCoordinate AMSTERDAM] radius:5000 opacity:1 width:10 color:color fill:YES colorOutlet:color];
[self.mapView.annotationManager addOverlay:circle];
![]() Circle |
![]() Polygon |
![]() Polyline |
Click delegate
You can implement an observable of shape-clicked event. You can do that with the global delegate TTAnnotationDelegate for all shapes that have to be registered on TTAnnotationManager as in the following examples:
Maps SDK allows to observe a shape-selected event. There is one global delegate TTAnnotationDelegate for all shapes that has to be registered on TTAnnotationManager as follows.
_
mapView.annotationManager.delegate = self
self.mapView.annotationManager.delegate = self;
_
func annotationManager(_: TTAnnotationManager, touchUp _: TTPolyline) {
// called when polyline clicked
}
- (void)annotationManager:(id<TTAnnotationManager>)manager touchUpPolyline:(TTPolyline *)polyline {
// called when polyline clicked
}
_
func annotationManager(_: TTAnnotationManager, touchUp _: TTPolygon) {
// called when polygon clicked
}
- (void)annotationManager:(id<TTAnnotationManager>)manager touchUpPolygon:(TTPolygon *)polygon {
// called when polygon clicked
}
_
func annotationManager(_: TTAnnotationManager, touchUp _: TTCircle) {
// called when circle clicked
}
- (void)annotationManager:(id<TTAnnotationManager>)manager touchUpCircle:(TTCircle *)circle {
// called when circle clicked
}
Route display
You can display a route on the map and customize its origin and destination icons. It is also possible to specify the fill color, outline color, and width of the route.
Sample use case: When you add the route, you would like to highlight the starting and the destination points. Also you would like to plan several routes simultaneously with different origin and destination points and use different icons.
Prerequisites:
TTMapView: The *mapView
object was created and configured. Route coordinates are prepared.
Origin and destination icons customization
If you need to customize the start and destination icons, you should create the icons through the UIImage class.
The icon can be created in the following ways:
_
iconStart = UIImage(named: "Start")!
iconEnd = UIImage(named: "End")!
self.iconStart = [UIImage imageNamed:@"Start"];
self.iconEnd = [UIImage imageNamed:@"End"];
![]() Basic |
Route customization
You can create a route with custom style properties like fill color, outline color, and width. First, you need to create a RouteStyle object:
_
routeStyle = TTMapRouteStyleBuilder()
.withWidth(2.0)
.withFill(.black)
.withOutlineColor(.red)
.build()
self.routeStyle = [[[[[TTMapRouteStyleBuilder new] withWidth:2.0] withFillColor:UIColor.blackColor] withOutlineColor:UIColor.redColor] build];
Next, you need to pass the mapRoute
object to the addRoute`method of the `mapView.routeManager
object, e.g.,:
_
let mapRoute = TTMapRoute(coordinatesData: plannedRoute, with: routeStyle,
imageStart: iconStart, imageEnd: iconEnd)
mapView.routeManager.add(mapRoute)
TTMapRoute *mapRoute = [TTMapRoute routeWithCoordinatesData:plannedRoute withRouteStyle:self.routeStyle imageStart:self.iconStart imageEnd:self.iconEnd];
[self.mapView.routeManager addRoute:mapRoute];
If you provide nil for imageStart
or imageEnd
there will be no icons on the route.
If you don’t call a style, then the default style will be applied.
![]() Custom |
Route segmented customization
You can create a route with segmented sections where each segment contains custom-style properties like fill color, outline color, and width.
_
// Section 1
let routeStyle1 = TTMapRouteStyleBuilder()
.withWidth(1.0)
.withFill(.black)
.withOutlineColor(.black)
.build()
let startPoint1 = plannedRoute.sections[0].startPointIndexValue let endPoint1 = plannedRoute.sections[0].endPointIndexValue
var coordinatesSection1 = arrayOfCoordiantes(plannedRoute: plannedRoute, start: startPoint1, end: endPoint1) let mapRoute = TTMapRoute(coordinates: &coordinatesSection1, count: UInt(coordinatesSection1.count), with: routeStyle1, imageStart: iconStart, imageEnd: iconEnd)
// Section 2 let routeStyle2 = TTMapRouteStyleBuilder() .withWidth(1.0) .withFill(.blue) .withOutlineColor(.blue) .build()
let startPoint2 = plannedRoute.sections[1].startPointIndexValue let endPoint2 = plannedRoute.sections[1].endPointIndexValue var coordinatesSection2 = arrayOfCoordiantes(plannedRoute: plannedRoute, start: startPoint2, end: endPoint2) mapRoute.addCoordinates(&coordinatesSection2, count: UInt(coordinatesSection2.count), with: routeStyle2)
// Section 1
TTMapRouteStyle *routeStyle1 = [[[[[TTMapRouteStyleBuilder new] withWidth:1.0] withFillColor:UIColor.blackColor] withOutlineColor:UIColor.blackColor] build];
NSInteger startPoint1 = plannedRoute.sections[0].startPointIndexValue; NSInteger endPoint1 = plannedRoute.sections[0].endPointIndexValue;
CLLocationCoordinate2D coordinateArray[endPoint1 - startPoint1]; [self arrayOfCoordinates:plannedRoute withStart:startPoint1 withEnd:endPoint1 withArray:coordinateArray];
TTMapRoute *mapRoute = [TTMapRoute routeWithCoordinates:coordinateArray count:endPoint1 withRouteStyle:routeStyle1 imageStart:self.iconStart imageEnd:self.iconEnd];
// Section 2 TTMapRouteStyle *routeStyle2 = [[[[[TTMapRouteStyleBuilder new] withWidth:1.0] withFillColor:UIColor.blueColor] withOutlineColor:UIColor.blueColor] build];
NSInteger startPoint2 = plannedRoute.sections[1].startPointIndexValue; NSInteger endPoint2 = plannedRoute.sections[1].endPointIndexValue;
CLLocationCoordinate2D coordinateArray2[endPoint2 - startPoint2]; [self arrayOfCoordinates:plannedRoute withStart:startPoint2 withEnd:endPoint2 withArray:coordinateArray2];
[mapRoute addCoordinates:coordinateArray2 count:endPoint2 - startPoint2 withRouteStyle:routeStyle2];
![]() Segmented |
Custom GPS Indicator
The Maps SDK provides the ability to change the GPS Indicator
inaccuracy area color at runtime.
Default behavior of the indicator consists of two states: active, when GPS signal is accurate, and inactive (dimmed).
To change both radius colors, first you need to obtain the current GPS Indicator
by using the following method:
_
let gpsIndicator = mapview.trackingManager.currentPosition as? TTCurrentPositionTrackingObject
TTCurrentPositionTrackingObject *gpsIndicator = self.mapView.trackingManager.currentPosition;
Use the following code to adjust a color of the active GPS indicator:
_
gpsIndicator.setInaccuracyAreaColor(GPS_ACTIVE_RADIUS_COLOR)
[gpsIndicator setInaccuracyAreaColor:GPS_ACTIVE_RADIUS_COLOR];
![]() Default GPS indicator active |
![]() Custom GPS indicator active |
Use the following code to adjust a color of the inactive GPS indicator:
_
gpsIndicator.setDimmedInaccuracyAreaColor(GPS_INACTIVE_RADIUS_COLOR)
[gpsIndicator setDimmedInaccuracyAreaColor:GPS_INACTIVE_RADIUS_COLOR];
![]() Default GPS indicator inactive |
![]() Custom GPS indicator inactive |
Use the following code to set the GPS indicator to inactive:
_
gpsIndicator.setDimmed(true)
[gpsIndicator setDimmed:YES];