Introduction
Documentation
Map initialization
You can initiate the map in two ways with the Maps SDK:
- Map initialization using Storyboard – allows you to visualize/prototype the map display in the user interface of your app with Storyboards.
- Map initialization from the code using TTMapConfiguration – makes it possible to set the map configuration options from the code. Also, the TomTom logo placement can only be defined with TTMapConfiguration.
You can find both ways described in this page.
1. Map initialization using Storyboard
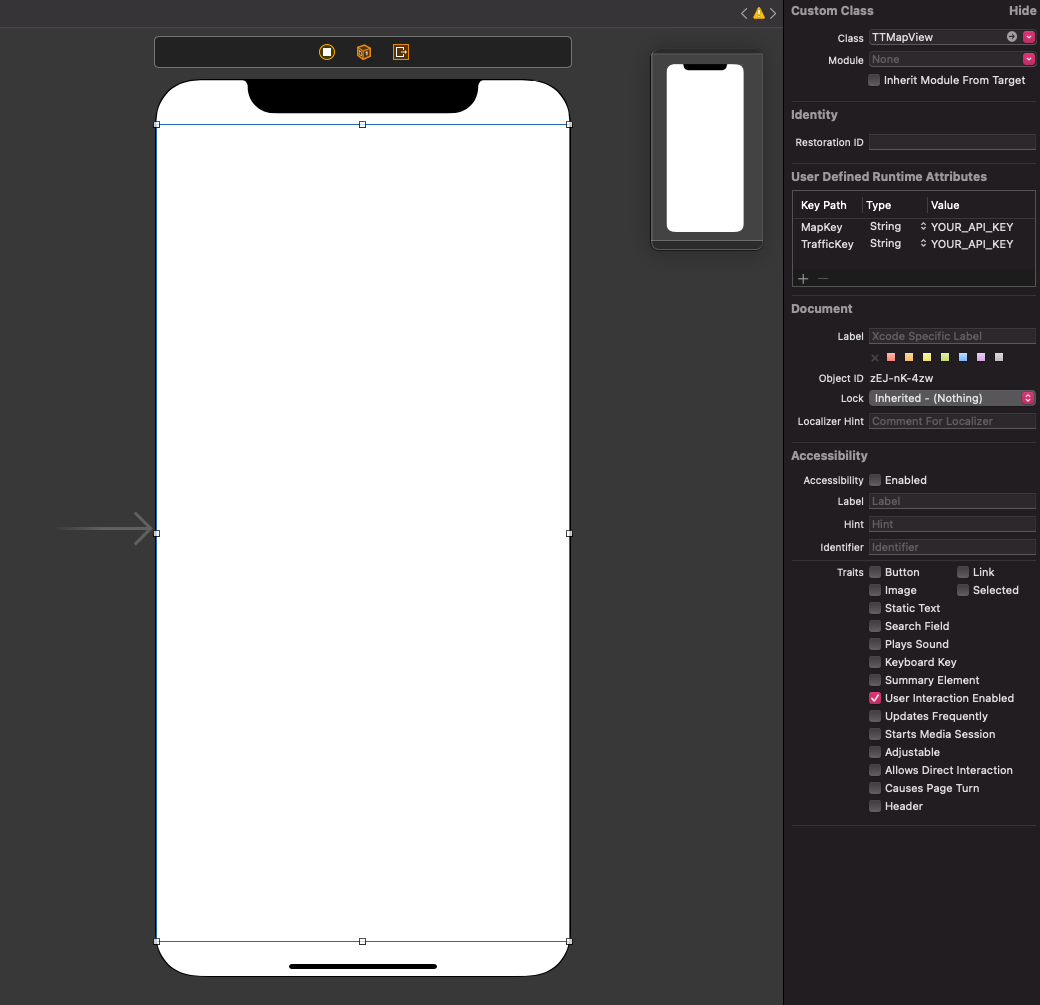
The main class that represents a Map is a TTMapView. The TTMapView is an interactive world map
that pans and zooms in response to gestures. Use its methods to receive map-related update messages
in your application as long as they conform to the TTMapViewDelegate protocol.
To initialize a map using storyboards:
- Drop the
UIViewobject from the Library into your storyboard. - In the Class field, set the class to
TTMapView. - Add the values
MapKeyandTrafficKeyto the User Defined RuntimeKey pathattributes. - Set the value type for these keys as String.
- Enter your service keys into the fields.
Map initialization using Storyboard |
2. Map initialization using TTMapConfigurationBuilder
The basic steps for adding a map are:
- Set up your project as it is described in DOWNLOADS.
- Create the object 'TTMapView'.
- Obtain the keys to the constructor class.
- Use the 'TTMapView' object to set the map properties.
[Optional] Create the TTMapConfiguration object and pass it to the MapView init method. The TTMapConfiguration object allows you to configure the initial viewport and TomTom logo position.
TTMapConfiguration
Map configuration is an extra parameter that can be used to init a 'TTMapView'.
TomTom Keys
The service key is added by entering it into the class constructor.
TomTom Logo
When using the Maps SDK for iOS, it is required that the TomTom logo is always visible. By default, the TomTom logo is located at the bottom-left corner of the map. However, you can easily customize its position to meet your app design by passing the TTLogoPosition object to your map configuration object.
ViewportTransform
If you want to init a 'TTMapView' centered on specific place with a custom bearing and pitch, you should check the TTViewportTransform param of TTMapConfiguration.
OnMapReadyCompletion:
Traffic flow tiles
IMPORTANT: The Maps SDK should be initialized with the style from Style Merger which only supports vector tiles and one type of the flow overlay. The approach of using a single style that contains multiple Traffic Flow tiles types was deprecated. After the deprecation period is over, it will not be possible to switch between Traffic Flow tiles types without reloading the style.
The Maps Display API provides support for the traffic flow overlay which can be displayed for both raster and vector tiles. The Style obtained from the Style Merger endpoint contains only one type of the Traffic Flow. To display other types of Traffic Flow it is required to reload the style to one which contains another Traffic Flow type.
The complete list of supported Traffic Flow types is listed below:
absolute: Free-flow speed.relative(default): Speed relative to free-flow.relative-delay: Speed relative to free-flow, but only when different.reduced-sensitivity: Speed relative to free-flow, but with wider speed ranges.
Traffic incident tiles
Maintaining the currency of traffic incident tiles
IMPORTANT: The Maps SDK should be initialized with the style from Style Merger which only supports vector tiles. The approach of using a single style that contains both Raster and Vector tiles was deprecated. After the deprecation period is over, it will not be possible to switch between Raster and Vector Traffic Incidents without reloading the style.
Traffic incident data provided as map tiles by the Vector Incident Tiles and Raster Incident Tiles services is updated periodically to reflect the current state of traffic as closely as possible. It might happen that the traffic data changes between two requests to the service. In this situation, always requesting the most recent data may lead to inconsistencies in the visual representation of traffic. Adjacent tiles may show traffic in different states.
The traffic incident tile services provide a way to synchronize tiles between Requests. If the ID of a traffic model is supplied in a Request’s URL, the traffic model specified by that ID is used to fulfill the Request. The Traffic Incident Viewport service provides the ID of the most recent traffic model shared between all tiles within the provided viewport. The Maps SDK automatically synchronizes traffic incident tiles displayed on the map and maintains their currency by periodically requesting a traffic model ID for the current viewport.
The Maps SDK requests a current traffic model ID from the Traffic Incident Viewport service every 30 seconds as long as the visibility of at least one traffic incident layer is set to
true. If the new ID and the current one are different, new traffic incident tiles are requested from the respective service. All regular charges apply.
Online resources caching
To display the map some external resources are needed by the map renderer: map style and map tiles.
The map style itself (a .json file describing map layers display properties and rendering order) and assets needed by the style are bundled with the SDK library. Style assets include sprites (sets of icons) displayed on the map and fonts.
When the map viewer is focused at a particular spot, map tiles provided by the remote online server are needed to display the map. When a part of the map is displayed for the first time, the needed tiles are downloaded from the server.
Resources downloaded from the server are stored (cached) in an offline database for further use. The server communicates maximum tile resource lifetime by means of a "Cache-Control" HTTP header.
Expiration time is stored in the offline database together with the tile resource. If a tile resides in the cache it can be displayed even if an internet connection is not available.
When the object in the cache expires, the server is asked again about the object. If a newer version of the object is available, it is downloaded and the cache contents are refreshed. If the old resource is still valid, its lifetime is prolonged.
Cache size is limited to 50MB of disk space. When the limit is reached, the least recently used tile resources are discarded.
Map Layers
The Maps SDK uses JSON file (styles) defining the sources of data to be shown on the map and its appearance. Styles are compliant with the Map Styles Specification.
Layers
The layers property of a style is an array of all the layers the style defines. Each element of
the array contains all the information needed to render a layer. Note that a single element of a
map, such as a road, may consist of several layers. Among the properties of a layer, two are of
particular interest in this context:
- #sources
source- The name of the source of data for the layer; corresponds to a child of thesourcesproperty. - #source-layers
source-layer- The name of a layer in a vector tile source; corresponds to an element of a vector tile.
Sources
Sources are defined as properties of the sources root property of a style. The structure of a
source depends on its type. The style used in the Maps SDK contains three types of source:
vector- vector map and traffic tilesraster- raster map and traffic tilesgeojson- additional elements such as chevron, gps inaccuracy radius indicator, etc.
Source layers
The source layer property of a layer is mandatory for all layers of the vector type. It defines
the element of a vector tile (also called a layer) which is the source of data for this layer.
As noted in the #layersLayers section, there are elements of the map that consist of multiple layers. The layers that constitute such an element might refer to the same source layer. For instance - the visual representation of a minor local toll road comprises 11 layers - one for the main part, one for the outline, another one for a road that goes through a tunnel, etc.
Check the Map Display API documentation for a complete list of vector layer sources (layers in a vector tile) used in the SDK.
Default style
Layer groups in the default style
IMPORTANT: The Maps SDK should be initialized with the style from Style Merger which only supports vector tiles. The approach of using a style that contains both raster and vector tiles was deprecated. After the deprecation period is over the default style will not contain raster layer groups.
In order to display raster tiles, you can check out our Map Tiles example.
The default style delivered with the SDK contains the following layer groups (background to foreground):
- Background: Color and pattern displayed in places where there is no other map data.
- Vector map: The baseline tile layer in vector format.
- Raster map: The baseline tile layer in raster format.
- Raster overlay for hybrid maps: Streets, labels, and icons on a transparent background.
- Traffic flow: Raster and vector traffic flow tile overlays.
- Traffic incidents: Raster and vector traffic incident tile overlays.
- Routes :Planned and alternative routes.
- Vector map labels and icons – Rendered on top of most other layers for better readability.
- GPS inaccuracy indicator - A circle indicating the GPS inaccuracy area.
- Position indicator - A static location marker.
- Chevron - An animated location marker.
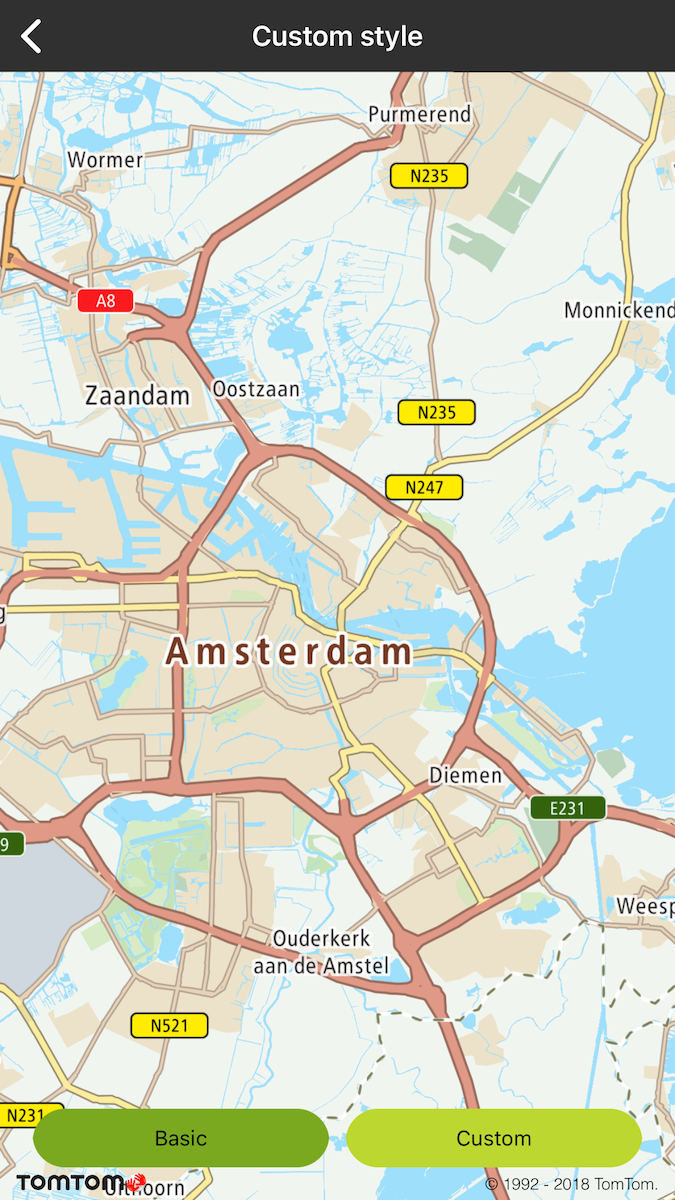
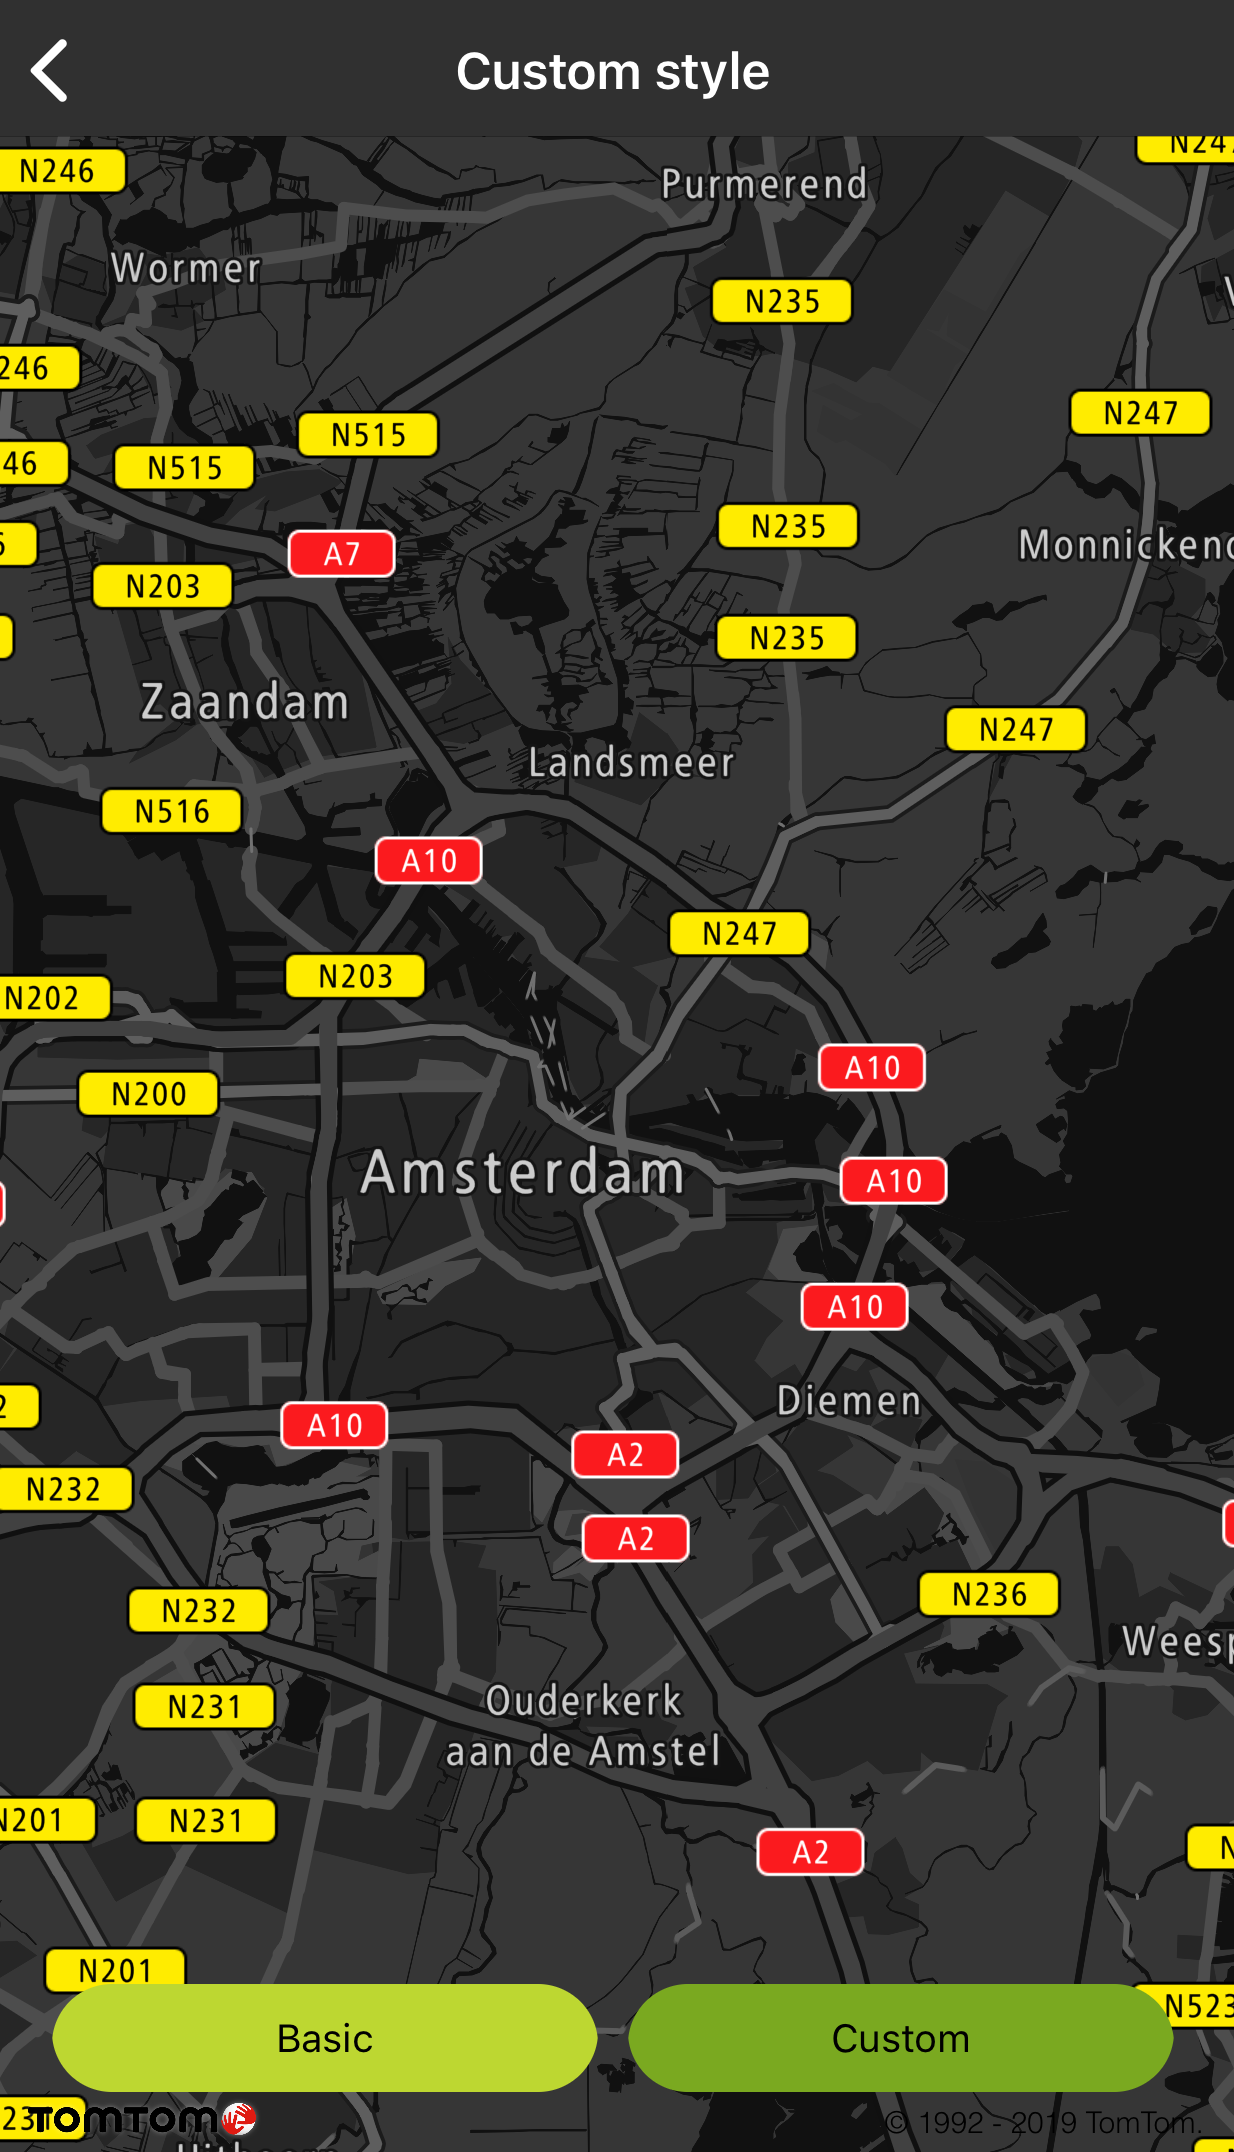
Custom style
Custom style
You can change the appearance of the map by providing a JSON file (style) defining the sources of data to be shown on the map and its appearance. A style has to:
- Include all mandatory layer sets (see Table 1).
- Contain Maps SDK-specific tags.
- More information about TomTom styles is available in the Map Styles Specification.
A basic style is provided as a part of the https://developer.tomtom.com/assets/downloads/mapssdk/APIReferences/CustomStyleResources_2.4.714/CustomStyleResources_2.4.714.zip Custom Style Resources package.
Styles compliant with the Map Styles Specification can be edited using Map Styler. Before a style can be edited in Map Styler:
- Service key placeholders have to be replaced with actual service keys.
- All service keys included in the style must be valid for the Map Display API product.
- Sprite and glyph locations have to be replaced by ones that can be reached by Map Styler. If service key is needed to access these resources, it must be included.
- Maps SDK-specific tags have to be removed from tile source links or replaced with default values.
- (Optional) Visibility of layers can be altered to your preferences.
All these changes, with the exception of layer visibility, have to be reverted before the modified style can be used with the SDK. Custom Style Resources contain a Python script - convertStyle.py - which simplifies this process. Detailed usage instructions can be found in the following dedicated section.
Layer sets
The SDK uses the concept of a layer set to refer to a group of layers. A layer set consists of all layers using the same source. Layer sets listed in Table 1 are required for the SDK to function. If any of these layer sets are absent or do not meet the requirements mentioned below, they will be replaced with default layer sets created at runtime.
| Map view element | Default source name | Required layer type | Required layer count | Source type |
Route polyline | tomtom-active-route | line | 2 | GeoJSON |
Route start icon | tomtom-start-route | symbol | 1 | GeoJSON |
Route end icon | tomtom-end-route | symbol | 1 | GeoJSON |
GPS inaccuracy radius | tomtom-gpsradius | circle | 1 | GeoJSON |
Position indicator | tomtom-position | symbol | 1 | GeoJSON |
Vehicle icon | tomtom-chevron | symbol | 1 | GeoJSON |
Two layers for route polyline define the outline and fill styles. Two layers for chevron, GPS radius and position define the styles of two versions of associated objects - normal (active) and dimmed ( inactive).
There is a number of layer sets that are important, but not strictly required. They are responsible for providing style and data sources for maps - vector and raster, traffic flow and incidents as well as hybrid overlay. These sets will not be replaced by default ones at runtime.
Source URIs for map layer sets have a fixed format - they contain placeholders for API keys and optional parameters. It is not recommended to change them.
Raster tile size
The SDK offers 256x256 px and 512x512 px raster tiles. By default, the larger tiles are used. The
size of tiles can be modified by setting the tileSize parameter in the url of raster sources to
either 256 or 512.
Style API
When your custom style is ready, you can use it in your application in a number of ways:
- Provide the URI to a location accessible by your application in setStylePath(…).
- Replace the default style:
- Create a data/style directory in your project’s root.
- Rename your file to style.json and place it in data/style.
- Copy glyph and sprite folders from framework to data/style.
Sample use case: You want to display a night-themed map at night or while in a tunnel.
Even though online style locations are supported, glyphs and sprites have to be stored locally.
Basic style |
Night custom style |
Using convertStyle.py
The convertStyle.py script is distributed as a part of the https://developer.tomtom.com/assets/downloads/mapssdk/APIReferences/CustomStyleResources_2.4.714/CustomStyleResources_2.4.714.zip Custom Style Resources bundle. It can be executed with one of two commands: 'mapstyler' and ' mapssdk'. When executed with the 'mapstyler' command, it replaces Maps SDK-specific elements of the base style (-b|--base parameter) with values provided in script’s parameters or in Info.plist or AndroiManifest.xml. When executed with the 'mapssdk' command, it reverts changes related to Maps SDK-specific elements while leaving user’s modification intact. Because of Map Styler requirement, API key contained in field "OnlineTraffic.key" of Info.plist or AndroidManifest.xml must be valid also for Map Display API product.
For the script to work properly, the same base file has to be used for both conversions.
1python2 convertStyle.py <common parameters> <command=mapstyler|mapssdk> <command-specific parameters>23# All parameters are required unless specified otherwise45common parameters:6 -w WDIR, --wdir WDIR Working directory. Root of relative paths.7 [optional, default = "."]8 -S, --silent Silent mode. No messages will be printed.9 -b BASE, --base BASE Path to the base for the new style.10 -o OUTPUT, --output OUTPUT11 Path to the output file.1213commands:14 mapstyler Convert a base style so that it can be edited in15 Map Styler.16 mapssdk Convert a style edited in Map Styler so that it works17 with your application using Maps SDK.1819mapstyler parameters:20 -k KEYS, --keys KEYS Path to Info.plist or AndroiManifest.xml.21 -s SPRITES, --sprites SPRITES22 Online location of sprites.23 -g GLYPHS, --glyphs GLYPHS24 Online location of glyphs.25 -v {all,none,intact,predefined}, --visibility {all,none,intact,predefined}26 Change visibility of layers. 'intact' leaves the base27 style's settings intact, 'predefined' makes vector28 layers visible and all other layers invisible.29 [optional, default = "predefined"]3031mapssdk parameters:32 -e EDITED, --edited EDITED33 Path to the style edited in Map Styler.
Sample workflow
- Upload glyphs and sprites to an online location accessible by Map Styler.
- Use convertStyle.py to create a style that can be edited in Map Styler.
python2 convertStyle.py -b mapssdk-default-style.json -o my_style_prepared_for_mapstyler.json mapstyler -k path/to/app/AndroiManifest.xml -g http://link.to.glyphs.com -s http://link.to.sprites.com
- Upload my_style_prepared_for_mapstyler.json to Map Styler.
- Edit the style in Map Styler.
- Export the style in Map Styler, saving it as my_style_exported_from_mapstyler.json.
- Use convertStyle.py to prepare the style edited in Map Styler to for use with Maps SDK.
python2 convertStyle.py -b mapssdk-default-style.json -o my_style_prepared_for_sdk.json mapssdk -e my_style_exported_from_mapstyler.json