Time to leave
Purpose
This tutorial shows you how to use the TomTom Maps SDK for iOS to create an application that calculates the time to leave before proceeding to the destination point at the desired time.
Getting Started
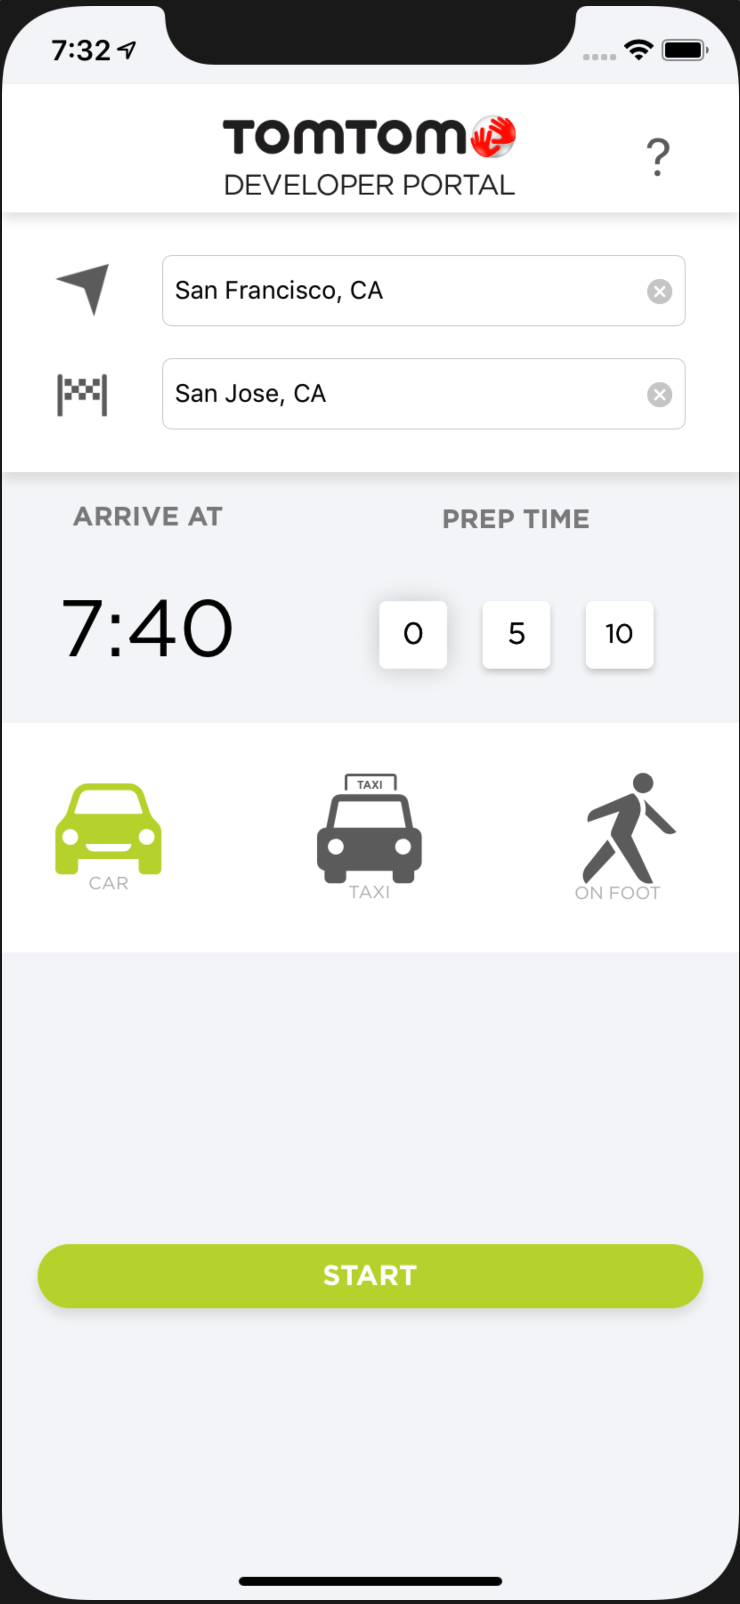
A user can plan their route to reach the destination using the following items:
- Departure and destination locations.
- Travel mode.
- The time they want to reach the destination.
- Optionally preparation time before the departure.
How it works:
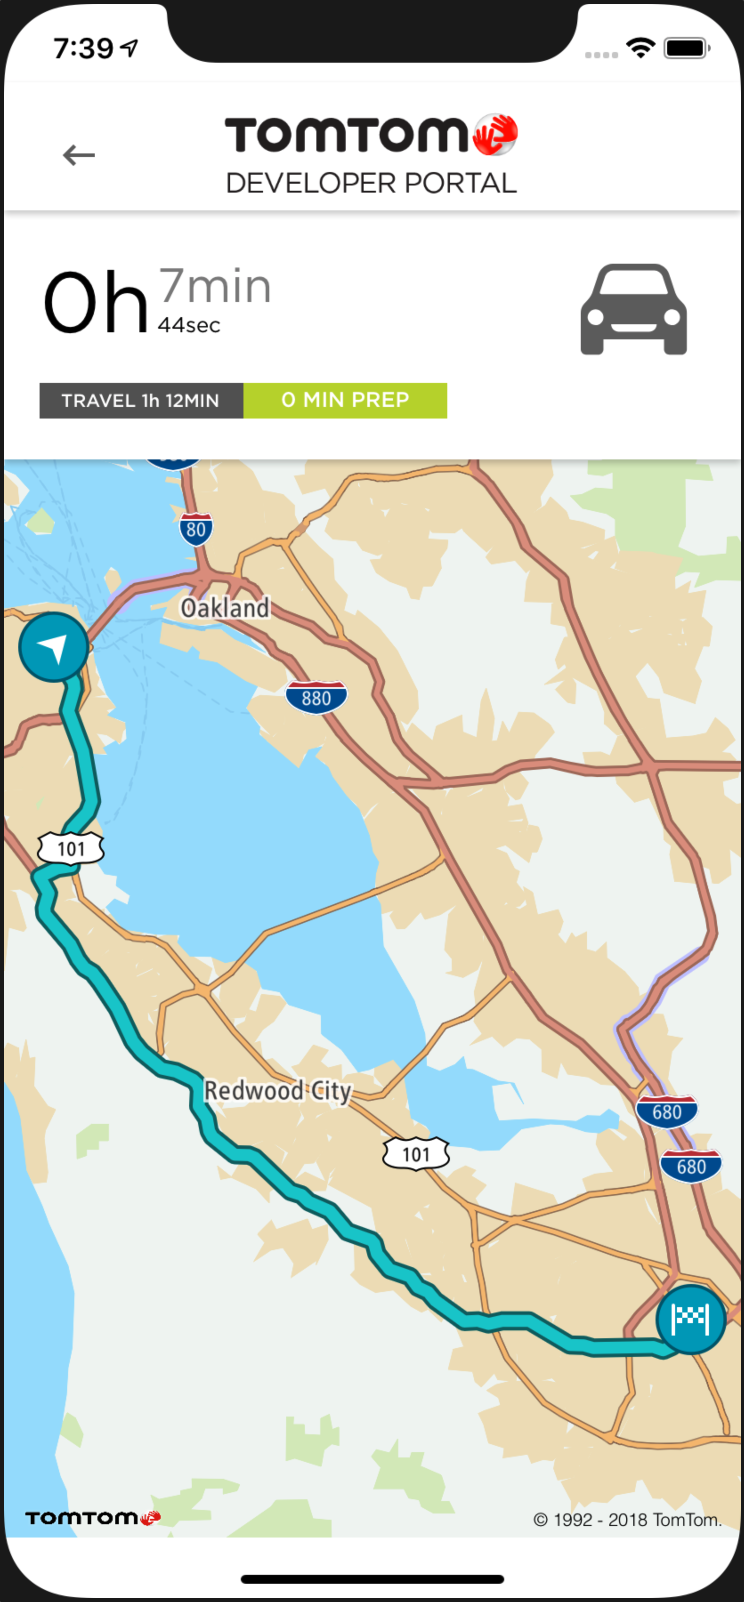
- The route is calculated and displayed on a map.
- The time to leave timer starts to count down.
- The route is recalculated each minute to check for any traffic delays.
- In case of any changes in departure time, the countdown timer is updated and the user is notified.
This article does not cover the whole of the application’s code description, only the code sections where the TomTom SDK is used.
The application is written in Swift language. If you are interested in Objective-C language, please check the Search along a route application.
You can find and clone the working application on our GitHub. Have fun with modifying it and testing our APIs! If you want to follow a step-by-step application creation from scratch, check out the “Search Along the Route” tutorial.
The following sections describe the TomTom:
- Search SDK module to search for addresses
- Map SDK module to display a map
- Routing SDK module to plan routes
Prerequisites:
- Clone a GitHub repository, with the source code of the TimeToLeave application:
- If you don't have an API key visit a How to get a TomTom API key site and create one.
- Copy and paste your API key into a key placeholders inside the Keys.swift file.
1import Foundation2public class Key: NSObject {3 @objc public static let Map = "Map.Key"4 @objc public static let Routing = "Routing.Key"5 @objc public static let Search = "Search.Key"6 @objc public static let Traffic = "Traffic.Key"7}
- Run pod install command open a newly created *.xcworkspace file. For more details about this step, please see the downloads section.
Address & POI search / Typeahead search:
How it works
Results from the Search API query are used to feed departure and destination autocomplete text fields with the list of suggested positions.
-
The TomTomOnlineSDKSearch package is imported on top of the file so that the
tomtomSearchAPIobject can be defined inside the MainViewController class:import TomTomOnlineSDKSearchlet tomtomSearchAPI = TTSearch(key: Key.Search) -
The MainViewController class conforms to the
TTSearchDelegateprotocol and assigns itself as a delegate in thetomtomSearchAPIobject:1class MainViewController: UIViewController, TTSearchDelegate {2 override func viewDidLoad() {3 super.viewDidLoad()4 self.tomtomSearchAPI.delegate = self5 } -
Searching is triggered inside the
editingChangedmethod every time when editing of the departure or destination location has changed and has more than three characters.1@IBAction func editingChanged(_ textView: UITextField) {2 let enteredText = textView.text3 if enteredText?.count ?? 0 >= 3 {4 let searchQuery: TTSearchQuery = TTSearchQueryBuilder.create(withTerm: enteredText ?? "").withTypeAhead(true).withLang("en-US").build()5 self.tomtomSearchAPI.search(with: searchQuery)6 }7} -
The
TTSearchQueryBuilderis used to createsearchQueryobject. Because a searched term can be partial, thewithTypeAhead(true)parameter is used to get better results from the search engine. Search engine results are handled by one of the two methods: -
func search(_ search: TTSearch, completedWith response: TTSearchResponse) -
func search(_ search: TTSearch, failedWithError error: TTResponseError)See the following code example:1func search(_ search: TTSearch, completedWith response: TTSearchResponse) {2 searchResults.removeAll()3 for result in response.results {4 let resultTuple = (result.address.freeformAddress!, result.position)5 searchResults.append(resultTuple)6 }7 if CLLocationCoordinate2DIsValid(currentLocationCoords) {8 searchResults.append(("-- Your Location --", currentLocationCoords))9 searchResults.sort() { sh.0 < .0 }10 }11 autocompleteTableView?.reloadData()12 autocompleteTableView.isHidden = false13}1415func search(_ search: TTSearch, failedWithError error: TTResponseError) {16 print(error.description)17} -
When the search query has completed with a successful response a tuple with an address and position of that address is created.
Search result addresses are used to create an autocomplete table view so that the user can pick the correct address from the list which then becomes the departure or the destination position.
When both the departure and the destination positions are set, a user can pick the arrival time, preparation time and travel mode. These parameters are gathered and passed to the CountDownViewController using “prepare for segue” method so that application can switch the count down screen. See the following code example.
1override func prepare(for segue: UIStoryboardSegue, sender: Any?) {2 if segue.identifier == self.timeShowSegueIdentifier {3 let destViewController: CountDownViewController = segue.destination as! CountDownViewController4 destViewController.travelMode = travelMode5 destViewController.arriveAtTime = getArrivalDate()6 destViewController.preparationTime = preparationTime7 destViewController.departureLocation = departureCoords8 destViewController.destinationLocation = destinationCoords9 }10}
TomTom Map display module:
A CountDownViewController uses map and routing modules from the TomTom Maps SDK.
- To start working with TomTom Map, a user has to import the TomTomOnlineSDKMaps package on top of the file.
- Then, the user:
- Creates the
TTMapViewobject which will be initialized later in the code. - Creates the
TTMapStyleDefaultConfigurationandTTMapConfigurationobjects in order to pass them into theTTMapViewconstructor methods.
The mapView object is then initialized inside the initTomTomServices and initTomTomMap
methods, where proper constraints together with an insets has been set and onMapReadyCompletion
block has been defined.
Inside that block the mapView object is fully initialized and the user can start interacting with
it.
In the presented application, user is requesting a route update so that a route can be visualized on the map. See the following code example.
1import UIKit2import TomTomOnlineSDKMaps3import TomTomOnlineSDKRouting4class CountDownViewController: UIViewController, TTRouteResponseDelegate{5 var mapView: TTMapView!6 override func viewDidLoad() {7 super.viewDidLoad()8 initTomTomServices()9 }1011 fileprivate func initTomTomMap() {12 let style = TTMapStyleDefaultConfiguration()13 let config = TTMapConfigurationBuilder.create()14 .withMapKey(Key.Map)15 .withTrafficKey(Key.Traffic)16 .withMapStyleConfiguration(style)17 .build()18 self.mapView = TTMapView(frame: self.view.frame, mapConfiguration: config)19 self.view.insertSubview(mapView, belowSubview: countDownView)20 self.mapView.translatesAutoresizingMaskIntoConstraints = false21 self.mapView.leftAnchor.constraint(equalTo: self.view.leftAnchor).isActive = true22 self.mapView.rightAnchor.constraint(equalTo: self.view.rightAnchor).isActive = true23 self.mapView.topAnchor.constraint(equalTo: self.countDownView.bottomAnchor).isActive = true24 self.mapView.bottomAnchor.constraint(equalTo: self.view.safeAreaLayoutGuide.bottomAnchor).isActive = true25 }2627 fileprivate func initTomTomServices() {28 initTomTomMap()29 self.ttRoute.delegate = self30 let insets = UIEdgeInsets.init(top: 30 * UIScreen.main.scale, left: 10 * UIScreen.main.scale, bottom: 30 * UIScreen.main.scale, right:10 * UIScreen.main.scale)31 self.mapView.contentInset = insets32 self.mapView.onMapReadyCompletion {33 self.mapView.isShowsUserLocation = true34 self.present(self.progressDialog, animated: true, completion: nil)35 self.requestRouteUpdate()36 }37 }
TomTom Routing module:
The CountDown view controller uses the TomTom Routing APIs to perform routing requests and operations like drawing a route on the map or displaying start and end route icons.
-
First, a
TomTomOnlineSDKRoutingis imported on top of the file, and attRoutevariable is declared and initialized. See the following code example.1import TomTomOnlineSDKMaps2import TomTomOnlineSDKRouting34class CountDownViewController: UIViewController{5var mapView: TTMapView!67let ttRoute = TTRoute(key: Key.Routing) -
Then, the CountDownViewController conforms to the TTRouteResponseDelegate class and can be set as a delegate inside the ttRoute object. See the following code example.
1class CountDownViewController: UIViewController, TTRouteResponseDelegate {2var mapView: TTMapView!34fileprivate func initTomTomServices () {5 self.ttRoute.delegate = self -
After assigning a delegate to the CountDownViewController, the “request route update” method can be called. See the following code example.
1fileprivate func requestRouteUpdate() {2 let routeQuery = TTRouteQueryBuilder.create(withDest: self.destinationLocation, andOrig: self.departureLocation)3 .withArriveAt(self.arriveAtTime)4 .withTraffic(true)5 .withTravelMode(self.travelMode)6 .withRouteType(.fastest)7 .build()8 self.ttRoute.plan(with: routeQuery)9} -
The
requestRouteUpdatecreates therouteQueryobject and passes it to thettRouteobject inside aplan(with: query )method as an argument.TTRouteQueryBuilderis used to simplify building arouteQueryobject with a few helper methods:
withArriveAt– a date and time of arrival at the destination point. It’s an important method inside the application because it changes a departure date which is later used to calculate time left before the departure.withTraffic– when enabled, current traffic information is used during the route planning, when disabled – only historical traffic data is used.withTravelMode– in the application user can choose one of the following: car, taxi or pedestrian. Other possible parameters are listed here:withRouteType– allow the users to select one type of route from: fastest, shortest, thrilling or eco.
-
When the
ttRoute.plan(with: routeQuery)method will be executed, thettRouteobject will call theTTRouteResponseDelegatemethods which are implemented inside CountDownViewController.1func route(_ route: TTRoute, completedWith result: TTRouteResult) {2 func startTimer() {3 self.countDownTimer = Timer.scheduledTimer(timeInterval: 1.0, target: self, selector: #selector(updateTimer), userInfo: nil, repeats: true)4 }56 func drawRouteOnTomTomMap(_ route: TTFullRoute) {7 let mapRoute = TTMapRoute(coordinatesData: route, with: TTMapRouteStyle.defaultActive(), imageStart: TTMapRoute.defaultImageDeparture(), imageEnd: TTMapRoute.defaultImageDestination())8 mapView.routeManager.add(mapRoute)9 mapView.routeManager.showRouteOverview(mapRoute)10 }1112 func presentTrafficUpdateDialog(message: String) {13 let trafficChangedDialog = initStoryBoardDialog(identifier: "trafficUpdateMessage")14 (trafficChangedDialog as! TrafficUpdateViewController).message = message15 presentTrafficDialog(viewController: trafficChangedDialog)16 }1718 func presentTrafficDialog(viewController: UIViewController, for seconds: Double = 3.0) {19 self.present(viewController, animated: true)20 DispatchQueue.main.asyncAfter(deadline: DispatchTime.now() + seconds) {21 viewController.dismiss(animated: true)22 }23 }2425 guard let plannedRoute = result.routes.first else {26 return27 }2829 self.progressDialog.dismiss(animated: true, completion: nil)30 let newDepartureTime = plannedRoute.summary.departureTime31 self.travelTimeInSeconds = plannedRoute.summary.travelTimeInSecondsValue32 if (self.previousDepartureTime == nil) {33 self.previousDepartureTime = newDepartureTime34 drawRouteOnTomTomMap(plannedRoute)35 startTimer()36 updateTimer()37 }38 else if self.previousDepartureTime != newDepartureTime {39 presentTrafficUpdateDialog(message: "Route recalculated due to change in traffic: \(Int(self.previousDepartureTime.timeIntervalSince(newDepartureTime!)))sec")40 self.previousDepartureTime = newDepartureTime41 }42 else if self.previousDepartureTime == newDepartureTime {43 let noTrafficDialog = initStoryBoardDialog(identifier: "trafficNoUpdateMessage")44 presentTrafficDialog(viewController: noTrafficDialog)45 }46}4748func route(_ route: TTRoute, completedWith responseError: TTResponseError) {49 func displayErrorDialog() {50 let alertDialog = UIAlertController(title: "Error", message: "No routes found satisfying requested time. Please choose different arrival time and try again." , preferredStyle: .alert)51 let dialogAction = UIAlertAction(title: "Dismiss", style: .default, handler: { _ in52 self.dismiss(animated: true, completion: nil)53 })54 alertDialog.addAction(dialogAction)55 self.present(alertDialog, animated: true, completion: nil)56 }5758 self.progressDialog.dismiss(animated: true, completion: nil)59 if self.previousDepartureTime == nil {60 displayErrorDialog()61 }62} -
When planning of the route will not succeed, the
route(completedWith error: TTResponseError)method is executed. -
Inside that method the application creates and display an error dialog to the user.
-
When user taps on the “Dismiss” action the CountDownViewController will be dismissed and the application will display its first screen, so that the user can re-plan the route again.
-
When the planning of the route succeeds, the
route(completedWith result: TTRouteResult)method will be called. After receiving routing results, the new departure time is saved and few checks are performed: -
When a
self.previousDepartureTimevariable isnil, it means that it’s a first routing call since the CountDownViewController did load. In this case: -
The
drawRouteOnTomTomMapfunction is called and the route is displayed on the map. See the following code example.1func drawRouteOnTomTomMap(_ route: TTFullRoute) {2 let mapRoute = TTMapRoute(coordinatesData: route, with: TTMapRouteStyle.defaultActive(), imageStart: TTMapRoute.defaultImageDeparture(), imageEnd: TTMapRoute.defaultImageDestination())3 mapView.routeManager.add(mapRoute)4 mapView.routeManager.showRouteOverview(mapRoute)5} -
The
startTimermethod initializes and starts a timer with one second interval. Timer will be used to count down the time which is left to the departure time.updateTimermethod will be called at each tick of the timer.1func startTimer() {2 self.countDownTimer = Timer.scheduledTimer(timeInterval: 1.0, target: self, selector: #selector(updateTimer), userInfo: nil, repeats: true)3} -
Lastly, the
updateTimermethod is called to update all count down labels immediately without waiting for the one second interval before the first timer tick. MethodupdateTimerwill be described later. -
When the
self.previousDepartureTimevariable is different than the newDepartureTime it means, that there was an update in traffic conditions. The application saves thenewDepartureTimeinside theself.previousDepartureTimevariable and displays a message to the user: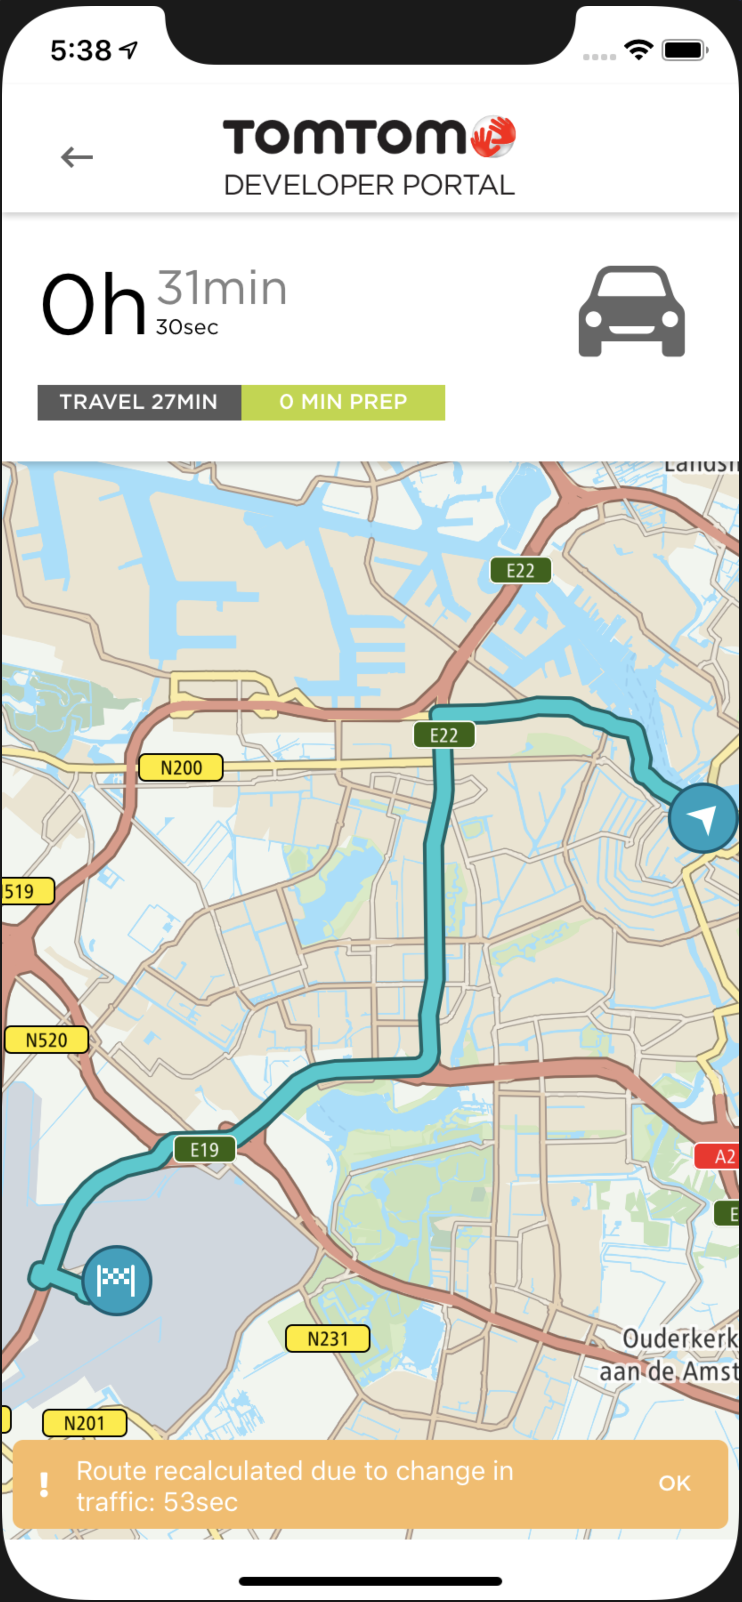
-
When the
self.previousDepartureTimeis the same as thenewDepartureTimevariable it means that traffic conditions are the same so there is no action besides displaying the proper dialog to the user: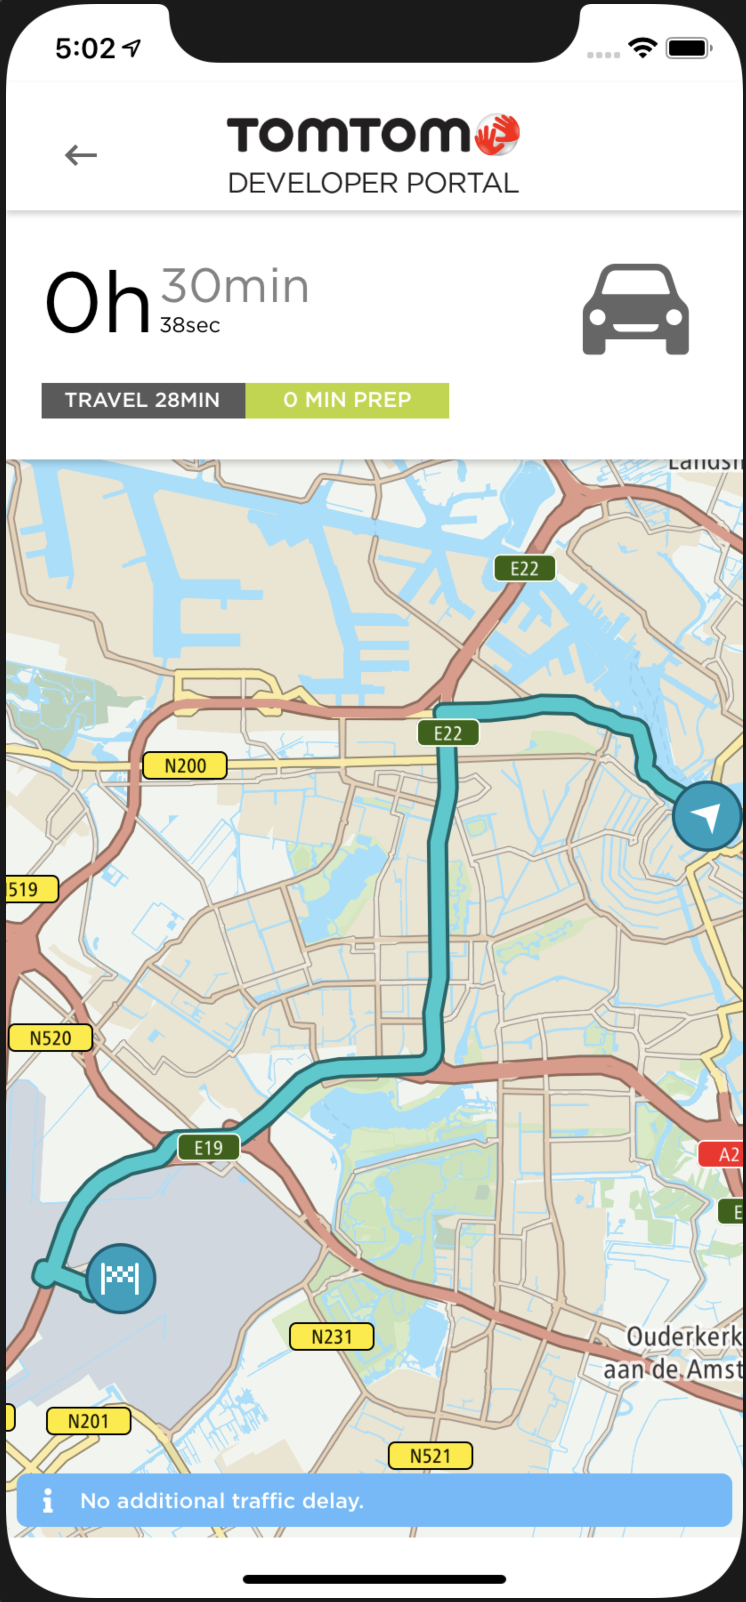
When the CountDown ViewController is displayed for the first time and route planning has been finished successfully, the timer is initialized and starts calling the updateTimer method each and every second. See the following code example.
1@objc func updateTimer() {2 func prepareFinalAlert() -> UIAlertController {3 let timeToLeaveAlert = UIAlertController(title: "Time's UP!", message: "Time to leave!", preferredStyle: .alert)4 let timeToLeaveWhateverAction = UIAlertAction(title: "Whatever", style: .default, handler: { _ in5 let overTimeDialog = self.initStoryBoardDialog(identifier: "overtimeDialog")6 (overTimeDialog as! OverTimeViewController).parentDelegate = self7 self.present(overTimeDialog, animated: true, completion: nil)8 })9 let onMyWayAction = UIAlertAction(title: "On My Way!", style: .default, handler: { _ in10 self.performSegue(withIdentifier: "safeTravelsSegue", sender: self)11 })12 timeToLeaveAlert.addAction(timeToLeaveWhateverAction)13 timeToLeaveAlert.addAction(onMyWayAction)14 return timeToLeaveAlert15 }1617 let routeRecalculationDelayInSeconds = 6018 countDownSeconds += 119 let currentTime = Date()20 if currentTime < previousDepartureTime {21 let timeInterval = DateInterval(start: currentTime, end: previousDepartureTime)22 displayTimeToLeave(timeInterval)2324 if countDownSeconds % routeRecalculationDelayInSeconds == 025 && timeInterval.duration > 5 {26 self.requestRouteUpdate()27 }28 }29 else {30 resetTimer()31 let finalTimeToLeaveAlert = prepareFinalAlert()32 self.present(finalTimeToLeaveAlert, animated: true, completion: nil)33 }34}
First, a countDownSeconds variable is incremented and a current time is stored in
the currentTime variable. Now, there are two cases which will be handled inside the updateTimer
function.
- When the
currentTimevariable occurs earlier than theself.previousDepartureTimevariable, it means that the user still has some time to leave a departure point. To visualize how much time is left to leave, time interval betweencurrentTimeandpreviousDepartureTimeis calculated and displayed to the user by thedisplayTimeToLeavefunction. Every 60 seconds timer invokesrequestRouteUpdatefunction which updates departure times based on the current traffic conditions. - The second case occurs when the current time is the same or later than
the
previousDepartureTime. In that case it means that the timer finished its count down and the user should leave the departure position in order to be on the requested arrival time at the destination point. ThecountDownSecondsvariable is set to zero, and the final dialog is displayed to the user.
Happy Coding