Home screen
Decommission notice
February, 2026
- This service will be decommissioned on March 31, 2027.
- All services will be withdrawn following a 12 months deprecation period.
- There is no recommended migration path.
Homescreen configuration
Introduction
End users generally interact with the TomTom BRIDGE in three ways:
- Via the home screen (sometimes called the launcher)
In this mode of operation users can follow the navigation via the navigation widget, clicking on it to go into full screen navigation mode. Users can interact with third party widgets and applications installed onto the home screen. - Full screen Navigation
In this mode the user can interact with the full screen navigation application. It is not possible to place widgets or application onto this fullscreen view.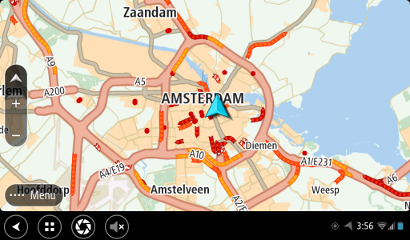
- A 3rd party or pre-installed application
In this mode of use an application has been launched and is displayed full screen for the user to interact with. Pushing home will return the user to the home screen.
Bridge Hub
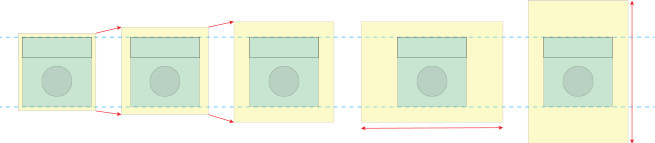
When a display is connected to the Bridge Hub device (either an HDMI screen or a USB 'remote display') the size and density of the attached screen are queried then the optimal tile layout for the screen, with minimal tile padding, is automatically selected. A hard-coded set of possible home screen tile layouts is provided so that supported displays will work on Bridge Hub out-of-the-box.
Of course your customer may have their own requirements when it comes to tile layout. For example, they may wish to have fewer tiles on the home screen to accommodate larger tiles. When the number of tiles specified does not use all of the available screen space extra padding is added between the tiles to prevent tiles appearing only in the middle of the screen.
The default (hard-coded) layouts can be by-passed by adding custom layouts in json format to the /sdcard/homescreen/ directory. The naming of the layout file(s) is not relevant the software looks for the presence of layouts in any jsons available in the /sdcard/homescreen/ folder.
NB This behavior also applies to Bridge Terminal although the possible layouts are limited to a maximum of 2x4 or 4x2 portrait due to the screen size.
Below is an example of how a 2x4 layout configuration might look:
1{2 [34 "configurable": "true",5 "tile_layout": { "rows": 2, "columns": 4 },6 ]7"navigation":8 [9 { "startcell": "1.11", "endcell": "1.23" }10 ],11"widget":12 [13 { "package_name": "com.tomtom.pnd.musicplayer", "class_name": "com.tomtom.pnd.musicplayer.widget.MusicWidgetProvider", "startcell": "1.14", "endcell": "1.14" }14 ],15"application":16 [17 { "package_name": "com.tomtom.pnd.updater", "class_name": "com.tomtom.pnd.updater.UpdaterActivity", "startcell": "1.24" },18 { "package_name": "com.android.settings", "class_name": "com.android.settings.Settings", "startcell": "2.11" },19 { "package_name": "com.tomtom.pnd.musicplayer", "class_name": "com.tomtom.pnd.musicplayer.ui.MainActivity", "startcell": "2.12" },20 { "package_name": "com.tomtom.pnd.navpadusermanualapp", "class_name": "com.tomtom.pnd.navpadusermanualapp.MainActivity", "startcell": "2.14" },21 { "package_name": "com.tomtom.navui.sdktestapp", "class_name": "com.tomtom.navui.sdktestapp.TabActivity", "startcell": "2.21" },22 { "package_name": "com.tomtom.pnd.maplibtestapp", "class_name": "com.tomtom.pnd.maplibtestapp.MaplibDemoActivity", "startcell": "2.22" },23 { "package_name": "com.appcarousel.tomtom.tomtombridgeappstore", "class_name": "com.appcarousel.tomtom.tomtombridgeappstore.activities.MainActivity", "startcell": "2.23" },24 { "package_name": "com.android.gallery3d", "class_name": "com.android.gallery3d.app.Gallery", "startcell": "2.24" }25 ],26"app-browser":27 [28 { "startcell": "3.11" } ], "widget-browser": [ { "startcell": "3.12" } ], "video": [ { "startcell": "2.13", "endcell": "2.13" }29 ]30}
When present, valid home screen layouts in the /sdcard/homescreen/ directory are used and the optimal tile layout (the one with the most tiles) supported by the connected screen will be selected. Home screen layouts which are not supported by the connected screen (ie too many tiles) are disregarded. Please refer to the example illustrations below.

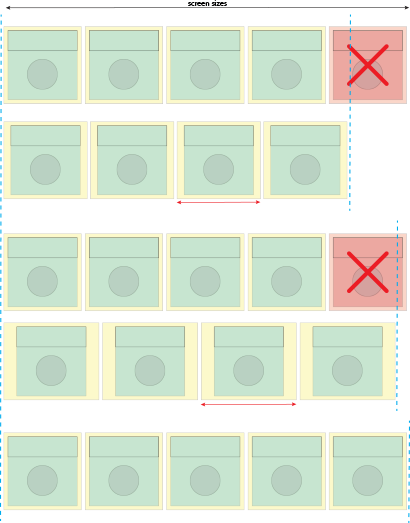
In the event that no supported tile configurations exist in the /sdcard/homescreen/ directory for the connected screen an error will be shown.
An error will also be shown when two or more homescreen configuration jsons contain the same tile layout, or when there is a syntax error in any of the homescreen jsons.
Bridge Terminal
The default Bridge Terminal homescreen consists of eight user-definable tiles, laid out in two rows by four columns. This configuration provides an open environment for you to develop applications and configure the Bridge Terminal for your end users.
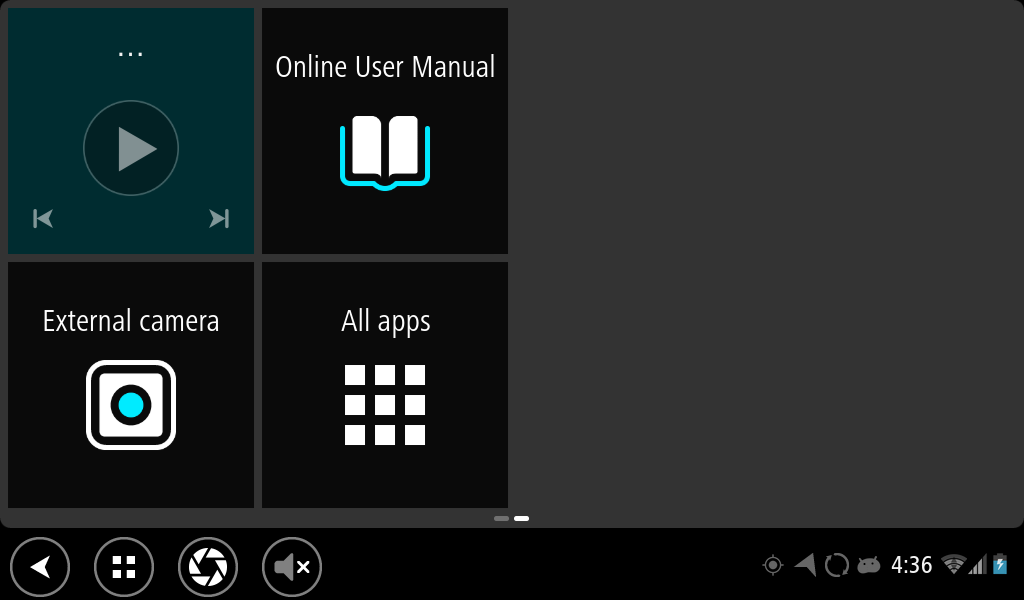
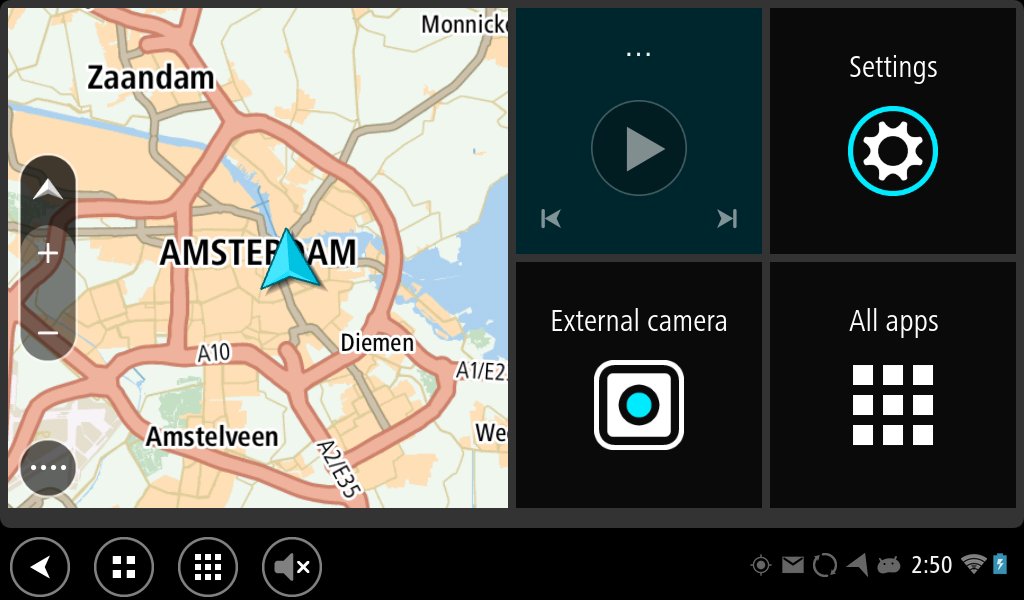
The default configuration begins with a home screen containing a 3/4 screen navigation widget and two tiles on the right side of the screen. Page two of the home screen contains shortcuts to more apps and the "All Apps" browser.
Customising the homescreen
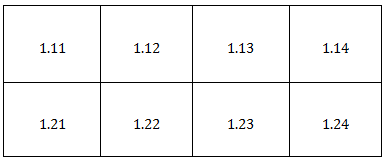
It is possible to define multiple pages containing tiles, although in practice 2 or 3 pages should suffice. On startup page 1 is shown - the user can then swipe between the pages. Tiles are identified by a number in the following format: {page}.{row}{column}
So for page 1, tile numbers 1.11 to 1.24 are available. In this example, only one home screen page will be displayed.
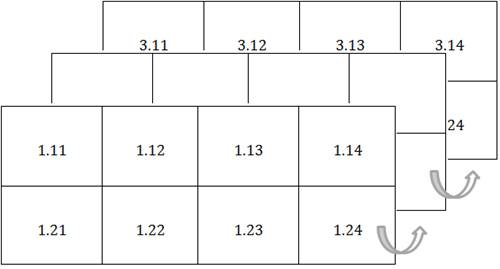
Create multiple pages
To define a second page, just change the '1' into a '2' for two pages or a '4' to define four pages.
Creating blank pages
To create blank pages, define at least 3 pages and only put items on pages 1 and 3.
Configuring the tiles
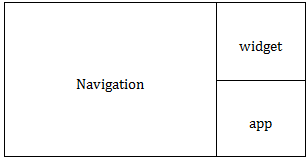
Tiles can be populated with short cuts to applications or interactive widgets. Short cuts are buttons with an icon and title text, when the user clicks on them, they will launch a certain application full screen. Widgets are interactive views which can span multiple tiles, they can display dynamically updated or animated information, users can sometimes interact with them or launch fullscreen applications by clicking on them. Widgets on Bridge are standard Android widgets.
The Bridge home screen can be configured to show a navigation widget on one of it's pages, spanning multiple tiles. You can also configure a tile to display an "All apps" drawer which when clicked on will display tiles for each application currently installed on the Bridge device.
Below is an example layout of a home screen page.
Screen orientation
If screen rotation is enabled on a device with a custom tile layout it is important to consider this when adding home screen layouts so that layouts for both orientations are covered, if desired.
In the event that no valid integrator configurations are present to support screen rotation then the current screen orientation will be kept and an error message will be shown until the user rotates the display back to the previous orientation.
Note that for a legacy 4x2 layout (in widgets.json) rotation will not be possible - landscape will be enforced.
Using a legacy configuration (widgets.json)
Some older setups (17.1 and earlier) may use tile layouts in a file called widgets.json, located in the /sdcard/ directory. If this is already present it will be used as a fall back in the event that no valid configurations are found in the /sdcard/homescreen/ directory. In case valid configurations are present in both locations the ones in /sdcard/homescreen/ will take precedent.
Section types
The widgets.json file is split into sections, each section defining the location of items relating to that section. You can define items for the following sections:
Section type: navigation
This (simple) section is used to define where the navigation widget will be displayed and the dimensions of the widget. This is an optional section, you can choose not to have a navigation widget on the home screen - in this case access to navigation should be provided by adding an application short cut (to the navigation apk) on one of your home screen pages, alternatively the application shortcut will always be available in the application browser.
Requirements:
- Only one instance of navigation is allowed
- Minimum height and width are 2 x 2 tiles
- Maximum width is 4 tiles, maximum height 2 tiles
Explanation of the fields:
- "startcell" [mandatory] is to define the start position of navigation. Value has to be lower than "endcell". e.g. startcell is 1.11 and endcell is 1.12.
- "endcell" [mandatory] is to define the end position of navigation.
Section type: widget
This section explains how to add standard Android widgets to your home screen. Widgets can encompass more than one tile.
Widgets will only appear on the home screen if they are installed and configured correctly. If your widget is not appearing in the home screen then you should check the error logs for more details.
To see which widgets are installed on your device, please read 'Exporting a package list' below in this document.
Requirements:
- Widgets are optional components of the home screen.
- Widgets should at least be the minimum size allowed.
- A widget can span over more than one tile but height and width should limit it to one page.
Explanation of the fields:
- "package_name" [mandatory]. Read below 'Exporting a package list'.
- "class_name" [mandatory]. Read below 'Exporting a package list'.
- "startcell" [mandatory] is to define the start position of a widget. Value has to be lower than "endcell", unless the widget is 1 X 1 size.; e.g. startcell is 1.11 and endcell is 1.12.
- "endcell" [mandatory] is to define the end position of a widget. Value has to be the same or higher than "startcell" e.g. startcell is 1.11 and endcell is 1.12 or higher.
- "background_color" [optional] is to define the background color of an application tile.
It uses the Android constant values
e.g. 0xffffffff.
1"widget":2[3 {4 "package_name: "",5 "class_name": "",6 "startcell": "",7 "endcell": "",8 "background_color": ""9 }10]
Section type: application
In the application section you can create short cuts to Apps installed on your device. To see which Apps are installed and more importantly to get the package and class name information, read ' Exporting a package list'.
Requirements:
- Apps are optional components of the homescreen;
- Apps cannot span, they are fixed to one tile.
To define apps in the widgets.json file there are mandatory and optional fields:
- "startcell" [mandatory] is to define the start position of an instance.
- "package_name" [mandatory]. Read below 'Exporting a package list'.
- "class_name" [mandatory]. Read below 'Exporting a package list'.
- "background_color" [optional] is to define the background color of an application tile. It uses the Android constant values e.g. 0xffffffff. The background color can also be transparent: value 0x00000000. Syntax: "background_color": " 0xffcccccc".
- "text_color" [optional] is to define the text color of an application tile. It uses the Android constant values e.g. 0xff000000. Syntax: " text_color": "0xffcccccc",
- "icon" [optional] is to define a user icon instead of the default Android icon. Supported filetype is .png.
- "round_corners" [optional] is to define (the amount of) rounded corners on the background tile. Values range from 0 (no roundness) to 255 (Max roundness) - default is 0.
- "enable" [optional] takes an enable slot identifier (0-255), multiple items can use the same
slot, slots can be enabled or disabled via intents, default is that slot 0 is disabled and slots
1-255 are enabled. Use this functionality to disable (sets of) icons runtime (for example -
disabling items when driving)
There are 255 slots available. Each slot can be either enabled or disabled. Application shortcuts
which you do not allocate a slot to (with "enable") will always be enabled and cannot be disabled,
ever. Slots are setup automatically at bootup, slot 0 is disabled, all other slots enabled.
1"application":2[3 {4 "name": "app 1",5 "package_name": "",6 "class_name": "",7 "startcell": "",8 "background_color": "",9 "text_color": "",10 "icon": "user_icon.png"11 }12]
Section type: video
This section is used to define where the video widget will be displayed and the dimensions of the widget. This is an optional section, you can choose not to have a video widget on the home screen. Unlike the Video Application which is always fullscreen, you can specifiy the video widget dimensions on the homescreen. When the device is connected to a video feed, the streaming video should appear in the video widget area. Clicking on the video widget will start a fullscreen Video Application. The fullscreen Video Application is also triggered when it detects a video feed. You can stop the autostart of the fullscreen Video Application by adding a file rear_view_camera_no_autostart in the /mnt/sdcard/ directory of your device.
Requirements:
- Only one instance of video is allowed.
- No size restrictions, however since it retains its aspect ratio its better to have it in 1x1 or 2x2 tiles.
- Maximum width is 4 tiles, maximum height 2 tiles.
- To prevent VideoApplication from autostart, add a blank file named rear_view_camera_no_autostart in the /mnt/sdcard/ directory of your device.
Explanation of the fields:
- "startcell" [mandatory] is to define the start position of video. Value has to be lower than "endcell". e.g. startcell is 1.11 and endcell is 1.12.
- "endcell" [mandatory] is to define the end position of video.
Section type: app-browser
In the application section of the widgets.json you can enable apps installed as on your device. To see which apps are installed, read 'Exporting a package list'.
Requirements:
- Apps are optional components of the homescreen;
- Apps cannot span, they are fixed to one tile.
To define apps in the widgets.json file there are mandatory and optional fields:
- "startcell" [mandatory] is to define the start position of an instance.
- "package_name" [mandatory]. Read below 'Exporting a package list'.
- "class_name" [mandatory]. Read below 'Exporting a package list'.
- "background_color" [optional] is to define the background color of an application tile. It uses the Android constant values e.g. 0xffffffff. The background color can also be transparent: value 0x00000000. Syntax: "background_color": " 0xffcccccc".
- "text_color" [optional] is to define the text color of an application tile. It uses the Android constant values e.g. 0xff000000. Syntax: " text_color": "0xffcccccc",
- "icon" [optional] is to define a user icon instead of the default Android icon. Supported filetype is .png.
- "round_corners" [optional] is to define (the amount of) rounded corners on the background tile. Values range from 0 (no roundness) to 255 (Max roundness) - default is 0.
- "enable" [optional] takes an enable slot identifier (0-255), multiple items can use the same
slot, slots can be enabled or disabled via intents, default is that slot 0 is disabled and slots
1-255 are enabled. Use this functionality to disable (sets of) icons runtime (for example -
disabling items when driving)
1"application":2[3 {4 "name": "app 1",5 "package_name": "",6 "class_name": "",7 "startcell": "",8 "background_color": "",9 "text_color": "",10 "icon": "user_icon.png"11 }12]
Updating application icons
When you want to update the icon of an app, add a folder in the same directory where widgets.json is located. The code should look like this:
1{2 "name": "Earth",3 "package_name": "com.google.earth",4 "class_name": ""com.google.earth.EarthActivity,5 "startcell": "1.24",6 "background_color": "0xffcccccc",7 "icon": "/folder/icon.png"8}
Exporting a package list
To find out what packages are installed on your device you can use the app "PackageLister". After executing this app two buttons are availble: 'Generate homescreen-list' and 'Generate package-list file'.
A file will be exported to
/sdcard/packagelister/homescreen-list. This file contains all installed widgets and apps on that specific Android device.
You can use these to define the homescreen.
The PackageLister is a developer tool and can be downloaded from the downloads section.
Example output of "PackageLister":
1{2"widget":3 [4 { "package_name": "com.android.contacts", "class_name": "com.android.contacts.socialwidget.SocialWidgetProvider" },5 { "package_name": "com.google.android.apps.currents", "class_name": "com.google.apps.dots.android.app.appwidget.PostListAppWidgetProvider" },6 { "package_name": "com.google.android.deskclock", "class_name": "com.android.AnalogAppWidgetProvider" }78 ],910"application":11 [12 { "package_name": "com.android.calculator2", "class_name": "com.android.calculator2.Calculator" },13 { "package_name": "com.android.contacts", "class_name": "com.android.contacts.activities.PeopleActivity" },14 { "package_name": "com.google.android.deskclock", "class_name": "com.android.deskclock.DeskClock" }1516 ],17...
Example 1 homescreen layout json
This is an example of the code:
1{2 "navigation":3 [4 {5 "startcell": "1.11",6 "endcell": "1.22"7 }8 ],9 "widget":10 [11 {12 "package_name": "com.google.android.gm",13 "class_name": "com.google.android.gm.widget.GmailWidgetProvider",14 "startcell": "1.13",15 "endcell": "1.23",16 "background_color": "0xfffccccc"17 }18 ],19 "application":20 [21 {22 "name": "Calculator",23 "package_name": "com.android.calculator2",24 "class_name": "com.android.calculator2.Calculator",25 "startcell": "1.14",26 "background_color": "0xffccccc",27 "icon": "icon.png"28 },29 {30 "name": "Earth",31 "package_name": "com.google.earth",32 "class_name": ""com.google.earth.EarthActivity,33 "startcell": "1.24",34 "background_color": "0xffcccccc",35 "icon": "icon.png"36 }37 ]38}
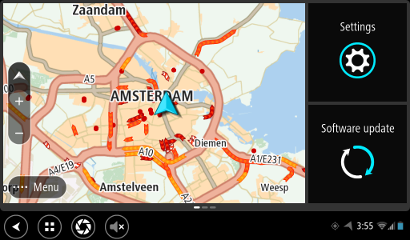
The result will look like this:
Application view of one home screen page
Example 2 homescreen layout json
This is an example of the json code.
1{2 "navigation": [3 {4 "startcell": "1.11",5 "endcell": "1.23"6 }7 ],8 "application": [9 {10 "class_name": "com.android.settings.Settings",11 "package_name": "com.android.settings",12 "startcell": "1.14",13 "endcell": "1.14",14 "background_color": "0xcc000000",15 "text_color": "0xffffffff"16 }17 ],18 "widget": [19 {20 "package_name": "com.tomtom.pnd.musicplayer",21 "class_name": "com.tomtom.pnd.widget.MusicWidgetProvider",22 "startcell": "2.11",23 "endcell": "2.22"24 }25 ],26 "app-browser": [27 {28 "startcell": "1.24",29 "endcell": "1.24",30 "background_color": "0xcc000000",31 "text_color": "0xffffffff"32 }33 ],34 "video": [35 {36 "startcell": "2.23",37 "endcell": "2.23",38 "background_color": "0xcc000000"39 }40 ]41}
Application view. Note the page indicator:
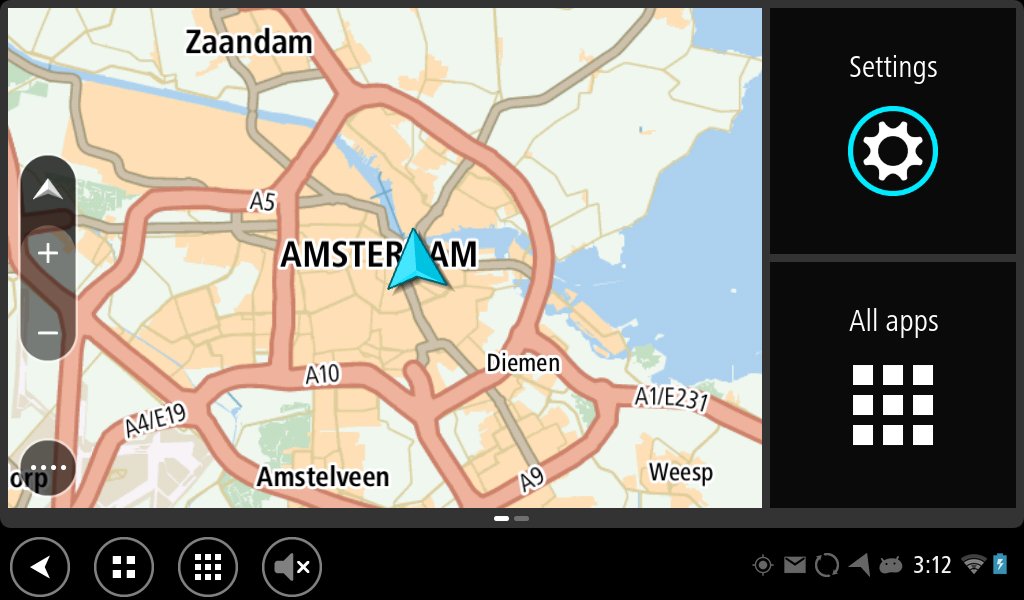
Application view of home screen page 1
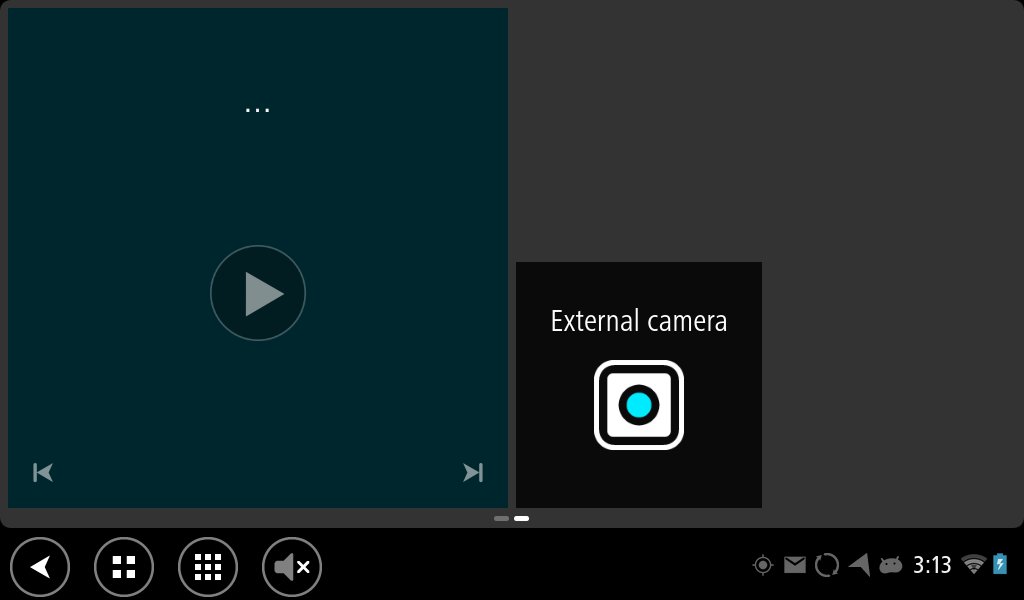
Application view of home screen page 2
Adding multiple widgets and apps
1"widget":2 [3 {4 "package_name": "",5 "class_name": "",6 "startcell": "",7 "endcell": "",8 "background_color": ""9 }, -- note the comma when adding an extra application10 {11 "package_name": "",12 "class_name": "",13 "startcell": "",14 "endcell": "",15 "background_color": ""16 } -- no comma after the last package17 ],18"application":19 [20 {21 "package_name": "",22 "class_name": "",23 "startcell": "",24 "text_color": ""25 "background_color": ""26 }, -- note the comma when adding an extra application27 {28 "package_name": "",29 "class_name": "",30 "startcell": "",31 "text_color": "",32 "background_color": ""33 } -- no comma after the last package34 ],
Enabling and disabling shortcuts dynamically
Application shortcuts which have been allocated an "enable slot identifier" can be enabled or disabled by sending intents to the home screen process.
Testing this functionality can be achieved by sending intents from the command line:
adb shell am start -n com.tomtom.navpad.navapp/com.tomtom.navpad.navapp.NavPadNavAppActivity --es reason "enable" --ei index "3" --ez enable "false"
Programmatically an intent needs to be sent to the home screen with the following extra data.
1(string) "reason", "enable"2(int) "index", enable-slot-identifier3(boolean) "enable", TRUE|FALSE
This functionality can be used for example for monitoring the vehicle speed in a background service and sending intents to enable or disable icons in the home screen when a certain speed is reached. Or preventing access to applications if the user has not logged in to a customers backend server.
Configuring the Homescreen by drag and drop
In the above sections, we have seen how the Homescreen can be configured by manually editing the widgets.json file. However, manually editing the widgets.json can introduce errors. In case of major errors in the widgets.json file, the device will revert to default layout of Homescreen.
To avoid this, you can make your homescreen configurable. A configurable homescreen enables the user to make changes to the homescreen layout, by drag and drop rather than editing the file manually. Drag and drop is enabled in the default layout. If you do not want the default layout and have your own widgets.json file, then it can be made configurable by adding the following line to the widgets.json:
"configurable": "true"
Below is an example layout for a configurable Homescreen.
1{2 "configurable": "true",3 "navigation": [4 {5 "startcell": "1.11",6 "endcell": "1.23"7 }8 ],9 "application": [10 {11 "class_name": "com.android.settings.Settings",12 "package_name": "com.android.settings",13 "startcell": "1.14",14 "endcell": "1.14",15 "background_color": "0xcc000000",16 "text_color": "0xffffffff"17 }18 ],19 "widget": [20 {21 "package_name": "com.tomtom.pnd.musicplayer",22 "class_name": "com.tomtom.pnd.widget.MusicWidgetProvider",23 "startcell": "2.11",24 "endcell": "2.22"25 }26 ]27}
A configurable homescreen allows the user to add, move and delete widgets and applications on the homescreen. Unlike applications which occupy only one tile on the homescreen , a widget can be resized on a configurable homescreen. The a user makes a change to homescreen layout by drag and drop, a new layout is written to a file called the "x-user.json", where ‘x’ corresponds to the current tile layout (eg 5x3-user.json). This is a per user setting and is stored in the /sdcard/homescreen/user directory.
If you want to allow your users to add their own apps and widgets from a custom layout remember to include All apps and Add widget to their home screen.