BRIDGE NavApp SDK
TomTom BRIDGE is Android
A TomTom BRIDGE device is a 'standard' Android device, currently running Marshmallow 6.0, API level 23. Minimal platform changes were done to improve the in-car experience, which means that a TomTom BRIDGE, by and large, remains an Android device. Any apps that you can run on other Android platforms, will run on TomTom BRIDGE as well, so you are free to embellish the TomTom BRIDGE experience with APKs of your own making, or any third party applications that your customers / users would find useful.
There is one notable exception to this: the launcher application. To provide as much power as possible to the user on their home screen, TomTom integrated its widgets directly into the default launcher. If you would like to use another launcher, be aware that the "Navigation" and "External camera" widgets will not be available to you.
The TomTom BRIDGE SDK offers seamless integration of TomTom solutions with any business application to help companies achieve their efficiency goals.
The SDK contains NavApp SDK and Map Library SDK which will enable you to integrate your business applications with TomTom's advanced navigation software. They are designed for ease of use: just add the SDKs to your application project and start navigating from within your own app. The SDKs are initialised through a single API call as well as most of the navigation API functions.
BRIDGE NavApp SDK
The SDK can be downloaded from the Downloads section of this portal.
BRIDGE NavApp SDK javadoc documentation
NavApp SDK - interfacing to navigation
Installing the SDK
Copy the navappclient.jar file into your application project libs directory. The file can be found in the SDK which you downloaded from the portal.
Initialising the SDK
The NavApp SDK consists of a group of interfaces accessed through the NavAppClient class.
To use the NavApp SDK you need to create an instance of the NavAppClient, using the ** NavAppClient.Factory.make(Context, ErrorCallback)** method.
The returned instance is used to access the individual APIs.
As instantiating the NavAppClient requires some background initialization, the NavAppClient is preferably created once per application, e.g. in the Activity onCreate callback.
Once this call returns the NavAppClient instance is ready to use.
1protected void onCreate(final Bundle savedInstanceState) {2 // Instantiate the NavAppClient passing in a Context.3 mNavappClient = NavAppClient.Factory.make(this, mErrorCallback)4}56private final ErrorCallback mErrorCallback = new ErrorCallback() {7 @Override8 public void onError(final NavAppError error) {9 Log.e(TAG, "onError(" + error.getErrorMessage() + ")\n" + error.getStackTraceString());10 mNavappClient = null;11 }12};
And should be closed in the Activity onDestroy callback, using NavAppClient.close()
1protected void onDestroy() {2 mNavappClient.close();3}
Using the API
The NavAppClient instance can then be used to access the APIs.
Retrieving information about the map
Any callback from the SDK will be done on the UI Thread.
All APIs will throw an IllegalArgumentException if the listener argument is null.
1mSDKUtils = mNavappClient.getUtils();2mSDKUtils.getMapInfo(mMapInfoListener);34private MapInfo.Listener mMapInfoListener = new MapInfo.Listener() {5 public void onMapInfo(final MapInfo mapInfo) {6 Log.d(TAG, "name: " + mapInfo.getName() +7 "releaseNumber: " + mapInfo.getReleaseNumber() +8 "releaseDate: " + mapInfo.getReleaseDate() +9 "buildNumber: " + mapInfo.getBuildNumber() +10 "locationPath: " + mapInfo.getLocationPath());11 }12};
Planning a trip
1mTripManager = mNavappClient.getTripManager();23final Routeable destination = mNavappClient.makeRouteable(DESTINATION_LATITUDE, DESTINATION_LONGITUDE);4mTripManager.planTrip(destination, mPlanListener);56private Trip.PlanListener mPlanListener = new Trip.PlanListener() {7 public void onTripPlanResult(final PlanResult result) {8 Log.d(TAG, "onTripPlanResult result[" + result + "]");9 }10};
Map Library SDK
The SDK can be downloaded from the downloads section of this portal.
For information on how to use the SDKs, please visit the pages containing example code: Map Library SDK
Importing and Exporting Routes
Importing routes into Navigation
The Navigation application handles the intent ACTION_SEND and ACTION_SEND_MULTIPLE, with mime types "application/gpx" and "application/itn". This is useful if you want to import Routes directly into the Navigation Application from a File Explorer. However, if you want to import into Navigation, Routes from your application, you can do it one at a time, using the following intent.
For single .gpx or .itn file: tomtom.intent.action.IMPORT_SINGLE_ROUTE
The mime types are "application/gpx" and "application/itn", for .gpx and .itn files respectively. The following is an example to import .gpx Routes to Navigation from an external application.
Importing single Route to Navigation
1private void importSingleRouteToNavigation(final File importfile) throws IOException {2 final Uri fileUri = Uri.fromFile(importfile);3 final Intent importToNavigationIntent = new Intent();4 importToNavigationIntent.setAction("tomtom.intent.action.IMPORT_SINGLE_ROUTE");5 importToNavigationIntent.putExtra(Intent.EXTRA_STREAM, fileUri).setType("application/gpx").setFlags(Intent.FLAG_ACTIVITY_NEW_TASK);6 importToNavigationIntent.addFlags(Intent.FLAG_GRANT_READ_URI_PERMISSION);7 startActivity(importToNavigationIntent);8 }
To share routes from your application's internal data files, use FileProvider. Routes imported into Navigation, can be found in the "My Routes" screen, in the Main Menu.
Exporting routes and Saving Routes to device
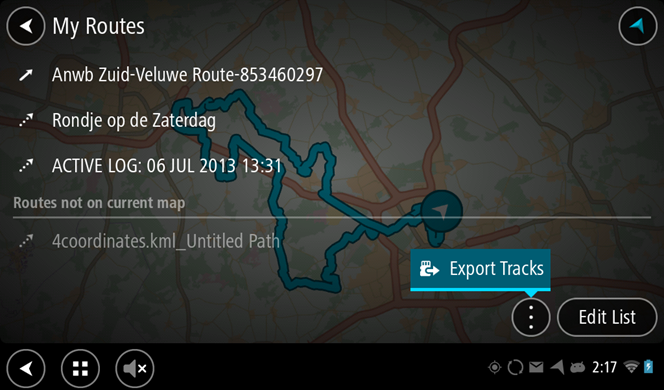
All the Routes (both .gpx files and .itn files) appear on the "My Routes" screen. Only the .gpx Routes can be exported to another application or saved to device from the "My Routes" screen.
 Indicates the itinerary files (.itn), which cannot be exported
 Indicates the route files (.gpx), which can be exported
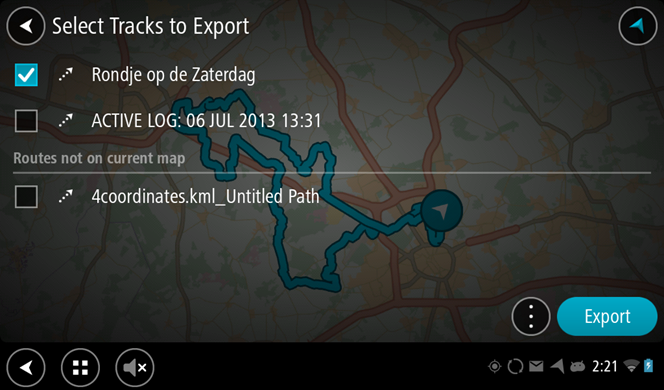
The routes to be exported can be selected by choosing "Export Tracks" on the contextual menu on the "My Routes" screen.
Exporting .gpx routes from My Routes

Selecting Routes to export

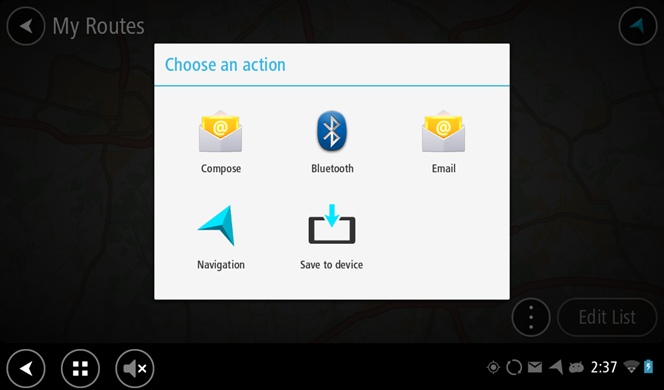
When a route or multiple routes are exported, you are presented with an option to send it to a an application that handles the route files. To save the route on the device, send the routes to "Save to device" application. This will save the selected routes in the Routes folder internally.
Saving routes to device

If you want to send the route files to your own application, then your application must handle the ACTION_SEND and ACTION_SEND_MULTIPLE intents, with mine type "application/gpx".
Intent filters in manifest file
1<intent-filter>2 <action android:name="android.intent.action.SEND" />3 <category android:name="android.intent.category.DEFAULT" />4 <data android:mimeType="application/gpx" />5</intent-filter>67<intent-filter>8 <action android:name="android.intent.action.SEND_MULTIPLE" />9 <category android:name="android.intent.category.DEFAULT" />10 <data android:mimeType="application/gpx" />11</intent-filter>
The route files can then be retrieved from the intent, as shown in the example below.
Retrieving route files from intent
1final ArrayList2 uriList = new ArrayList34 ()5if (Intent.ACTION_SEND.equals(intent.getAction())) {6 final Uri uri = (Uri) intent.getExtras().get(Intent.EXTRA_STREAM);7 uriList.add(uri);8}9else if (Build.VERSION.SDK_INT >= Build.VERSION_CODES.JELLY_BEAN && Intent.ACTION_SEND_MULTIPLE.equals(intent.getAction())) {10 try {11 final ClipData clipData = intent.getClipData();12 if (clipData != null) {13 final Integer itemCount = (Integer) clipData.getItemCount();14 for (int i = 0; i < itemCount.intValue(); i++) {15 final Item clipDataItem = clipData.getItemAt(i);16 if (clipDataItem != null) {17 uriList.add(clipDataItem.getUri());18 }19 }20 }21 }22 catch (final IllegalArgumentException e) {23 if (Log.E) Log.e(TAG, e.getMessage());24 }25}
Generating inputstream from file uri
1final ParcelFileDescriptor inputPFD = mContentResolver.openFileDescriptor(uri, "r");2final FileDescriptor fd = inputPFD.getFileDescriptor();3FileInputStream inputStream = new FileInputStream(fd);
Recording new Routes
New routes can be created in the Navigation application, by using the "Start Recording" option on your Main Menu. When the recording starts, you can see a red dot on your Navigation screen.
To stop the recording, go back to the Main Menu and select the "Stop Recording" option. Routes created this way, are listed in the "My Routes" screen in .gpx format. As such, they can be exported to another application or saved to the device.
Remove speed limit indication
By default, Bridge will show the current vehicle speed and speed limit in the Navigation app, provided the map contains that information for the current road. If you wish to hide these from the user, you can install the "disable speed info" package. Add the following to your configuration:
1{2 "name": "disable-speed-info",3 "path": "disable-speed-info_1.0_all.ttpkg",4 "version": "1.0"5}
And make sure that the package, found in the extra-packages.zip on
the releases page, can be reached by your
configuration.
Listening for speed limit changes
NavApp is broadcasting intent action: tomtom.intent.action.SPEED_LIMIT_CHANGED indicating that the speed limit has changed. An extra int newSpeedLimitExtra provides a new speed limit in meters per hour.