Icon customization
Map Maker lets you replace existing map icons and upload custom icons.
In this guide, you will learn:
- How to prepare icon files.
- What is the Figma Map Icons Template and how to use it.
- How to change default icons.
- How to add custom icons and how to reference them in the style.
Preparing icon files
The easiest way to modify default map icons is to download the Figma Map Icons Template and modify icons directly in Figma. You can learn more about the Figma Map Icons Template in the section Using the Figma Map Icons Template.
If you are preparing your own icons, see File requirements.
File requirements
- Files must be in SVG format.
widthandheightattributes should be defined in the<svg>element.- If
widthandheightattributes are not defined, the dimensions will be taken from theviewBox. - Dimensions must be in the range between 1 and 350.
- Subset of SVG elements and attributes are supported. See the lists below.
Supported SVG elements
| circle |
| defs |
| desc |
| ellipse |
| font |
| g |
| glyph |
| hkern |
| line |
| linearGradient |
| marker |
| mask |
| path |
| pattern |
| polygon |
| polyline |
| radialGradient |
| rect |
| stop |
| switch |
| symbol |
| text |
| title |
| tspan |
| svg |
| use |
| clipPath |
| filter |
| feOffset |
| feGaussianBlur |
| feComposite |
| feColorMatrix |
Supported SVG attributes
| accent-height |
| accumulate |
| additive |
| ascent |
| attributeName |
| attributeType |
| begin |
| by |
| class |
| clip-path |
| clip-rule |
| color |
| color-rendering |
| cx |
| cy |
| d |
| direction |
| display |
| dur |
| end |
| fill |
| fill-opacity |
| fill-rule |
| filter |
| filterUnits |
| flood-color |
| flood-opacity |
| font-family |
| font-size |
| font-stretch |
| font-style |
| font-variant |
| font-weight |
| g1 |
| g2 |
| glyph-name |
| gradientUnits |
| height |
| href |
| id |
| image-rendering |
| in |
| k1 |
| k2 |
| k3 |
| k4 |
| keyPoints |
| keySplines |
| keyTimes |
| lang |
| marker-end |
| marker-mid |
| marker-start |
| markerHeight |
| markerUnits |
| markerWidth |
| maskContentUnits |
| maskUnits |
| max |
| mask |
| min |
| offset |
| operator |
| opacity |
| orient |
| origin |
| path |
| pathLength |
| patternContentUnits |
| patternTransform |
| patternUnits |
| points |
| preserveAspectRatio |
| primitiveUnits |
| r |
| rx |
| ry |
| refx |
| refy |
| repeatCount |
| repeatdur |
| restart |
| result |
| rotate |
| shape-rendering |
| slope |
| stdDeviation |
| stop-color |
| stop-opacity |
| stroke-dasharray |
| stroke-dashoffset |
| stroke-linecap |
| stroke-linejoin |
| stroke-miterlimit |
| stroke-opacity |
| stroke |
| stroke-width |
| style |
| systemLanguage |
| transform |
| text-anchor |
| text-rendering |
| type |
| u1 |
| u2 |
| unicode |
| values |
| viewBox |
| visibility |
| version |
| width |
| x |
| x1 |
| x2 |
| xmlns |
| y |
| y1 |
| y2 |
| zoomAndPan |
Exporting SVGs from Adobe Illustrator
- Export as SVG: Use the Export As option and choose the SVG format.
- SVG options: Use the following settings:
- Styling: Presentation Attributes
- Font: Convert to outline
Using the Figma Map Icons Template

TomTom's Figma Map Icons Template contains icon sets for any style created in Map Maker. You can modify icons directly in Figma or export them as SVGs and modify them in any vector graphics editor.
To open the Figma Map Icons Template, you must import it to Figma which requires a Figma account.
Replacing default icons
You can replace any default icon by uploading an SVG file named the same as the icon ID you want to replace in the format <<icon ID>>.svg.
For example, if you want to replace the Cafe icon with the ID "poi-cafe", you need to upload an SVG file named poi-cafe.svg.
If you do not know the icon ID, find the icon in the Icons list and hold the pointer over it. The icon ID will appear.
You can use the search box in the top of the Icons list to find the icon you want to replace. Just type the name of the icon and the list will be filtered.
You can upload up to 512 icons at a single time.
Follow these steps to replace default icons:
- Open a style.
- Click the Assets tab.
- Click Upload
- Select or drag-and-drop SVG files. The names of the selected files should match the icon IDs you want to replace.
- Compare new icons with the current ones.
- Click Add selected icons.
Replaced default icons are marked with a blue indicator in the top left corner of the icon in the Icons List.
Uploading custom icons
You can upload custom icons that are not part of the default icon set. Uploaded custom icons will be available in the My icons folder in the Assets tab.
The steps are exactly the same as when replacing the default icons, but the icon name should not match any of the default icon IDs.
- Open the style.
- Click the Assets tab.
- Click Upload
- Select or drag-and-drop SVG files. The names of the selected files should not match any of the default icon IDs.
- See the icons preview.
- Click Add selected icons.
- Browse your icons in the My icons folder in the Assets tab.
Replacing a single icon
If you want to replace a single icon, you can do it directly from the Icons list. You do not need to know the icon ID in this case.
Follow these steps to replace a single icon:
- Open the style.
- Click the Assets tab.
- Click the icons category (for example "Points of Interest"). The Icons list will appear.
- Click the icon you want to replace. The Icon Panel will appear.
- Click Select file or drag-and-drop an SVG file. You can only upload a single file.
- Compare a new icon with the current one. Click Replace icon if you are satisfied with the new icon. The icon will be replaced.
Using a custom image for a layer pattern
You can use custom icon as a pattern for any fill or line type layer.
You can check the type of the layer in the Layer editor next to the type property.
- Open the style.
- Upload your custom icon.
- Select a fill type layer (for example "Water - Fill").
- Find the Pattern property in the Layer editor.
- Unlink the Pattern property by clicking
 Unlink.
 - Click the Pattern box. Icon select window will appear.
- Select your custom icon from the My icons folder and observe how the pattern changes on the map.
Restoring single icon to default
Modified icons can be restored to the default state. Please note that restoring (or deleting) icons cannot be reverted.
Follow these steps to restore an icon:
- Open the style.
- Click the Assets tab.
- Click the icons category, to which the replaced icon belongs. An Icons list will appear.
- Find the icon you want to restore and click it. The Icon Panel will appear.
- Click
 Restore. The icon will be restored to its default version.
Icons in the My icons folder cannot be restored, but they can be deleted.
The steps are the same as for restoring an icon, but instead of ![]() Restore,
you will see
Restore,
you will see ![]() Remove.
Remove.
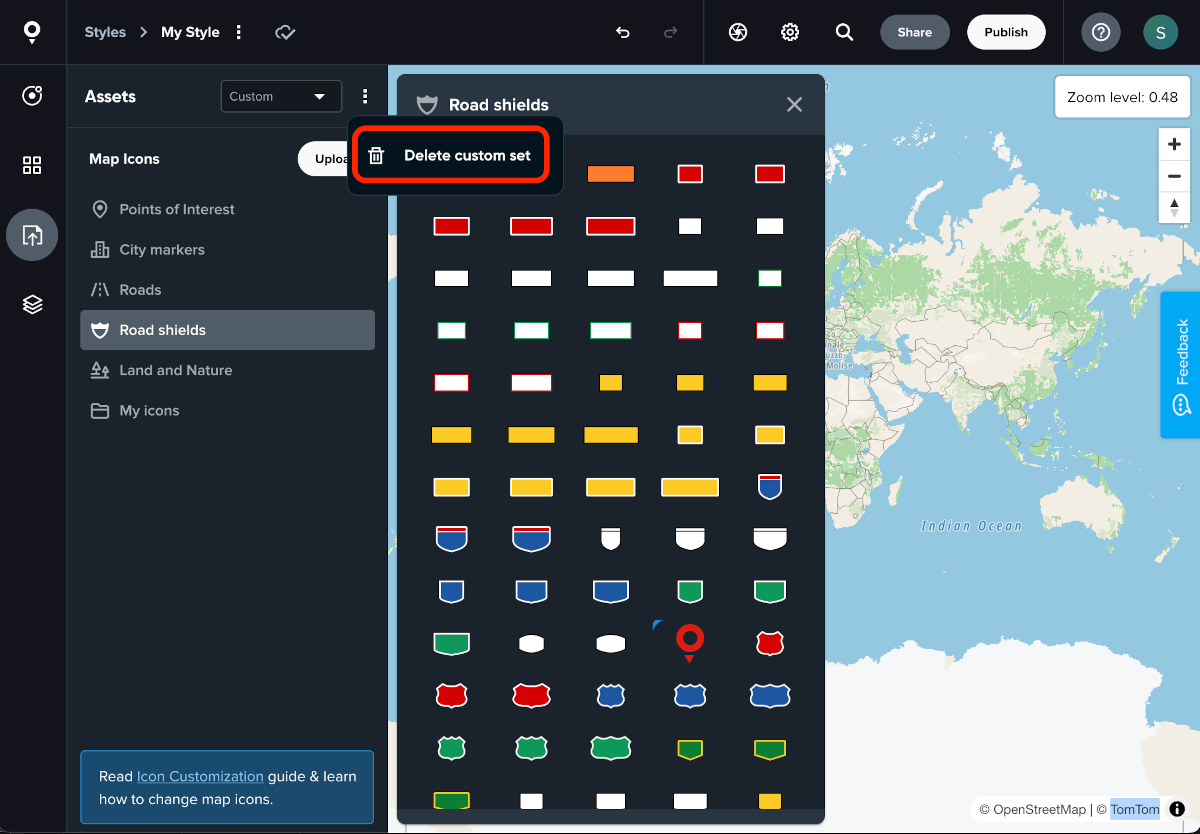
Restoring all icons to default
You can restore all icon changes and go back to the default icon set, by removing a custom set. Please notice that this action cannot be undone.
Click ![]() Show more
and choose the Delete custom set option.
Show more
and choose the Delete custom set option.
Replacing stretchable icons
Some of the default TomTom icons can have stretch properties, which define areas that can be stretched. Stretchable areas allow the icons to be resized without losing quality. An example use case is fitting content, such as text, inside the icon. With a stretchable icon, you can use the same icon for varying text lengths. For more information about stretch properties, see MapLibre Style Specification > Sprite > Stretch properties.
You can replace stretchable icons with your custom icons, but you cannot redefine stretch areas. When replacing stretchable icon, keep in mind that changing the width or height might result in visual misalignment.
To help you with this, Map Maker visualizes the stretch areas of the icons with stretch properties. When an icon is stretchable, holding the pointer over it will show the stretch areas. You can also compare stretch areas when uploading icons or single icon.
Steps to replace stretchable icons are the same as for replacing regular icons.
Figure 1. Stretch areas visualization in the Icons list. Hold the pointer over a stretchable icon to see the stretch areas.
Figure 2. Stretch areas visualization in the Icon Panel. Hold the pointer over the icon you want to be replaced or over an uploaded icon to see the stretch areas.
Figure 3. Stretch areas visualization in the Upload icons dialog. Hold the pointer over the icon you want to replace or over an uploaded icon to see the stretch areas.