Frequently Asked Questions
Important note:The TomTom Digital Cockpit SDK is not available for general use. Please contact us for more information.
Missing credentials
Cannot get property 'artifactoryEdgeUser' on extra properties extension as it does not exist
Please configure your credentials for Artifactory.
--
Incorrect credentials
1 > Could not resolve com.tomtom.ivi.platform:dependencies-catalog:1.0.6044.2 > Could not get resource 'https://repository.tomtom.com/artifactory/ivi/com/tomtom/ivi/platform/dependencies-catalog/1.0.6044/dependencies-catalog-1.0.6044.pom'.3 > Could not HEAD 'https://repository.tomtom.com/artifactory/ivi/com/tomtom/ivi/platform/dependencies-catalog/1.0.6044/dependencies-catalog-1.0.6044.pom'. Received status code 401 from server:
Please make sure you have configured your credentials correctly, and that your Artifactory identity token is not expired.
There is no map and/or search does not work
TomTom Digital Cockpit uses an on-board map for its navigation features, but this map is not included in the SDK package or in the emulator image. You must download and install the map separately, please follow the instructions in Install a map.
How do I open/close the debug menu?
Refer to the explanation on The Debug Menu.
How do I start a Route Demo?
A route demo is a simulation of a drive along a currently planned route on the device, this may be useful to see what happens at the various points along the route, without the need to go for an actual drive.
To plan a route, long press on any point on the map, and a route will be planned from the current position, to this location.
In order to allow position simulation, you first need to enable Developer Options in Android:
- On the emulator, go to the
Settingsmenu:- Press the Home button (the circle in the sidebar outside the emulator screen).
- Select
Car Launcher as Home>Just Once. - Press the Android application icon (nine dots in a grid) at the bottom of the screen.
- Scroll down and open
Settings.
- Scroll down and open
System, then openAbout. - Find
Build numberand tap this seven times, after which aYou are now a developer!toast appears to confirm that developer options are enabled.
Enable location mocking:
- Go back to the System menu and scroll down to
Developer options. - Scroll down and select
Select mock location app. - Select
IVI Example. - This setting is persistent until you uninstall the application.
Cold boot the emulator, as explained in the How to cold boot the emulator section.
Start a Route Demo:
- Make sure a route has been planned.
- Tap on the chevron (current position indicator). The
Trip Previewpanel is shown. - Tap on the
Playbutton in theTrip Previewpanel to start the route demo. - You can change the vehicle speed by selecting the
1x,2x, or3xbuttons. - Tap on the chevron again to hide the
Trip Previewpanel.
Insufficient storage error when installing the APK
You may encounter an INSTALL_FAILED_INSUFFICIENT_STORAGE error when installing the APK on the
emulator. Ensure that the emulator AVD has sufficient disk storage configured:
-
In Android Studio open the AVD Manager via
Tools>AVD Manager. -
Edit the TomTom Digital Cockpit AVD by clicking its pencil icon in the
Actionscolumn. -
Click
Show Advanced Settingsand scroll down to theMemory and Storagesection. Ensure these fields have at least the following values:RAM:4096 MBVM heap:256 MBInternal Storage:5120 MB
-
Click
Finish.
Cold boot the emulator, as explained in the How to cold boot the emulator section.
How to cold boot the emulator
In some situation a cold boot of the emulator is required, for example after changing its configuration, or as a precaution when unexpected behavior occurs.
To cold boot the emulator, follow these steps:
- If the emulator is running, click the
xin the upper-right corner of this emulator's tab inside the emulator window. - In Android Studio go to:
Tools>AVD Manager. - On the right-hand side of each configured AVD there is a three-dots icon that launches a context
menu. Press this button (instead of pressing the triangular Play button), and select
Cold Boot Now.
Now wait for the emulator to start up.
RuntimeException: Required support for OpenGL standard derivatives is missing
When you launch the application on emulator, it crashes and restarts in a never-ending loop. Look in the logcat and if you get the following error, you need to set the emulator's OpenGL ES API level to 3.1:
1com.tomtom.ivi.example.product.exampleapp E/AndroidRuntime: FATAL EXCEPTION: GLThread 6672 Process: com.tomtom.ivi.example.product.exampleapp, PID: 57053 java.lang.RuntimeException: Required support for OpenGL standard derivatives is missing.4 at com.tomtom.navkit.map.TomTomNavKitMapJNI.SurfaceAdapter_onSurfaceCreated(Native Method)5 at com.tomtom.navkit.map.SurfaceAdapter.onSurfaceCreated(SurfaceAdapter.java:170)6 at com.tomtom.navkit.map.sdk.MapView$Renderer.onSurfaceCreated(MapView.java:320)7 at android.opengl.GLSurfaceView$GLThread.guardedRun(GLSurfaceView.java:1541)8 at android.opengl.GLSurfaceView$GLThread.run(GLSurfaceView.java:1272)
To fix this, set the emulator's OpenGL ES API level to 3.1 and restart the emulator:
- Click the three vertical dots in the top bar of the emulator screen. This opens the
Extended Controlsdialog. - Select
Settingsat the left. - Select the
Advancedtab at the top. - This should say
Desktop native OpenGLandRenderer maximum (up to OpenGL ES 3.1). - Close the
Extended Controlsdialog.
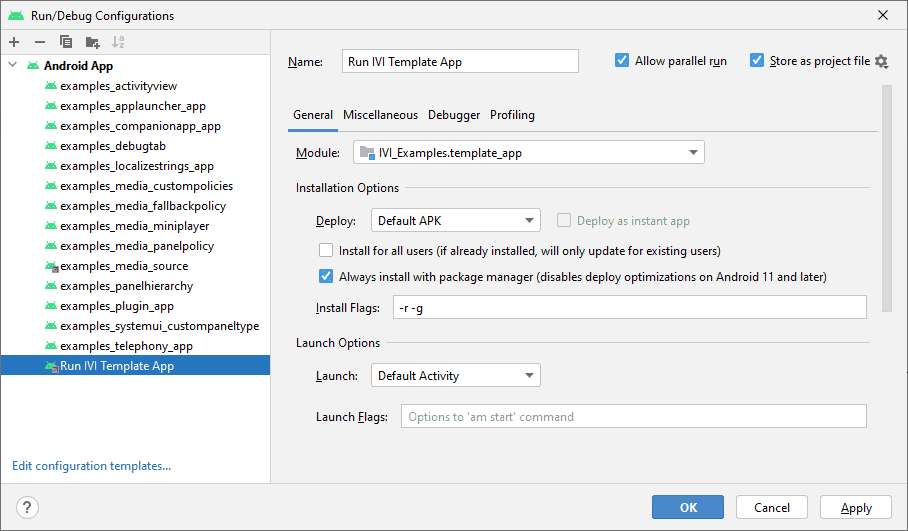
Android Studio does not install the application
Sometimes Android Studio does not install your new application after a rebuild but instead launches a previously installed version present on the emulator or target device. To solve this, enable the package manager to handle installs:
- Open the
Run/Debug Configurationsdialog viaRun>Edit Configurations.... - In this dialog tick the box
Always install with package manager. - Set field
Install Flagsto-r -g, to always reinstall the apk (-r) and to grant all permissions requested in the manifest file (-g). See also the ADB Package Manager documentation.
Configuration Run IVI Template app as delivered with the SDK has these settings pre-configured.
For the example applications you can configure this yourself, if needed.
How do I install the APK onto a custom device?
Some features of the TomTom Digital Cockpit example application require system permissions. For example, you won't be able to play music using Spotify nor use HVAC features. If you want to install the example app on a different emulator or device, you need to make sure that it is signed with the corresponding platform key.
Please see the instructions for installing on hardware.
Android doesn't allow my application while driving
An IVI application must tag all its activities to be Distraction Optimized; see more about
driver distraction guidelines.
To do this, add the distractionOptimized meta-data attribute in the AndroidManifest.xml for all
activities and activity aliases. Also see IviActivity.
I do not get a notification when an incoming call is received
To be informed by the platform about an incoming call, the IVI application needs to be configured as the system dialer. For example, when the stock implementation of the telecom service is used, the command to register it as the platform system dialer is:
adb shell telecom set-system-dialer <IVI Application Package Name>/com.tomtom.ivi.platform.telecom.plugin.service.telecom.IviInCallService