Advanced Maps and Routing for Truck Drivers in Android Apps
)
In a previous article, we showed how to use the TomTom Android SDK to build an application for truck drivers. In this article, we will extend the previous project by adding waypoints, custom section styles for different road types, and points of interest (POI).
In a previous article, we showed how to use the TomTom Android SDK to build an application for truck drivers. Specifically, we set up an application and used the Maps SDK for Android to determine the best route to the destination and the time to leave to arrive on time.
[]There’s so much more that you can do with the Maps SDK and TomTom location services to build compelling apps for fleet management, logistics, and mobility. In this article, we will extend the previous project by adding waypoints, custom section styles for different road types, and points of interest (POI).
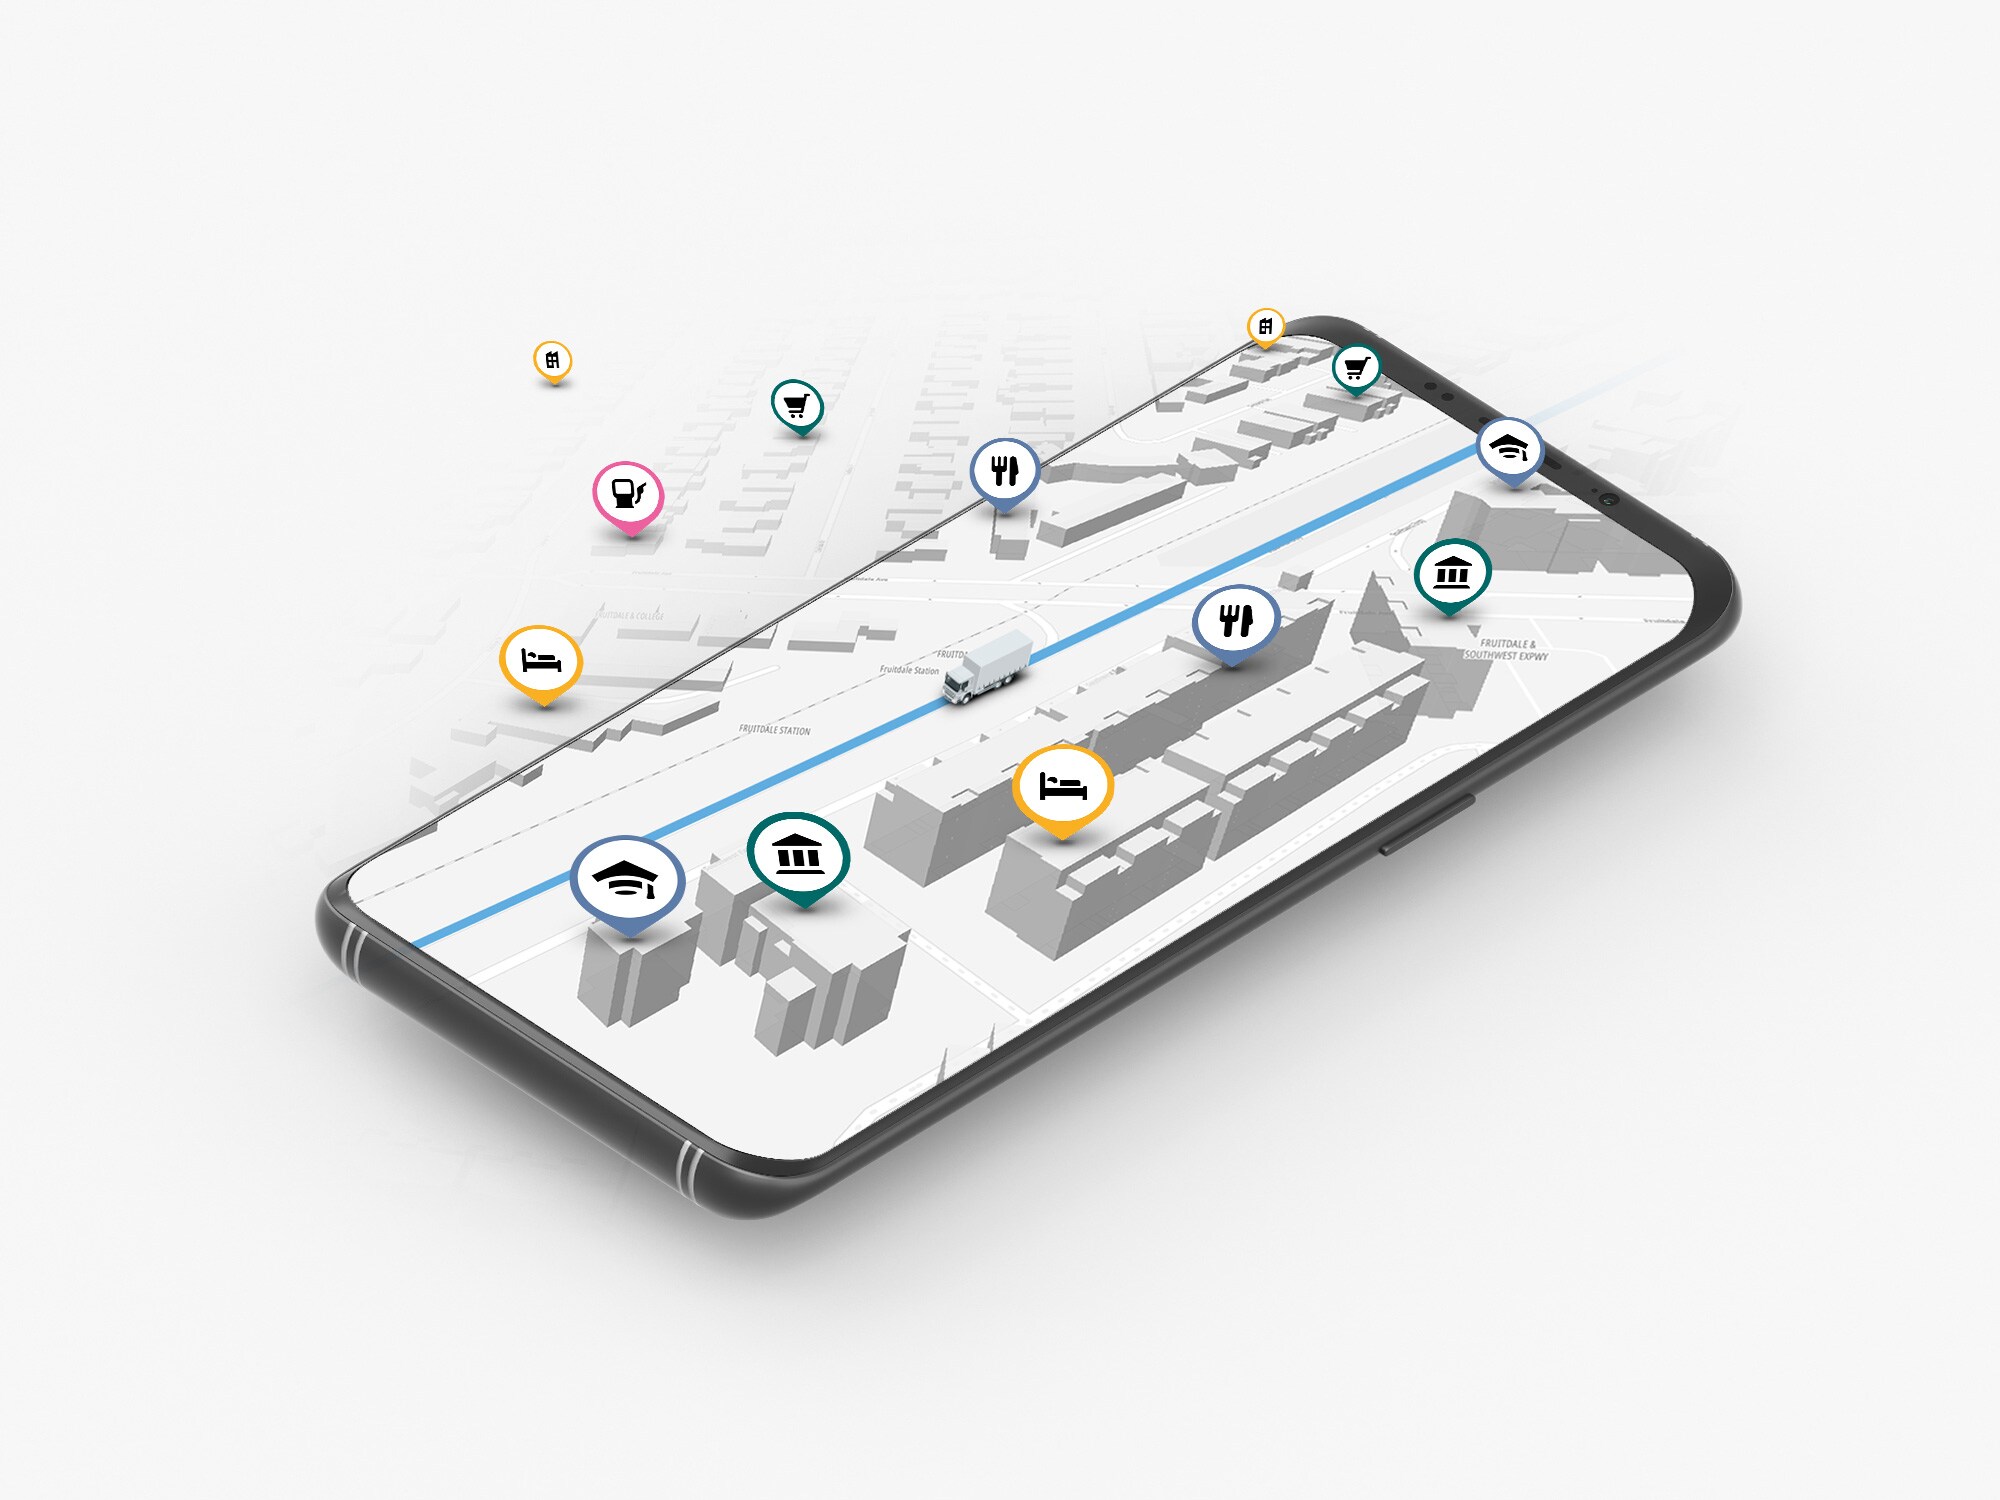
Waypoints have many uses. For example, more than one destination in a route is common for deliveries. Marking different road types is useful for marking toll roads, secondary roads, or possible hazards such as tunnels. POIs can be helpful when a driver routes with waypoints, so they can view key areas such as fuel stops, rest stops, weigh stations, and so on.
[]Before continuing, you need a TomTom Developer account, Java and Android Studio, and the source code from theprevious project. The previous article has instructions on how to request your free TomTom developer key and add it to the project. Once you have the previous project working, you can continue here.
Adding Waypoints
[]The first change that we will make to the project is to add a way to accumulate waypoints. The previous version of this application only required that a user enter a destination. Their starting point came from the phone’s location service.
[]When a location is entered in this version of the application, instead of immediately calculating a route, the location is added to a list of destinations. To hold information on a destination, I made a new class.
public class Destination {

      String label;
      LatLng location;


      public Destination(LatLng location, String label) {
      this.label = label;
      this.location = location;
      }

      public Destination(LatLng location) {
      this.label = "";
      this.location = location;
      }

      public LatLng getLocation() { return this.location; }
      public String getLabel() { return this.label; }
The application’s main activity needs a few new fields. Two of the fields are for holding and displaying the selected destinations. One field is for holding the routing result. The last new field contains style information. The style information will be used to change how a road is rendered. This can be used to convey specific information about the road.
Vector<Destination> waypointList = new Vector<Destination>();

ArrayAdapter<Destination> waypointListAdapter;

FullRoute fullRoute;

Vector<RouteStyle> routeStyleList = new Vector<RouteStyle>();
We also need to change the user interface for the application. We are keeping the text box for fuzzy searches and the map. I’m adding a ListView for displaying the address list and a button for adding addresses to the list.
[]The layout for the main activity now contains the following elements. I’m showing the layout without the constraints for simplicity.
<?xml version="1.0" encoding="utf-8"?>

<androidx.constraintlayout.widget.ConstraintLayout xmlns:android="http://schemas.android.com/apk/res/android"

    xmlns:app="http://schemas.android.com/apk/res-auto"
     xmlns:tools="http://schemas.android.com/tools"
      android:layout_width="match_parent"
      android:layout_height="match_parent"
      tools:context=".MainActivity">

      <AutoCompleteTextView
      android:id="@+id/txtAddress"
      android:hint="@string/address_hint"
      android:visibility="visible"
      />

      <TextView
         android:id="@+id/lblAddress"
      app:layout_constraintBottom_toBottomOf="@+id/txtAddress"
      />

      <Button
     android:id="@+id/btnAddStop"
      />

      <Button

      android:id="@+id/btnFuelSearch"
      android:onClick="onPoiSearchClick"
      android:text="@string/action_search_poi_fuel" />

      <Button
      android:id="@+id/btnCalculateRoute"
      android:onClick="onCalculateRouteButtonClicked"
      android:text="@string/action_calculate_route" />

      <ListView
      android:id="@+id/lvWaypointList"
      android:background="@drawable/border_ui"></ListView>
      <fragment
      android:id="@+id/mapFragment"
      android:name="com.tomtom.online.sdk.map.MapFragment"
      />

      <Button
      android:id="@+id/btnClear"
      android:onClick="onClearButtonClicked"
      android:text="@string/action_clear" />

      <TextView
      android:id="@+id/txtArrivalTimeLabel"
        android:text="@string/arrival_time" />

      <EditText
      android:id="@+id/txtArrivalTime"
      android:hint="@string/time_hint" />

</androidx.constraintlayout.widget.ConstraintLayout>
After the changes we’ve made, you can see the updated user interface below:
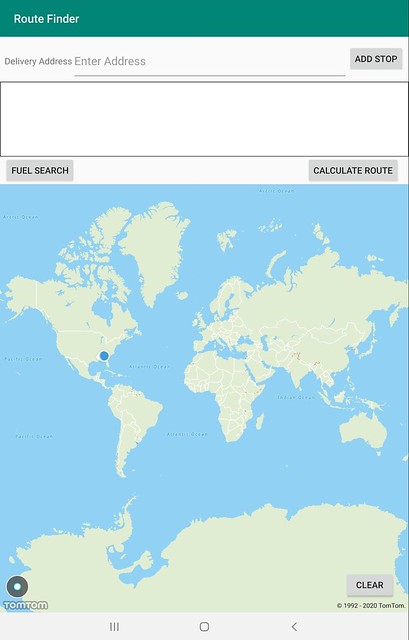
As the user enters an address, the application performs a fuzzy search to find potential matches. After selecting a match, the coordinates of the address are stored in a variable named destination. When the user clicks on the button to add the destination as a stop, the location is added to the waypoint list and the ListView is updated.
public void onAddDestinationButtonClicked(View view) {

      Destination wp = new Destination(destination, txtAddress.getText().toString());
      waypointList.add(wp);
      txtAddress.setText("");
      waypointListAdapter.notifyDataSetChanged();

}
After several items are added to the list, the user can ask for the route. The click handler for the routing button prepares the data for the request and passes it to the requestRoute function where most of the work for the request is done. The phone's current location is used for the starting point of the routing request and the last location is used as the destination. The coordinates for the stops between the two are placed in another list.
public void onCalculateRouteButtonClicked(View view) {
      if(waypointList.size() == 0)
                 return;

      Vector<LatLng> waypoints = new Vector<LatLng>();
      Destination lastWaypoint = waypointList.get(waypointList.size()-1);
      destination = lastWaypoint.getLocation();
      for(int i=0;i<waypointList.size()-1;++i) {
           Destination wp = waypointList.get(i);
           waypoints.add(waypointList.get(i).getLocation());
      }

      LatLng destination = waypointList.get(waypointList.size()-1).getLocation();

      requestRoute(
                 currentLocation,
                 destination,
                 travelMode,
                 waypoints
      );

      hideKeyboard(view);
      tomtomMap.zoomToAllMarkers();
}
The function requestRoute was part of the previous version of this program. Here, it’s been updated to accept an additional parameter for the waypoints. These waypoints are added to the routing query.
private void requestRoute(final LatLng departure, final LatLng destination, TravelMode byWhat,  List<LatLng> waypoints) {

      RouteQuery routeQuery = new RouteQueryBuilder(departure, destination)
            .withRouteType(RouteType.FASTEST)
            .withConsiderTraffic(true)
            .withTravelMode(byWhat)
            .withWayPointsList(waypoints)
            .build();
}
Creating Styles
[]The route displayed by the application now passes through all of the waypoints. But shown as a continuous path, there is no way to distinguish one part of the trip from another. This can be remedied by applying styles to paths.
[]Previously, the entire path was displayed by passing the coordinates that make up the trip to a route builder. Instead of passing all of the coordinates at once, they can be passed in groups with a style applied to each group.
Let’s create a few styles. In the onCreate method we’ll make a few styles that differ in color. Each leg of the trip will be rendered with one of these colors. Color information for a style is encoded as an ARGB 32-bit integer. The first byte is the alpha or transparency value. The next three bytes are for the amount of red, green, and blue in the color.
[]Styles are built using the RouteStyleBuilder. The line properties of interest for these styles are the width, fillColor, and outlineColor. These properties are set using methods on the builder with the prefix with.
To build my styles, I first made a list of the color codes that will go to each style. Then I iterate through the codes and create the style for each one.
int[] colorList = new int[]{

      0x8000FFFF, //teal
      0x8000FF00, //green
      0x800000FF, //blue
      0x80FF00FF  //purple
};

for(int i=0;i<colorList.length;++i) {

      RouteStyle rs =  RouteStyleBuilder.create()
            .withWidth(1.0)
            .withFillColor(colorList[i])
            .withOutlineColor(0x80000000)
            .build();

      routeStyleList.add(rs);
}
In addition to styles for the legs of a trip, I have also made a style for labeling slow traffic conditions. This style uses a red dashed line.
DashDescriptor dashDescription = new DashDescriptor(2.0, 2);

Vector<DashDescriptor> dashList = new Vector<DashDescriptor>();

dashList.add(dashDescription);

badTrafficStyle = RouteStyleBuilder.create()
      .withWidth(0.8)
      .withDashList(dashList)
      .withFillColor(0xFFFF0000)

      .withOutlineColor(0x00000000)

      .build();
To use these styles, the method displayRouteOnMap must be modified. The original version receives a list of the coordinates.
private void displayRouteOnMap(List<LatLng> coordinates) {
      RouteBuilder routeBuilder = new RouteBuilder(coordinates)
                 .isActive(true);
      tomtomMap.clear();
      tomtomMap.addRoute(routeBuilder);
      tomtomMap.displayRoutesOverview();
}
The updated version requires the FullRoute value. FullRoute contains the coordinates organized into groups.
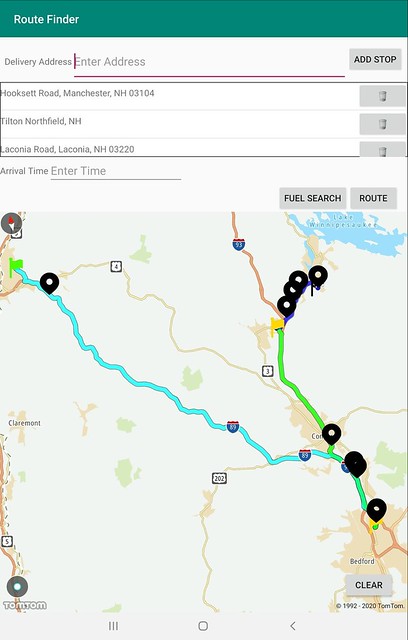
[]The FullRoute.getLegs method returns the coordinates group for each leg of a trip. The first leg is from the user’s starting point to the first waypoint. The second leg is from the first waypoint to the second waypoint, and so on.
[]To add each leg with a different color, iterate through the legs and add the coordinates of each leg using a different style. In addition to using color to mark the paths, each route will also display a flag. The first leg will have a green start flag. Each waypoint will be marked with a yellow flag. The final destination will have a checkered flag.
private void displayRouteOnMap(FullRoute route) {
      Icon endIcon = Icon.Factory.fromResources(getApplicationContext(), R.drawable.ic_checkeredflag);

      Icon waypointIcon = Icon.Factory.fromResources(getApplicationContext(), R.drawable.ic_yellowflag);

              Icon startIcon = Icon.Factory.fromResources(getApplicationContext(), R.drawable.ic_greenflag);

      final int lastLegIndex = route.getLegs().length-1;
      tomtomMap.clear();
      int styleIndex = 0;
      for(RouteLeg leg:route.getLegs()) {
           int trafficDelay = leg.getSummary().getTrafficDelayInSeconds();
           //marking legs with delays longer than 10 minutes as bad traffic
           boolean isBadTraffic = trafficDelay > (10*60);
           isBadTraffic = true;

      LatLng[] legPoints = leg.getPoints();

      //Wrap the points array into a vector list
      Vector<LatLng> legList = new Vector<LatLng>();
      Collections.addAll(legList, legPoints);

      //Build the route with the applied style and add it to the map

      RouteBuilder routeBuilder = new RouteBuilder(legList)
                       .style(routeStyleList.get((styleIndex) % routeStyleList.size()));
      if(styleIndex == 0)
                 routeBuilder.startIcon(startIcon);
      if(styleIndex == lastLegIndex)
                 routeBuilder.endIcon(endIcon);
      else
                 routeBuilder.endIcon(waypointIcon);
      tomtomMap.addRoute(routeBuilder);

      //if this leg has bad traffic, draw a red dashed line over the route

      if(isBadTraffic) {
                 RouteBuilder badTrafficRoute = new RouteBuilder(legList)
                  .style(badTrafficStyle);
                 tomtomMap.addRoute(badTrafficRoute);
      }
          ++styleIndex;

      }
      tomtomMap.displayRoutesOverview();
}
[]If we run the application now and select several waypoints, the legs of the trip are now visually distinct from each other. If you needed to plan a stop, the details for each leg are easy to see — no need to estimate on the fly.

Searching for Points of Interest
[]There may be other places of interest along a route such as gas stations, weigh stations, and places offering other services. Once we have a route result, it can be used as a search parameter for other POI.
[]The constraints for POI are adjustable. I will create a search for fuel stations that can be reached through a detour that is within a certain time constraint from the route. The search could also be for some energy or fuel consumption constraint or consider the business hours of potential matches.
To search along a route, create a new AlongRouteSearchQueryBuilder. Its constructor takes a keyword that characterizes the type of business being sought, the coordinates of the path along which to search, and the maximum amount of time from the planned route allowed (in seconds).
[]For the coordinates, I am using the list of coordinates for the entire route. A search could be constrained to a single leg of a trip by passing the coordinates that make up that leg instead of those of the entire route. The following performs a search for gas stations that can be reached within a five-minute (600-second) deviation. It also sets the maximum number of results to ten items.
final int MAX_DETOUR_TIME = 600;
final int RESULT_LIMIT = 10;

searchApi.alongRouteSearch(
          new AlongRouteSearchQueryBuilder("gas", fullRoute.getCoordinates(), MAX_DETOUR_TIME)
                  .withLimit(RESULT_LIMIT).build()
).subscribeOn(Schedulers.io())
.observeOn(AndroidSchedulers.mainThread())
.subscribe(new DisposableSingleObserver<AlongRouteSearchResponse>() {

      //Body of Observer omitted
 });
The search results are passed back to the observer specified in the subscribe method. The observer must implement the methods onSuccess and onError. For an error, the observer will show a toast notification that the search failed. For success, we want to display the results on the map as markers. If a user touches a marker, it will display text that we choose. The name of the point of interest will be used for the display text.
.subscribe(new DisposableSingleObserver<AlongRouteSearchResponse>() {
      @Override
      public void onSuccess(AlongRouteSearchResponse alongRouteSearchResponse) {
      showSearchResults(alongRouteSearchResponse.getResults());
      }

      @Override
      public void onError(Throwable e) {
          Toast.makeText(MainActivity.this, getString(R.string.no_search_results), Toast.LENGTH_LONG).show();
      }

      private void showSearchResults(List<AlongRouteSearchResult> resultList) {
           if(resultList.isEmpty()) {
                      Toast.makeText(MainActivity.this, R.string.no_search_results, Toast.LENGTH_SHORT).show();
                 return;
      }

      for(AlongRouteSearchResult result:resultList) {
                LatLng position = result.getPosition();
                  String poiName = result.getPoi().getName();
                 SimpleMarkerBalloon markerBalloonData = new SimpleMarkerBalloon(poiName);
                 markerBalloonData.addProperty(getString(R.string.address_key), address);

                 MarkerBuilder markerBuilder = new MarkerBuilder(position)
                  .markerBalloon(markerBalloonData)
                 .shouldCluster(true);
                 tomtomMap.addMarker(markerBuilder);

      }
     }

});
Taking it Further
With the TomTom Maps SDK it is easy to build applications for location search and navigation. We were able to extend the previous application to route through multiple stops and search for points of interest along the way.
If you would like to know more about how to track vehicles when they are on the road, check out our Asset and Vehicle Tracking demo.
You can get started with using the Maps SDK for Android by registering for a free developer account. If you would like to learn more about the TomTom Maps SDK for Android, check out the following links: