How to Reconstruct a Route from Data Points with the Snap to Roads API
)
In this easy-to-follow tutorial, you’ll learn about the TomTom Snap to Roads API and how you can use it to reconstruct a route. We’ll also show you how to integrate the route into an app (we’ve used React here, but you can also use Angular or Vue) to ensure you get a perfect reconstruction.
If you work in fleet management, you’ll likely encounter situations where you need to map a route using data points or coordinates. Whether you’re trying to reconstruct a trip to verify mileage, determine where a delay occurred, or plan for future optimization, you can use the TomTom Snap to Roads API to draw route information based on the coordinates you feed into it.
The person or system using the API feeds several coordinates for a known route and other optional information such as the heading, timestamp, and vehicle types. After that, it communicates with the TomTom engine, which returns the route information.
In this tutorial, we will recreate part of a highway using coordinates from a GPX trace.
Next, we’ll feed this information to the Snap to Roads API, which will return the highway’s route information. Then, to confirm that the Snap to Roads API returned the correct routes, we’ll use TomTom’s Maps SDK to display the road using the coordinates returned.
Prerequisites
Before getting started, you need to have:
An understanding of JavaScript
An understanding of the React library. Even though we’ll use React in this tutorial, you can use the insights gained to implement the concept using Angular, Vue, or any other JavaScript framework you prefer.
Node.js installed in your system, since we’ll use npm to create the React app and install its dependencies. You may also use Yarn.
A TomTom developer API key. If you haven’t yet, sign up for a free TomTom developer account.
Setting up
In your working folder, create a react app called tomtom-snap-to-roads by running the commands below.
npx create-react-app tomtom-snap-to-roads
cd tomtom-snap-to-roads
Then, store your API key in an environment variable to avoid explicitly storing it in your file. You can do that by running the following command:
REACT_APP_API_KEY="<YOUR-API-KEY>" npm startThe app will launch at localhost:3000.
We’ll need the TomTom Map SDK and the Map Web Services dependencies. Install them using:
npm i @tomtom-international/web-sdk-maps @tomtom-international/web-sdk-servicesFirst, we need to add CSS styling to size the map container correctly in the App.css file. This app is found in the React directory (tomtom-snap-to-roads). Open it and add this code:
.routeMapDemo {
  height: 100vh;
}
In the same directory, open the App.js file and clear its contents. This will prevent errors that may arise when trying to modify the code. In the tutorial, we’ll add the code we need in a step-by-step fashion.
Add the following lines to import the required modules:
import './App.css';
import '@tomtom-international/web-sdk-maps/dist/maps.css'
import mapSDK from '@tomtom-international/web-sdk-maps'
import mapServices from '@tomtom-international/web-sdk-services'
import { React, useState, useEffect, useRef } from 'react'
And then add the following skeleton functional component to it.
function App() {
  return (
    <div className="App">
      <div ref={mapContainer} className="routeMapDemo" />
    </div>
  );
}
export default App;
Adding the Code to the App Functional Component
Let’s start by adding the constants to store our API key, the map container, zoom level, and the map.
  const API_KEY = process.env.REACT_APP_API_KEY;
  const mapContainer = useRef();
  //use this to change the zoom level of the map
  const [zoomLevel, setZoomLevel] = useState(3);
Create and initialize a variable for storing the Traffic Flow URL endpoint.
let traffic_flow_url = encodeURI('https://api.tomtom.com/traffic/services/4/flowSegmentData/relative0/12/json?point=38.219901,-85.773140&unit=KMPH&openLr=false&key=' + API_KEY);We passed a point found on the Kentucky Highway. You can use various methods to get the coordinates of a route, including the Reverse Geocoding API. For simplicity, we added coordinates of a route manually using the coords_arr array. The coordinates can be found here. Note that we start with the longitude and then the latitude, which we will need soon pass into the Snap to Roads API.
But first, we need to retrieve the latitude and longitude and correctly set them to the coordinates that the API needs. To do that, let’s create a function called mainProcessor.
async function mainProcessor(targetMap) {

    let coords_arr = [//Add the linked coordinates here]

  let coords_length = coords_arr.length
  let full_coord = ""

    coords_arr.forEach((coordinate, index) => {
      //whenever a comma is encountered, split the text into an array
      let points = coordinate.split(",")
      //accessing the latitude and longitude from the split array

      let latitude = points[0]
      let longitude = points[1]
      full_coord = full_coord.concat(longitude + "," + latitude)
      if (index < (coords_length - 1)) {
        full_coord = full_coord.concat(";")
      }

    });

    //fields object
    let fields  = "{projectedPoints{type,geometry{type,coordinates},properties{routeIndex,snapResult}},route{type,geometry{type,coordinates},properties{id,linearReference,speedLimits{value,unit,type},address{roadName,roadNumbers,municipality,countryName,countryCode,countrySubdivision},traveledDistance{value,unit},privateRoad,partOfTunnel,urbanArea,elementType,frc,formOfWay,roadUse,laneInfo{numberOfLanes},heightInfo{height,chainage,unit},trafficSigns{signType,chainage,unit},trafficLight}},distances{total,ferry,road,privateRoad,publicRoad,offRoad,unit}}"

    let snap_to_roads_url = 'https://api.tomtom.com/snap-to-roads/1/snap-to-roads?points=' + full_coord + '&fields='+ fields +'&key=' + API_KEY
    snap_to_roads(snap_to_roads_url, targetMap)
  }
The function uses an async await function to load the response and a for-each loop to extract the array’s contents. In the for-each loop, we use an arrow function to append the coordinates to a string and separate them using a semicolon. The if statement prevents the code from appending the semicolon after the last coordinate. The fields object specifies what to include in the API’s response.
We have the snap_to_roads URL, which was retrieved from the API’s documentation page. At the end of the function, we call a function called snap_to_roads, which is used to get the reconstructed routes and draw the map. We’ll add that later. Let’s break a bit and talk about the Snap to Roads API.
A Brief Overview of the Snap to Roads API
When you visit the Snap to Roads API Explorer page, you’ll see these endpoints:

There are two sections, the Synchronous Snap to Roads API and Asynchronous Snap to Roads API. We’ve already introduced the first one. The second is used for sending snap requests in batches. That is, we can send multiple Snap to Roads API requests at once. The Asynchronous API returns a batch ID in response, which we can use to track a batch’s status or download it using the next two endpoints. We won’t discuss the asynchronous API since this tutorial focuses on the synchronous type.
Synchronous and asynchronous APIs have something in common: Both have the fields parameter in the request body. The engine uses this to know what to include in the response. One notable difference between the asynchronous and synchronous API is that we can pass in the geometry and type of a point in the request body of the asynchronous API.
Let’s focus on the synchronous API, for which we’ll use the GET endpoint. Click the down arrow to explore the parameters you can pass in the endpoint. Try feeding in some coordinates and click the EXECUTE button to see the response. Leave the fields parameter as it is.
You’ll see a response like the one below. This was downloaded and rendered in another program, which accounts for the difference in appearance.
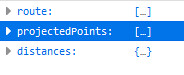
It returns the route, the point details we fed to the request, their snap results (if matched or not), and the distance.
We’re interested in the route, so let’s check it out.

It contains all the points in order, capturing their type and geometry. The geometry object includes the shape, meaning the graphical type of the point. The coordinates of the line string are also contained in the geometry object. In a line string, there must be at least two points.
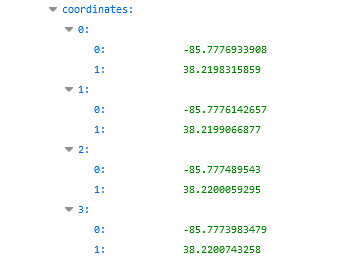
For the properties, we get information such as the speed limit, road address, lane information, and so on.

That’s enough theory. Let’s proceed with creating the React app.
Getting the Reconstructed Coordinates and Displaying the Map
Add the snap_to_roads function we introduced in the last snippet.
  async function snap_to_roads(snapUrl, targetMap) {
    let snap_response = await fetch(snapUrl);
    let roads_data = await snap_response.json();
    let routes_arr = roads_data.route

    //extracting the coordinates for setting the map's boundaries
    let boundary_coordinates = routes_arr[0].geometry.coordinates
    routes_arr.forEach((point, index) => {
      boundary_coordinates = boundary_coordinates.concat(point.geometry.coordinates)
    });

    //setting the GEOJSON object required for the map display
    //choosing the first route object to give us a quick GeoJSON-ready object
    routes_arr[0].geometry.coordinates = boundary_coordinates
    let mapGeoJsonObj = routes_arr[0]

    drawMap(targetMap, boundary_coordinates, mapGeoJsonObj)

  }
Just like the previous code, we use an async await function to get the responses and then process the coordinates. Since GeoJSON objects are needed for the map display, we will need to create one. The response from Snap-to-roads returns many of them in individual snapped segments, so we need to extract the coordinates and set them to one object. Instead of writing, a string, appending the coordinates, and converting it to JSON format, we will use a simpler option. We take advantage of GeoJSON objects returned by the API. We choose one snapped segment and set the extracted coordinates to it using this line.
routes_arr[0].geometry.coordinates = boundary_coordinatesNote that the coordinates will be used to set the map’s boundaries, that’s why we named them boundary_coordinates.
To display the map, we’ll use a helper function to avoid long code in the snap_to_roads function.
Below is the code for drawing the map:
async function drawMap(targetMap, boundaryCoords, geojsonObj) {
    try {
      setMapBounds(targetMap, boundaryCoords)
      targetMap.addLayer({
        'id': 'routeDemo',
        'type': 'line',
        'source': {
          'type': 'geojson',
          'data': geojsonObj
        },
        'paint': {
          'line-color': '#ff0000',
          'line-width': 8
        }
      });
    } catch (e) {
      console.log(e)
    }
  }
We start with setting the map bounds of the map section we want to display. We use a function called setMapBounds which we’ll look at later.
The map contains a method called addLayer, which is used to add map layers to an existing map. We’ll use it to add a road marking layer to denote the reconstructed road. First, we add a layer ID and the type. Next, a source object representing the data to be added to the layer is added. Finally, a color and line width are added using an object called paint.
Below is the setMapBounds method:
  function setMapBounds(targetMap, coordinatesObj) {
    let mapBounds = new mapSDK.LngLatBounds();
    coordinatesObj.forEach((point) => {
      mapBounds.extend(mapSDK.LngLat.convert(point));
    });
    targetMap.fitBounds(mapBounds, { duration: 0, padding: 50 });
  }
We start by creating a LngLatBounds object called mapBounds. Next, we extract points from the GeoJSON data from the call to the calculateRoute method.
The mapBounds extend method zooms the map to the appropriate level depending on the points passed to it. The points should be in the LngLat object format. That’s why we convert each point first using the LngLat.convert method.
Finally, we fit the map to the set bounds using the fitBounds method. This method takes the map’s bounds as the first parameter and the options object as the last parameter. The options object is used to set an animation duration and the padding around the map.
To load the map on the page load, we need a useEffect hook. Add it using the code below:
  useEffect(() => {
    let ourMap = mapSDK.map({
      key: API_KEY,
      container: mapContainer.current,
      zoom: zoomLevel
    });
    setMap(ourMap);
    ourMap.on('load', 'routeDemo' ,mainProcessor(ourMap));
    return () => ourMap.remove();
  }, []);
The map is initialized using the Map SDK while passing in the API key, the container for rendering the map, and the zoom level. We also call our mainProcessor method here to perform what we’ve discussed. We then remove the map during a reload to recreate a fresh one.
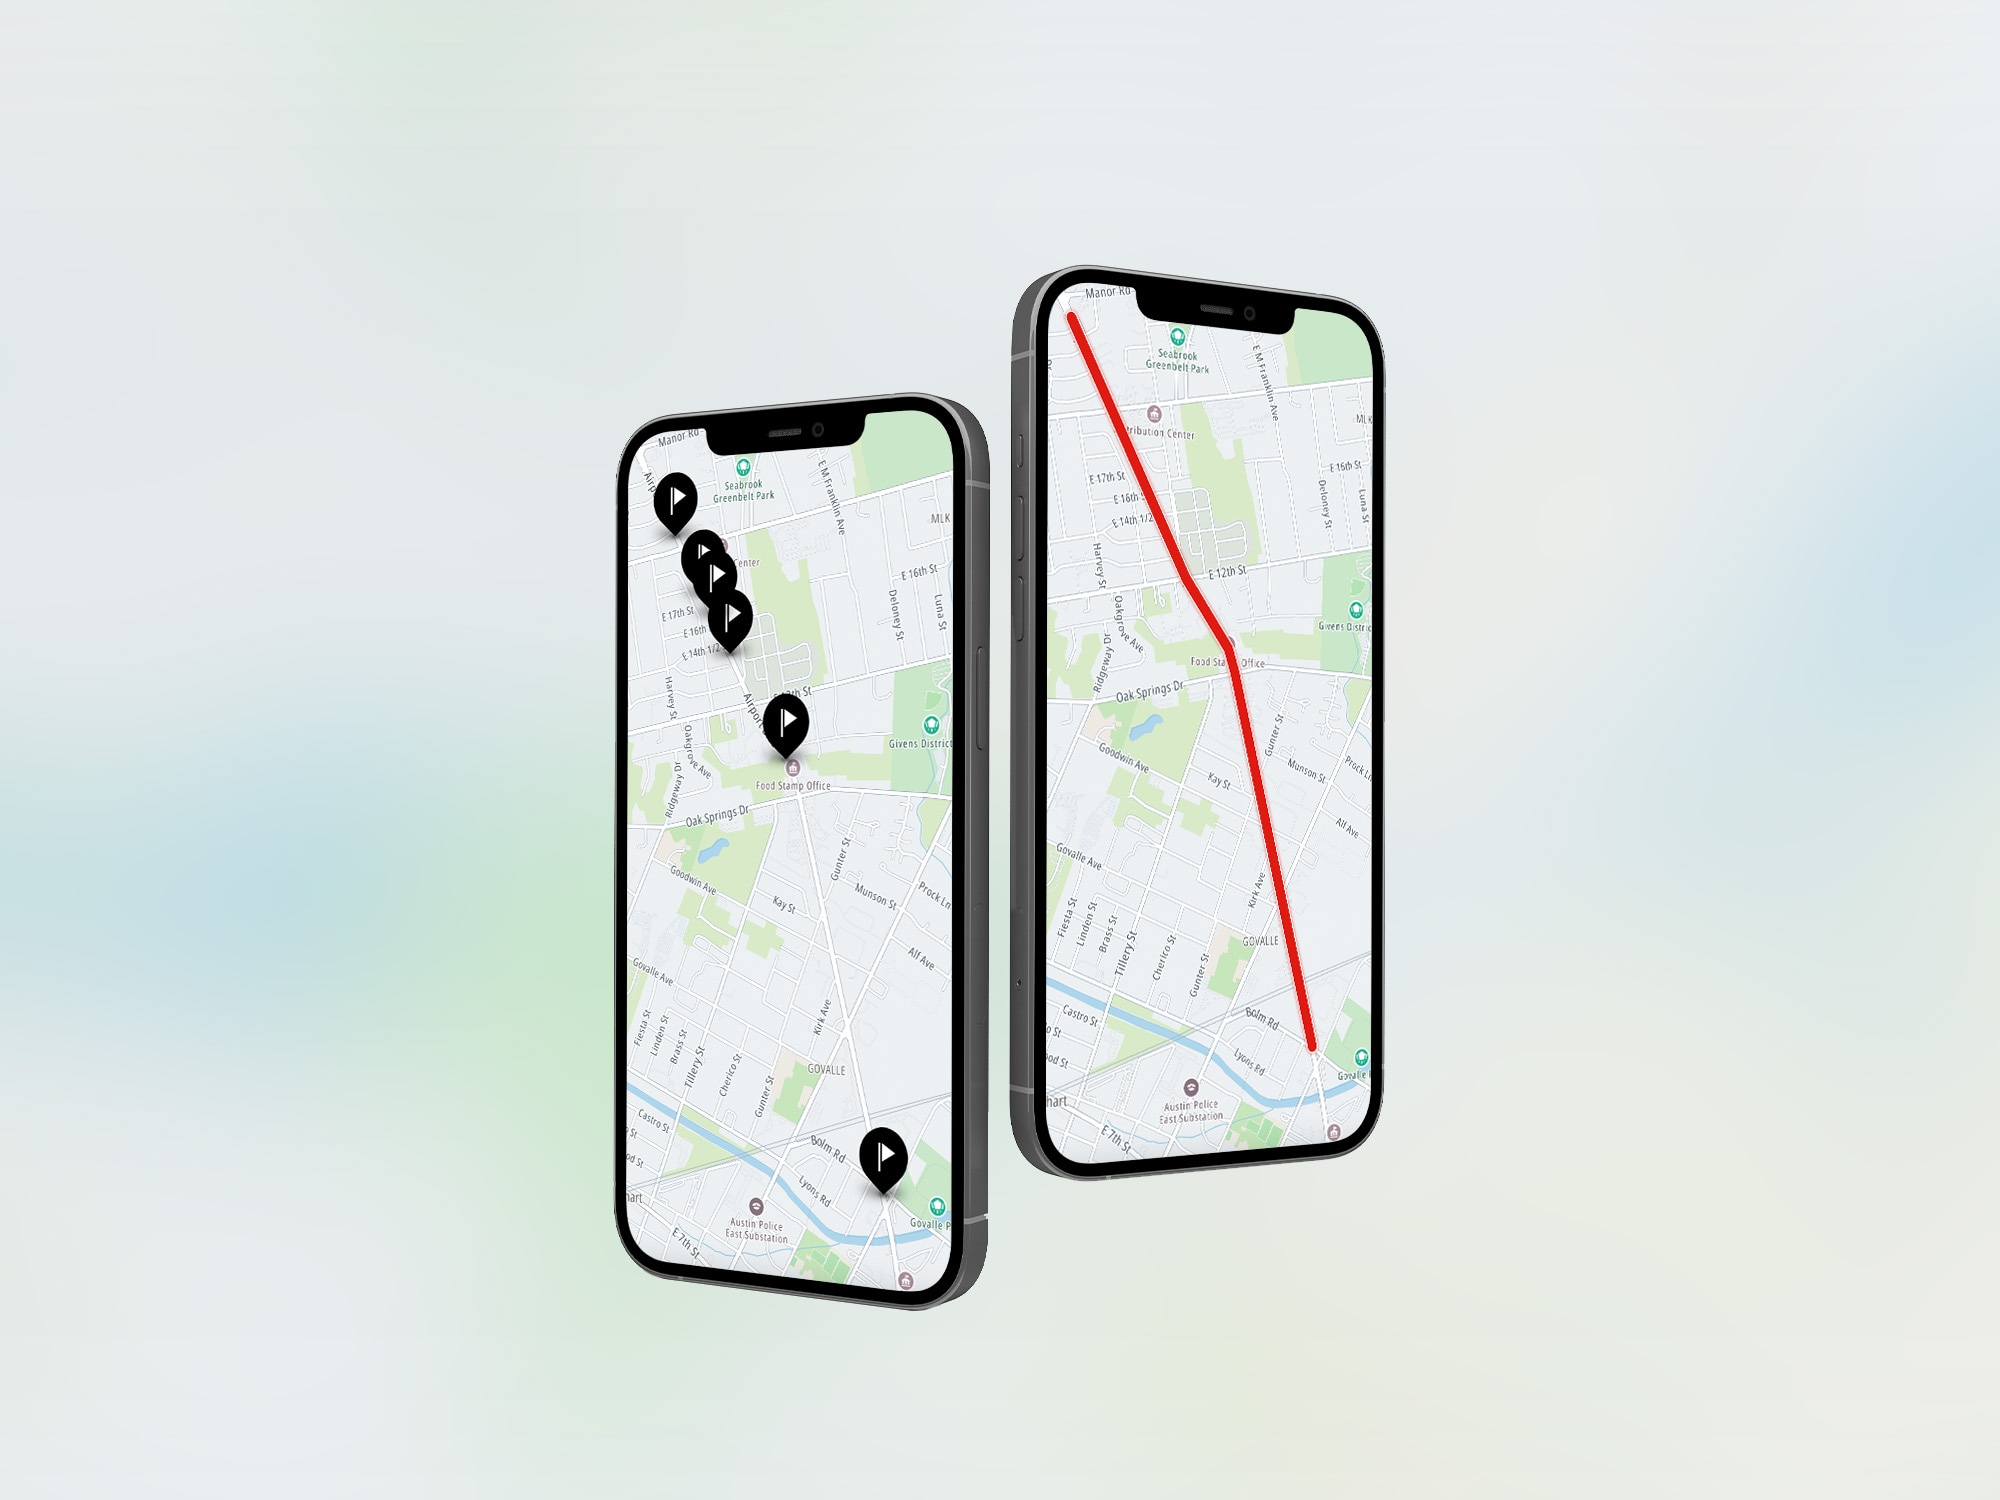
The image below will be rendered upon running the app:

Conclusion
In this tutorial, we learned about the Snap to Roads API and then saw how to integrate it into a React app. In the integration process, we discussed the API further. Some observations we made are:
Provide enough coordinates.
Check your inputs to the request body.
Now that you have a roadmap, try the API out yourself. You can display information about a route using popups, display traffic information, and do many other wonderful things using the Snap to Roads API.