Taxi cars dispatcher
Deprecation notice
February 01, 2025
- Maps SDK for Web V6 has been deprecated.
- The SDK CDN endpoints and Plugins CDN endpoints will be withdrawn following a 12 months deprecation period.
- The planned withdrawal date is February 01, 2026.
- Following withdrawal, requests to the CDN endpoints will return a 404 HTTP status code.
- Please note: For customers whose contracts extend beyond February 01, 2026, the service will continue to operate until the end of your contractual period. If you have any questions or need further assistance, please contact us.
Explore our new Maps SDK for JavaScript, currently in Public Preview.
Intro
This tutorial shows you how to create a web application for a taxi company using version 6 of the TomTom Maps SDK for Web.
It's not easy to identify which taxi can get the fastest to the customer by just looking at the map. Using the Calculate Route service you can obtain the travel time of each individual taxi to a particular point, in this case, a passenger. In this application you will use this service so that the dispatcher will pick the taxi that reaches the customer the fastest way.
In this tutorial you will create a map with markers pointing at taxis and passenger's locations. The application calculates each route and chooses the fastest one.
Prerequisites:
To start using the TomTom Maps SDK for Web, you need an API Key. If you don't have it, please visit a How to get a TomTom API key site and create one.
Map initialization
To display a TomTom map use the following code. You can just copy and paste it to your favorite code editor.
1<!DOCTYPE html>2<html>3 <head>4 <title>Taxi cars dispatcher</title>5 <meta charset="UTF-8" />6 <!-- Replace version in the URL with desired library version -->7 <link8 rel="stylesheet"9 type="text/css"10 href="https://api.tomtom.com/maps-sdk-for-web/cdn/6.x/<version>/maps/maps.css"11 />12 <script src="https://api.tomtom.com/maps-sdk-for-web/cdn/6.x/<version>/maps/maps-web.min.js"></script>13 <script src="https://api.tomtom.com/maps-sdk-for-web/cdn/6.x/<version>/services/services-web.min.js"></script>14 <style>15 body {16 margin: 017 }18 #map {19 height: 100vh;20 width: 100vw;21 }22 </style>23 </head>2425 <body>26 <div id="map"></div>27 <script>28 const apiKey = "<your-api-key>"29 const map = tt.map({30 key: apiKey,31 container: "map",32 center: [4.876935, 52.360306],33 zoom: 13,34 })35 </script>36 </body>37</html>
Note that the container parameter of tt.map constructor requires the same value as the id of a
HTML <div> element where the map will be embedded. Replace <your-api-key> placeholder with
your API Key.
You can find the custom markers used for this tutorial on GitHub.
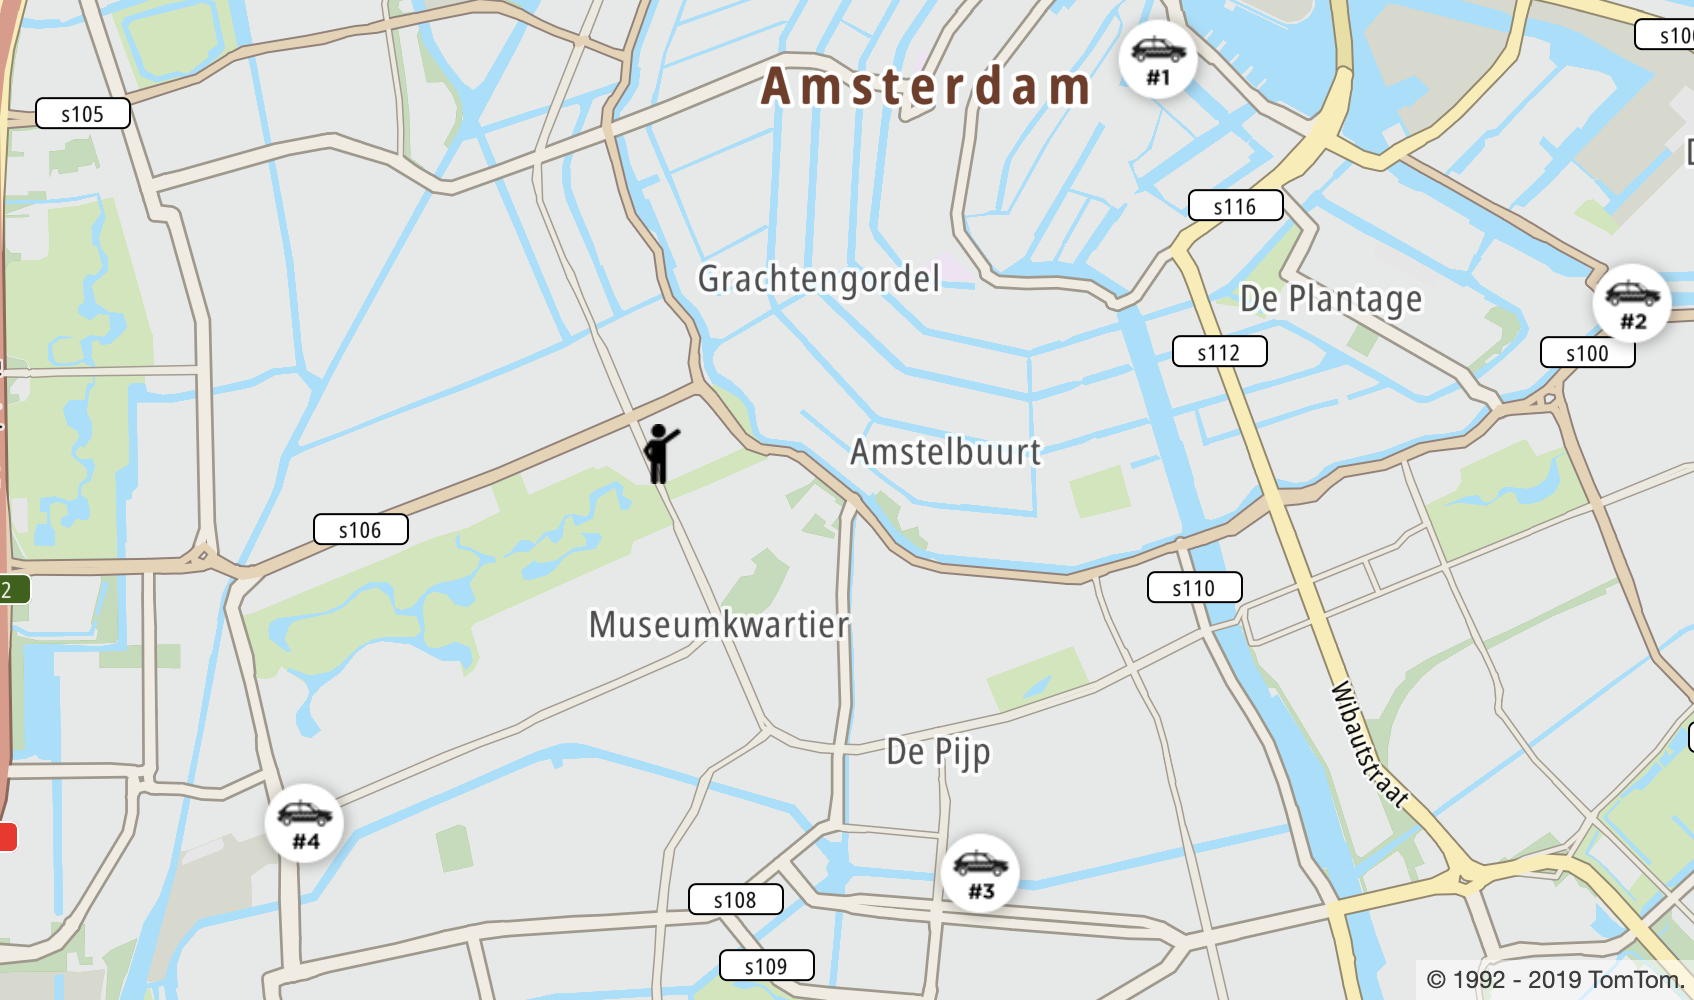
Passenger
Add a passenger marker to the map.
To add the passenger marker into the map:
- First: You need to add variables to the JavaScript section:
passengerInitCoordinates,passengerMarker, and acreatePassengerMarker(markerCoordinates, popup)function. - Second: The
passengerInitCoordinatesvariable needs to be declared before the map initialization.
1const passengerInitCoordinates = [4.876935, 52.360306]2let passengerMarker34function createPassengerMarker(markerCoordinates, popup) {5 const passengerMarkerElement = document.createElement("div")6 passengerMarkerElement.innerHTML =7 "<img src='img/man-waving-arm_32.png' style='width: 30px; height: 30px';>"8 return new tt.Marker({ element: passengerMarkerElement })9 .setLngLat(markerCoordinates)10 .setPopup(popup)11 .addTo(map)12}
To center the map on the passenger, replace the map definition like the one in the following example:
1const map = tt.map({2 key: apiKey,3 container: "map",4 center: passengerInitCoordinates,5 zoom: 13,6})
Ensure that the placeholder has been replaced by your API Key.
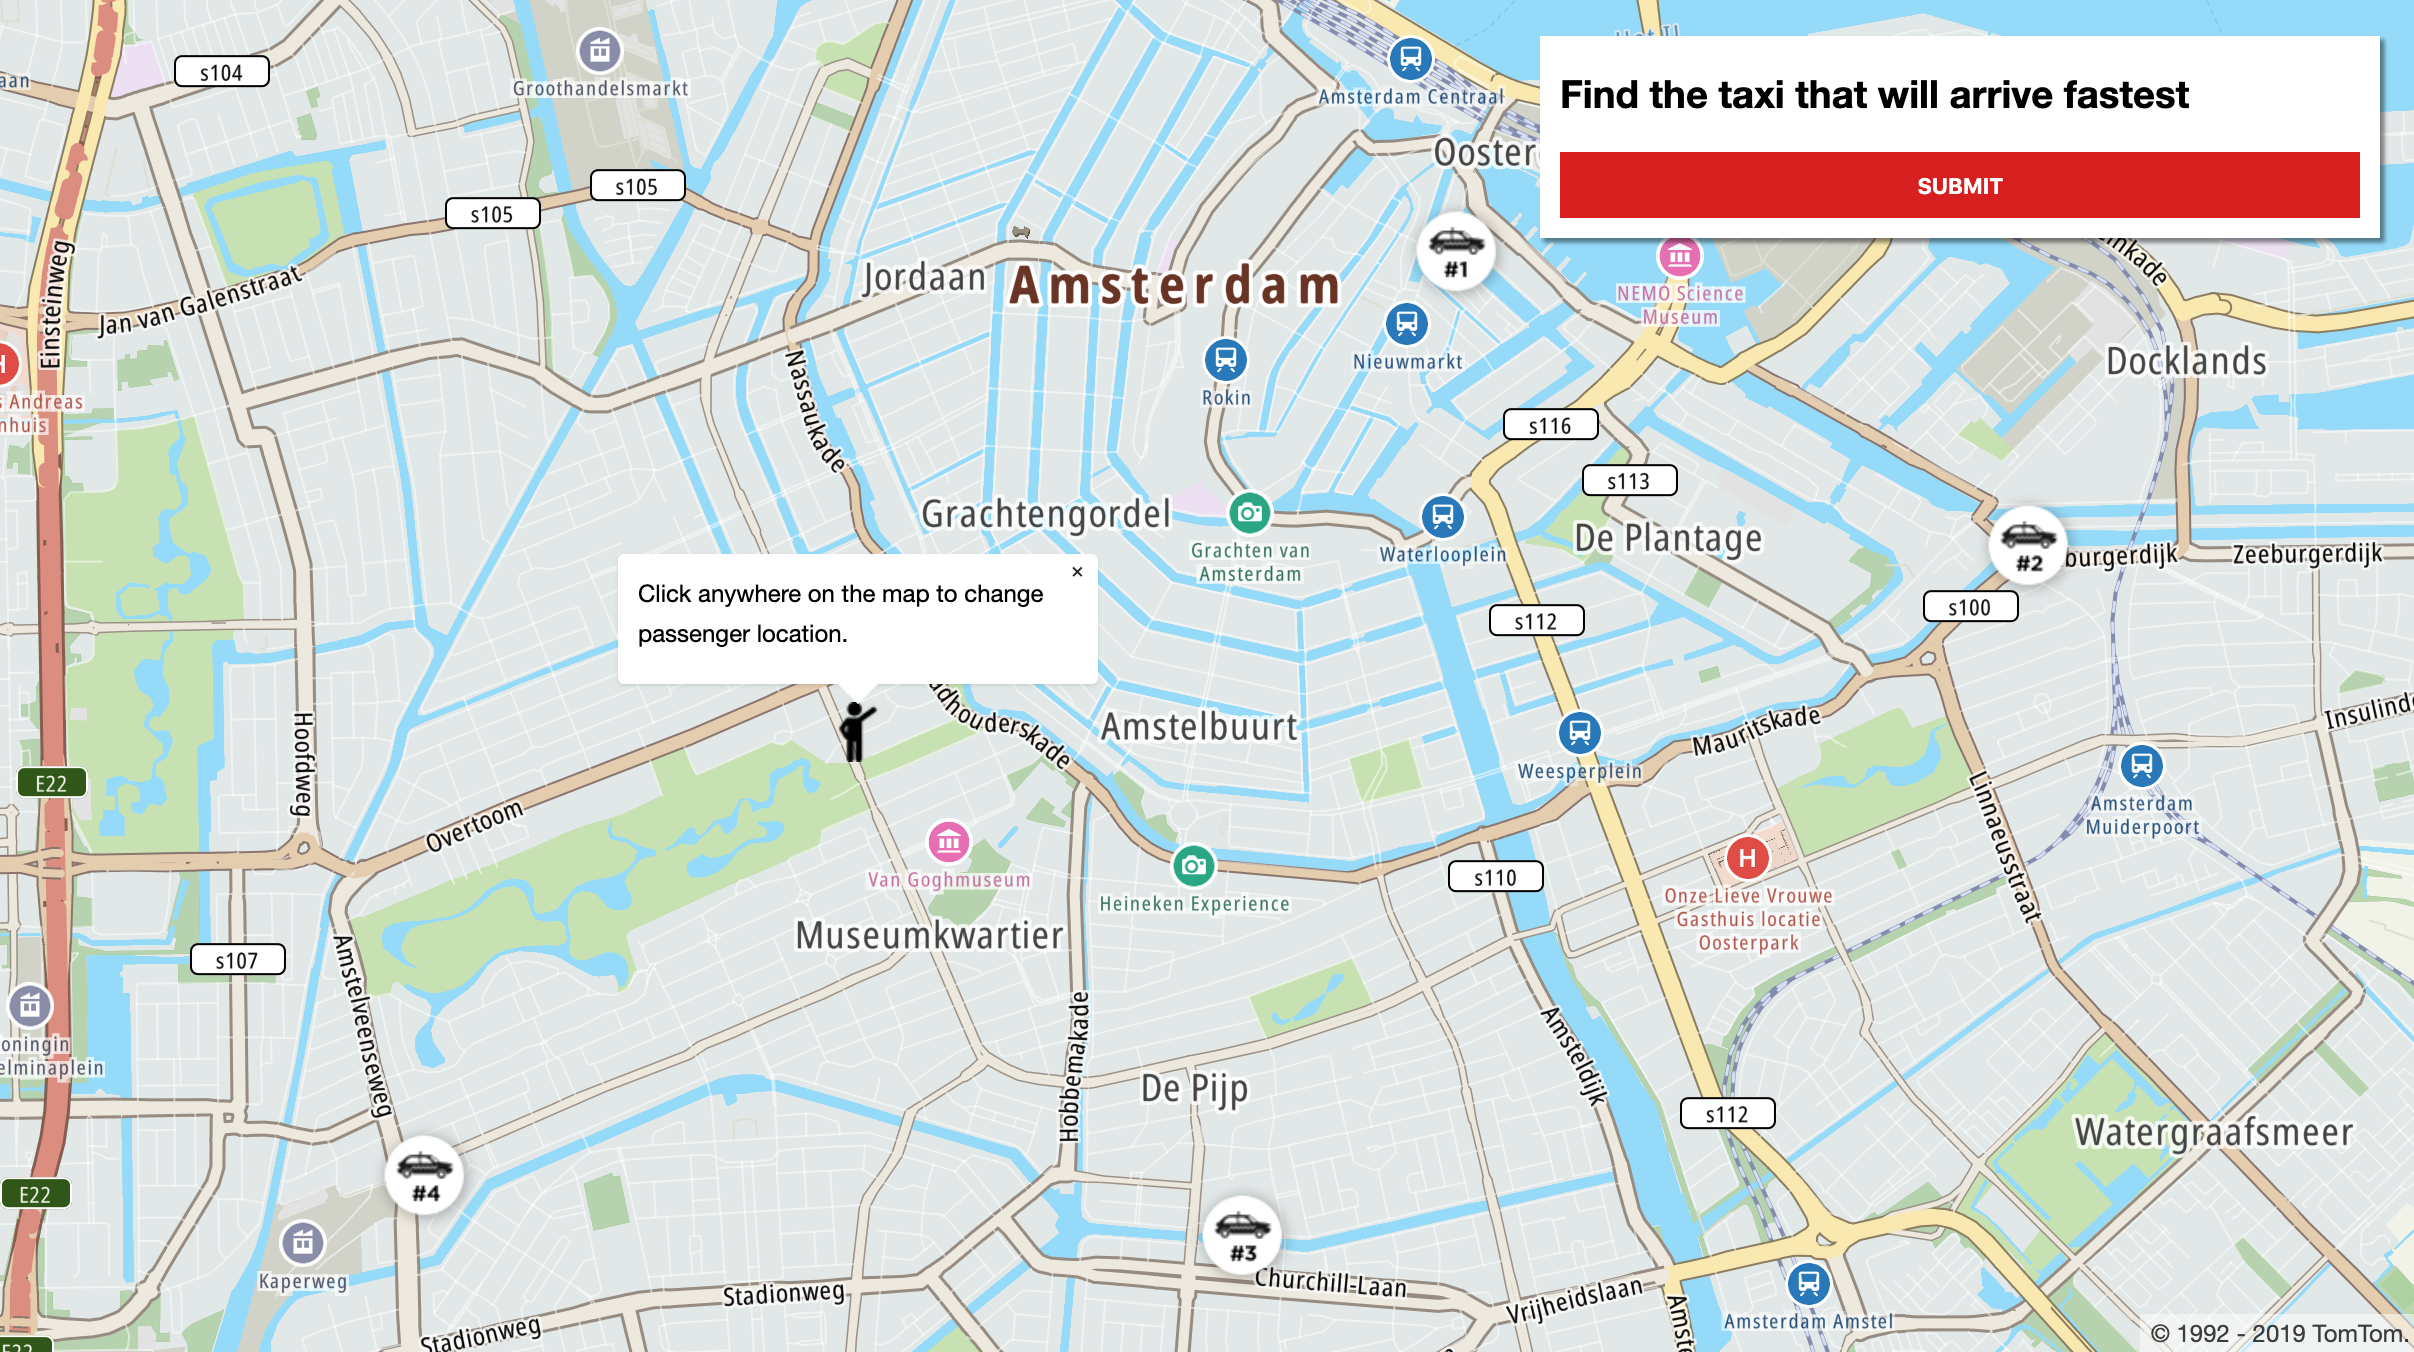
The following code puts the passenger marker on the map and opens a popup.
1passengerMarker = createPassengerMarker(2 passengerInitCoordinates,3 new tt.Popup({ offset: 35 }).setHTML(4 "Click anywhere on the map to change passenger location."5 )6)78passengerMarker.togglePopup()
Change the passenger marker position.
Now you can add a feature that allows users to click on the map to move a passenger. To do so, add an event listener on map click.
- In the handler function, call the
reverseGeocodemethod with a position parameter from the event’s propertygeoResponse. - In the
thenmethod define a callback that executes adrawPassengerMarkerOnMapfunction.
Add a conditional statement in the drawPassengerMarkerOnMap function: if the Reverse Geocoding
Response contains an address, then a marker with the previous position is removed and a new one is
created at the indicated location.
1function drawPassengerMarkerOnMap(geoResponse) {2 if (3 geoResponse &&4 geoResponse.addresses &&5 geoResponse.addresses[0].address.freeformAddress6 ) {7 passengerMarker.remove()8 passengerMarker = createPassengerMarker(9 geoResponse.addresses[0].position,10 new tt.Popup({ offset: 35 }).setHTML(11 geoResponse.addresses[0].address.freeformAddress12 )13 )14 passengerMarker.togglePopup()15 }16}
Now you can add an event that draws the passenger marker each time you click on the map area.
1map.on("click", function (event) {2 const position = event.lngLat3 tt.services4 .reverseGeocode({5 key: apiKey,6 position: position,7 })8 .then(function (results) {9 drawPassengerMarkerOnMap(results)10 })11})
Taxi cabs
Add the taxi markers definition, where the coordinates for taxi cabs are fixed for simplicity.
1let taxiConfig2function setDefaultTaxiConfig() {3 taxiConfig = [4 createTaxi("CAR #1", "#006967", [4.902642, 52.373627], "img/cab1.png"),5 createTaxi("CAR #2", "#EC619F", [4.927198, 52.365927], "img/cab2.png"),6 createTaxi("CAR #3", "#002C5E", [4.893488, 52.347878], "img/cab3.png"),7 createTaxi("CAR #4", "#F9B023", [4.858433, 52.349447], "img/cab4.png"),8 ]9}1011function createTaxi(12 name,13 color,14 coordinates,15 iconFilePath,16 iconWidth = 55,17 iconHeight = 5518) {19 return {20 name: name,21 color: color,22 icon:23 "<img src=" +24 iconFilePath +25 " style='width: " +26 iconWidth +27 "px; height: " +28 iconHeight +29 "px;'>",30 coordinates: coordinates,31 }32}
Add the taxi cabs into the map and an initialization of the setDefaultTaxiConfig function.
1setDefaultTaxiConfig()23taxiConfig.forEach(function (taxi) {4 const carMarkerElement = document.createElement("div")5 carMarkerElement.innerHTML = taxi.icon6 new tt.Marker({ element: carMarkerElement, offset: [0, 27] })7 .setLngLat(taxi.coordinates)8 .addTo(map)9})
Submit button
To add the Submit button, the map <div> tag needs to be updated with the following code:
1<div id="map"></div>2<div id="labels-container">3 <label>Find the taxi that will arrive fastest</label>4 <div id="route-labels"></div>5 <input type="button" id="submit-button" value="Submit" />6</div>
To see the button on the map, you need to add CSS styles.
1#submit-button {2 background: #df1b12;3 padding: 10px;4 margin-top: 10px;5 width: 100%;6 color: white;7 font-weight: bold;8 transition: background-color 0.15s ease-in-out;9 text-transform: uppercase;10 border: none;11 outline: none;12}1314#submit-button:hover {15 cursor: pointer;16 background: #b1110e;17}1819#labels-container {20 font-family: "Helvetica Neue", Arial, Helvetica, sans-serif;21 position: fixed;22 top: 10px;23 right: 10px;24 width: 400px;25 padding: 10px;26 margin: 10px;27 background-color: white;28 box-shadow: rgba(0, 0, 0, 0.45) 2px 2px 2px 0px;29}3031#labels-container label {32 line-height: 2;33 font-size: 1.2em;34 font-weight: bold;35}3637#labels-container #route-labels div {38 border-left: 6px solid;39 padding-left: 5px;40 margin-top: 3px;41}4243#route-labels div:hover {44 cursor: pointer;45 box-shadow: 0px 2px #888888;46}
Clear routes
To clear routes we need to first declare a variable.
let routes = []
The clear function:
- Removes routes from the map.
- Clears the
routesarray. - Calls
setDefaultTaxiConfig.
1function clear() {2 routes.forEach(function (child) {3 map.removeLayer(child[0])4 map.removeLayer(child[1])5 map.removeSource(child[0])6 map.removeSource(child[1])7 })8 routes = []9 setDefaultTaxiConfig()10 passengerMarker.togglePopup()11}
Next, the clear function can be embedded into submitButtonHandler.
1function submitButtonHandler() {2 clear()3}
Don’t forget to assign the submitButtonHandler listener to the button in the HTML document.
1document2 .getElementById("submit-button")3 .addEventListener("click", submitButtonHandler)
Now you can go to the next chapter where the clear function can be used.
Draw routes
The variables: routeWeight and routeBackgroundWeight need to be initialized as in the following
example.
const routeWeight = 9const routeBackgroundWeight = 12
For convenience, let's also create a taxiPassengerBatchCoordinates array and
a updateTaxiBatchLocations(passengerCoordinates) function which will be helpful with preparing
data for
a Batch Routing
call later.
1let taxiPassengerBatchCoordinates = []23function updateTaxiBatchLocations(passengerCoordinates) {4 taxiPassengerBatchCoordinates = []5 taxiConfig.forEach((taxi) => {6 taxiPassengerBatchCoordinates.push(7 taxi.coordinates + ":" + passengerCoordinates8 )9 })10}
Call the updateTaxiBatchLocations(passengerCoordinates) function right after
the setDefaultTaxiConfig();.
setDefaultTaxiConfig()updateTaxiBatchLocations(passengerInitCoordinates)
The drawAllRoutes function uses the calculateRoute method to get JSON objects with that route’s
geometry coordinates for each four taxi locations inside the taxiPassengerBatchCoordinates array
and a current passenger location.
- The JSON is used to create GeoJSON route layers by calling a
buildStylefunction. - Created layers are then added to the map.
1let bestRouteIndex23function drawAllRoutes() {4 tt.services5 .calculateRoute({6 batchMode: "sync",7 key: apiKey,8 batchItems: [9 { locations: taxiPassengerBatchCoordinates[0] },10 { locations: taxiPassengerBatchCoordinates[1] },11 { locations: taxiPassengerBatchCoordinates[2] },12 { locations: taxiPassengerBatchCoordinates[3] },13 ],14 })15 .then(function (results) {16 results.batchItems.forEach(function (singleRoute, index) {17 const routeGeoJson = singleRoute.toGeoJson()18 const route = []19 const route_background_layer_id = "route_background_" + index20 const route_layer_id = "route_" + index2122 map23 .addLayer(24 buildStyle(25 route_background_layer_id,26 routeGeoJson,27 "black",28 routeBackgroundWeight29 )30 )31 .addLayer(32 buildStyle(33 route_layer_id,34 routeGeoJson,35 taxiConfig[index].color,36 routeWeight37 )38 )3940 route[0] = route_background_layer_id41 route[1] = route_layer_id42 routes[index] = route4344 if (index === bestRouteIndex) {45 const bounds = new tt.LngLatBounds()46 routeGeoJson.features[0].geometry.coordinates.forEach(function (47 point48 ) {49 bounds.extend(tt.LngLat.convert(point))50 })51 map.fitBounds(bounds, { padding: 150 })52 }5354 map.on("mouseenter", route_layer_id, function () {55 map.moveLayer(route_background_layer_id)56 map.moveLayer(route_layer_id)57 })5859 map.on("mouseleave", route_layer_id, function () {60 bringBestRouteToFront()61 })62 })63 bringBestRouteToFront()64 })65}6667function bringBestRouteToFront() {68 map.moveLayer(routes[bestRouteIndex][0])69 map.moveLayer(routes[bestRouteIndex][1])70}7172function buildStyle(id, data, color, width) {73 return {74 id: id,75 type: "line",76 source: {77 type: "geojson",78 data: data,79 },80 paint: {81 "line-color": color,82 "line-width": width,83 },84 layout: {85 "line-cap": "round",86 "line-join": "round",87 },88 }89}
The route layer is drawn twice to create an outline:
route[0](route_background_layer_id) in black, with a thick stroke.route[1](route_layer_id) using the color from config and a normal stroke.
Add a processMatrixResponse function. It extracts 3 elements from each Response and uses them to
populate 3 separate arrays:
- travel times
- route lengths
- traffic delays
1function processMatrixResponse(result) {2 const travelTimeInSecondsArray = []3 const lengthInMetersArray = []4 const trafficDelayInSecondsArray = []5 result.matrix.forEach(function (child) {6 travelTimeInSecondsArray.push(7 child[0].response.routeSummary.travelTimeInSeconds8 )9 lengthInMetersArray.push(child[0].response.routeSummary.lengthInMeters)10 trafficDelayInSecondsArray.push(11 child[0].response.routeSummary.trafficDelayInSeconds12 )13 })14 drawAllRoutes()15}
Next, add the functions: convertToPoint, buildDestinationsParameter, and buildOriginsParameter.
1function convertToPoint(lat, long) {2 return {3 point: {4 latitude: lat,5 longitude: long,6 },7 }8}910function buildOriginsParameter() {11 const origins = []12 taxiConfig.forEach(function (taxi) {13 origins.push(convertToPoint(taxi.coordinates[1], taxi.coordinates[0]))14 })15 return origins16}1718function buildDestinationsParameter() {19 return [20 convertToPoint(21 passengerMarker.getLngLat().lat,22 passengerMarker.getLngLat().lng23 ),24 ]25}
The callMatrix function uses a matrixRouting method to create a Request for
the Matrix Routing API.
- The
gomethod then calls the API asynchronously, to allow for service processing time. - Use the
thenfunction to define a callback that processes the Response, includingtravelTimein seconds anddistancein meters.
To deal with the volume of route plans that may be required, this implementation uses the Routing API.
- In a simple implementation with one passenger and four taxis, the service would calculate a small matrix of 4 x 1 routes.
- But in a real life application, there may be many passengers requesting a taxi at the same time and many available taxis.
- A scenario with 3 passengers and 20 taxis creates a matrix of 20 x 3 = 60 routes.
For more information on the API, see Matrix Routing.
1function callMatrix() {2 const origins = buildOriginsParameter()3 const destinations = buildDestinationsParameter()4 tt.services5 .matrixRouting({6 key: apiKey,7 origins: origins,8 destinations: destinations,9 traffic: true,10 })11 .then(processMatrixResponse)12}
Finally, you can add the callMatrix function call and update submitButtonHandler.
1function submitButtonHandler() {2 clear()3 callMatrix()4}
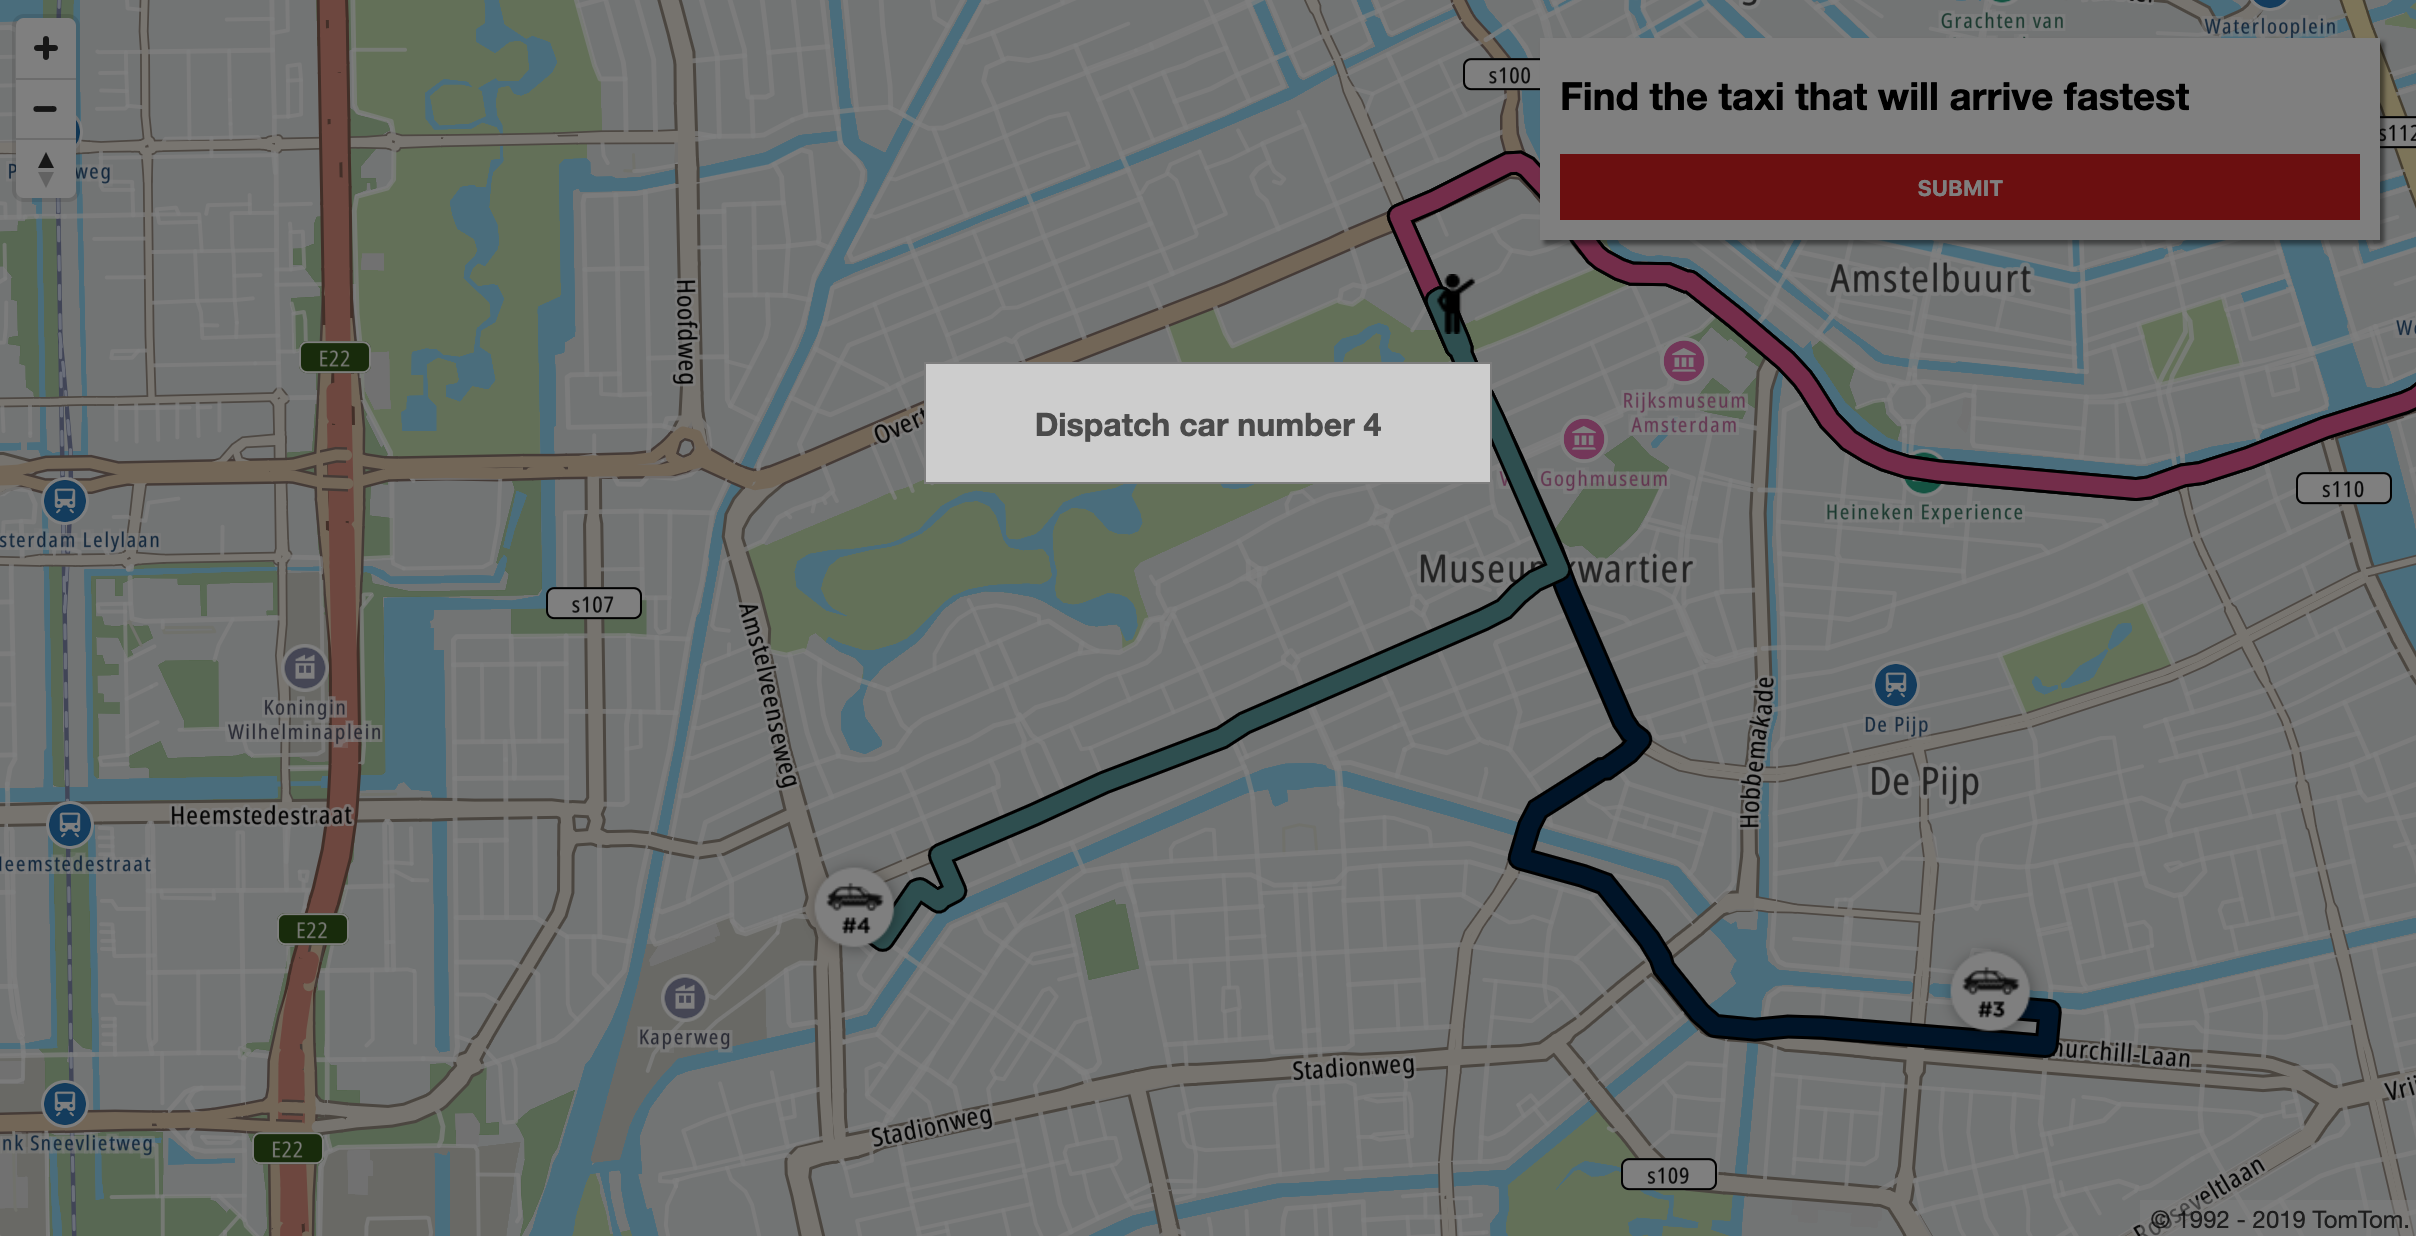
And the winner is …
Create a modal to inform the user which route is the fastest one.
- The modal appears when all calculations are done.
- Put a <div> with a modal id in the <body> tag, following the map <div> tag.
1<div id="modal">2 <div id="modal-content"></div>3</div>
Add the CSS for the modal to your style section:
1#modal {2 display: none;3 position: fixed;4 z-index: 1100;5 left: 0;6 top: 0;7 width: 100%;8 height: 100%;9 overflow: auto;10 background-color: rgba(0, 0, 0, 0.5);11}1213#modal-content {14 background-color: lightgray;15 color: #555;16 font-family: "Helvetica Neue", Arial, Helvetica, sans-serif;17 font-weight: bold;18 text-align: center;19 margin: 15% auto;20 padding: 20px;21 border: 1px solid #888;22 width: 20%;23}
Next, add the necessary variables.
1const modal = document.getElementById("modal")2const modalContent = document.getElementById("modal-content")3const fastestRouteColor = "#65A7A9"
To display and remove the modal from the screen, add the following code:
1modal.addEventListener("click", function () {2 modal.style.display = "none"3})45function displayModal() {6 modalContent.innerText = "Dispatch car number " + String(bestRouteIndex + 1)7 modal.style.display = "block"8}
The user can click anywhere to hide the modal.
Now is a time to choose the winner in a modifyFastestRouteColor function.
- If it is the fastest route, it is displayed above all other routes.
- The function copies the array
travelTimeInSecondsArrayto a newsortedTabarray and sorts it.
Because the default comparison function is alphabetic (meaning that '11' is less than '2'), the function uses a custom comparison function.
- The following one takes two values (such as 7 and 9) and subtracts one from the other.
- If the result is negative (-2), the function sorts 7 as lower than 9.
1function modifyFastestRouteColor(travelTimeInSecondsArray) {2 const sortedTab = travelTimeInSecondsArray.slice()3 sortedTab.sort(function (a, b) {4 return a - b5 })6 bestRouteIndex = travelTimeInSecondsArray.indexOf(sortedTab[0])7 taxiConfig[bestRouteIndex].color = fastestRouteColor8}
What's left is updating the processMatrixResponse, as shown in the following code:
1function processMatrixResponse(result) {2 const travelTimeInSecondsArray = []3 const lengthInMetersArray = []4 const trafficDelayInSecondsArray = []5 result.matrix.forEach(function (child) {6 travelTimeInSecondsArray.push(7 child[0].response.routeSummary.travelTimeInSeconds8 )9 lengthInMetersArray.push(child[0].response.routeSummary.lengthInMeters)10 trafficDelayInSecondsArray.push(11 child[0].response.routeSummary.trafficDelayInSeconds12 )13 })14 modifyFastestRouteColor(travelTimeInSecondsArray)15 drawAllRoutes()16 displayModal()17}
Summary
This tutorial has demonstrated:
- How to do a Matrix Routing API query.
- How to draw a route on the map.
- How to work with a route by setting event listeners , setting a style , and bringing the route to the front or back.
All the source code of that application can be found on GitHub.