Plan Your Road Trip Menu in Advance with the TomTom Routing and Search APIs
)
Learn how to use Python and pip to create an app that can locate restaurants along road trip routes. Plan the perfect travel menu by finding restaurants that align with your ideal meal stop times!
Road trips are fun, but planning them can be tricky. You often have to make stops to have a quick meal, which can be challenging to coordinate if you aren’t familiar with the route.
Using the TomTom Routing and Search APIs, you can plan your road trip menu in advance, specifying all the stops you want to make along the way. You can schedule meal stops and even find restaurants around your stop location.
In this article, we create an app using Python and JavaScript that lets you choose your restaurants based on your road trip schedule. You can find the complete application code on GitHub.
Prerequisites
To get started, you must have Python and pip installed. Pip is a package manager for Python. You use it to install and manage third-party Python packages in a Python development environment.
You must also get an API key from your TomTom account.
Create a Flask Application
Create a folder named tomtom-flask. Navigate to it using your command line tool and execute the following command to install Flask using pip:
pip install flaskOnce the installation is complete, create a file named app.py in the folder tomtom-flask with the following code:
from flask import Flask, render_template

app = Flask(__name__)

@app.route('/')
def index():
    return render_template('index.html')

if __name__ == "__main__":
    app.run(debug=True)
First, we imported both Flask and render_template from the core flask library. Then, we initialized the Flask application beneath the imports. After initialization, we set up our homepage route to render the index.html file from our templates/ folder. Finally, we run the application at the end of the file.
Next, create a folder named templates in tomtom-flask. Inside templates/, create an index.html file with the following markup:
<!DOCTYPE html>
<html lang="en">
<head>
    <title>Document</title>
    <link rel="stylesheet" href="{{ url_for('static',  filename='styles.css') }}">
    <link rel='stylesheet' type='text/css' href='https://api.tomtom.com/maps-sdk-for-web/cdn/6.x/6.15.0/maps/maps.css'>

    <link href="https://cdn.jsdelivr.net/npm/bootstrap@5.2.1/dist/css/bootstrap.min.css" rel="stylesheet" integrity="sha384-iYQeCzEYFbKjA/T2uDLTpkwGzCiq6soy8tYaI1GyVh/UjpbCx/TYkiZhlZB6+fzT" crossorigin="anonymous">

</head>
<body>
    <div>
        <section id="form-section">
            <div class="mb-3">
                <label for="origin" class="form-label">Origin</label>
                <input type="text" class="form-control" id="lat-origin" placeholder="Enter Latitide">
                <input type="text" class="form-control" id="long-origin" placeholder="Enter Longitude">
            </div>

            <div class="mb-3">
                <label for="destination" class="form-label">Destination</label>
                <input type="text" class="form-control" id="lat-dest" placeholder="Enter Latitide">
                <input type="text" class="form-control" id="long-dest" placeholder="Enter Longitude">
            </div>

            <button id="submit-btn">Submit</button>
        </section>

        <!-- Map and map details will be populated below -->
        <section class="map-area">
            <div id='map' class='map'></div>
            <div id='time'></div>

            <div id='select-input-div'>
            </div>
        </section>

    </div>

    <script src="{{ url_for('static',  filename='script.js') }}"></script>
    <script src="https://api.tomtom.com/maps-sdk-for-web/cdn/6.x/6.15.0/maps/maps-web.min.js"></script>
    <script src="https://api.tomtom.com/maps-sdk-for-web/cdn/6.x/6.15.0/services/services-web.min.js"></script>a
</body>
</html>
The homepage of our website renders this HTML file. It includes a form for collecting the origin and destination points from the user. Below the form, the page displays the map, journey time, and nearby restaurants.
The map area is empty now, but we populate it using JavaScript. Finally, we provide links to the CSS and the TomTom Maps SDK files.
In the root folder (tomtom-flask), create a folder called static and add a custom CSS named styles.css file.
.map {
    width: 80vw;
    height: 70vh;
}
Run the following command in your terminal to start up the application:
python app.pyNavigate to http://127.0.0.1:5000 with your web browser to see the result:
In the next section, we call the Routes API using the points a user provides to calculate the time it'll take to complete the journey.
Show the User the Route and Journey Time In the root folder (tomtom-flask), inside the static folder, create a file named script.js. Add the following:
var map = null
var instructions = null
var results = null
var api_key = put-your-api-key
The map variable is populated with our map when we create it later. When calling the routing API with a starting and ending point, it includes the instructions for getting there in the response object. We also want to store that globally in our code. Finally, we pass our API key from TomTom to the api_key variable.
Next, we have a helper code block that changes the time format from seconds to hours, minutes, and seconds (hh:mm:ss). Add the following:
 function convertTime(sec) {
    var hours = Math.floor(sec/3600);
    (hours >= 1) ? sec = sec - (hours*3600) : hours = '00';
    var min = Math.floor(sec/60);
    (min >= 1) ? sec = sec - (min*60) : min = '00';
    (sec < 1) ? sec='00' : void 0;

    (min.toString().length == 1) ? min = '0'+min : void 0;
    (sec.toString().length == 1) ? sec = '0'+sec : void 0;

    return {
        hrs: hours,
        mins: min,
        secs: sec
    }
}
Next, we add an event listener to listen for a click event on the Submit button and call the calculateRoute function when this event occurs. Add the following line of code in script.js, after the results variable:
document.getElementById("submit-btn").addEventListener("click", calculateRoute)Create a loadMap function below the above code in script.js. Inside loadMap, first get the origin and destination points from the form inputs:
function calculateRoute() {
    const lat0 = document.getElementById("lat-origin").value
    const long0 = document.getElementById("long-origin").value

    const lat1 = document.getElementById("lat-dest").value
    const long1 = document.getElementById("long-dest").value

    // fetch request goes here
}
Next, we make a GET request to the Routing API, including the coordinates as parameters. Add the following code in script.js, after the variable named long1:
fetch(`https://api.tomtom.com/routing/1/calculateRoute/${lat0},${long0}:${lat1},${long1}/json?routeRepresentation=summaryOnly&instructionsType=text&key=${api-key}`)
    .then(response => response.json())
    .then((data) => {
        loadMapWithStopTimes(data, long0, long1, lat0, lat1)
    })
Inside the callback for the last then function, we call the loadMapWithStopTimes function, passing in the API response data as well as the origin and destination coordinates.
Next, create the loadMap function below calculateRoute:
function loapMapWithStopTimes(data, long0, long1, lat0, lat1) {
  // the rest of the code will go here
}
As described by the comment above, the rest of the code provided under this section goes inside the loadMapWithStopTimes function.
First, we convert the time format, access the time container element, and insert a string showing the time it will take to complete the journey:
        const {hrs, mins, secs} = convertTime(data.routes[0].summary.travelTimeInSeconds)
        const timeBtn = document.getElementById('time')
        timeBtn.innerHTML = `Your Journey will take ${hrs} hours, ${mins} minutes and
        ${secs} seconds`
Next, we assign the guidance instructions for the journey to the global instructions variable:
instructions = data.routes[0].guidance.instructionsFor the user to select a time on the browser, create a select input element and its accompanying label:
        let label = document.createElement('label')
        label.innerHTML = "Choose a time to stop for a meal"

        let select = document.createElement('select')
        select.id = "stop-time"
        select.name = "time"
        select.onchange = getRestaurants
When the value of the select input changes, getRestaurants is called to retrieve all nearby restaurants based on the time the user stops for a meal. We’ll implement the code for it towards the end of this article.
Next, we insert possible stop times for the user based on the points included in the instructions array in the API response:
        // Keep track of the minutes already included
        let minTracker = null

        instructions.forEach((instruction, index) => {

            // We don't want to get the first and last time
            if(index !== 0 && index !== 1 && index !== instruction.length - 1) {
                    let {hrs, mins} = convertTime(instruction.travelTimeInSeconds)

                    // Check if minute is already included
                    if (mins !== minTracker) {

                        // Create select option
                        minTracker = mins
                        let option = document.createElement('option')

                        // add travelTime to value attribute
                        option.setAttribute('value', instruction.travelTimeInSeconds)
                        option.innerHTML = `${hrs} ${hrs === 1 ? 'hour': 'hours'} and ${mins} minutes in`

                        // Append option to select
                        select.appendChild(option)
                    }
                }

            })
In the code above, we created minTracker to track the minutes added as a select option for the user’s meal stop time. Then, in the forEach loop, we skipped the first and last points in the journey since it’s unlikely that the traveler will be eating at the beginning and just before the end. We then created a select option and set its value attribute to the journey time in seconds. Finally, we made a string showing the journey time and added it to the option element that we then appended to the select element.
Once the user has filled out the form, we can stop displaying it. To remove the form, and add the select options, add the following code:
        document.getElementById('form-section').remove()

        // Now, insert into the page
        let targetEl = document.getElementById("select-input-div")
        targetEl.appendChild(label)
        targetEl.appendChild(select)
Finally, create a TomTom map and focus it on the starting point of the journey:
let locations = [
            { lat: lat0,  lng: long0},
            { lat: lat1,  lng: long1}
        ]

        map = tt.map({
            key: api-key,
            container: 'map',
            center: locations[0],
            bearing: 0,
            maxZoom: 21,
            minZoom: 1,
            pitch: 60,
            zoom: 14,
        });

        map.addControl(new tt.FullscreenControl());
        map.addControl(new tt.NavigationControl());

        locations.forEach((location, index) => {
            new tt.Marker().setLngLat(location).addTo(map)
        })
That’s all! Remember that all of the code provided in this section should go inside the final then method nested to fetch. However, if we run the code now, we get an error because getRestaurants is not yet defined. We will do that in the next section.
Search for Nearby Restaurants
Now, let’s create the code for searching restaurants close to the stop-time specified by the user.
Recall that every time the user selects a stop-time for a meal, the getRestaurants function is called. When this happens, we’ll get the selected option and find its corresponding instruction object. From there, we get its latitude and longitude. Add the following code after the loadMap function in script.js:
function getRestaurants() {
const option = document.getElementById("stop-time").value

    const selectedLoc = instructions.find((instruction) => {
        return instruction.travelTimeInSeconds == option
    })

    const lat = selectedLoc.point.latitude
    const long = selectedLoc.point.longitude

    // fetch request goes here
}
Make a request to the search API to search for restaurants that are close to the selected stop point. Add the following code to getRestaurants:
    fetch(`https://api.tomtom.com/search/2/categorySearch/pizza.json?lat=${lat}&lon=${long}&radius=1700&categorySet=7315&view=Unified&relatedPois=off&key=${api_key}`)
    .then(response => response.json())
    .then((data) => {
        // The remaining code will go here
    })
Add the subsequent code blocks inside the callback of the last then method, as specified in the comment above.
In the above fetch request, categorySet is set to 7315, representing restaurants, while the radius is set to 1700 meters (approximately 1 mile).
Now that we have a list of restaurants to show the user, assign it to the global results variable:
results = data.results Next, cycle through the results. For each restaurant, show the name, address, and phone number and also create a button for adding them to the map:
results.forEach((result) => {
            let dl = document.createElement('dl')
            dl.className = "restaurants_list"

            const dt_1 = document.createElement('dt')
            dt_1.innerHTML = `Restaurant Name:`

            const dd_1 = document.createElement('dd')
            dd_1.innerHTML = result.poi.name

            const dt_2 = document.createElement('dt')
            dt_2.innerHTML = `Address:`

            const dd_2 = document.createElement('dd')
            dd_2.innerHTML = result.address.freeformAddress

            const dt_3 = document.createElement('dt')
            dt_3.innerHTML = `Phone No:`

            const dd_3 = document.createElement('dd')
            dd_3.innerHTML = result.poi.phone

            const btn = document.createElement('button')
            btn.id = result.id
            btn.className = "restaurants"
            btn.innerHTML = "Add to map"

            dl.appendChild(dt_1)
            dl.appendChild(dd_1)

            dl.appendChild(dt_2)
            dl.appendChild(dd_2)

            dl.appendChild(dt_3)
            dl.appendChild(dd_3)

            dl.appendChild(btn)

            document.getElementById('time').appendChild(dl)
        })
In this snippet, we also appended all the child nodes to the dl parent and inserted them into the page.
At this point, when the user selects a stop time in the select input, the app calculates the route and displays a list of nearby restaurants. However, clicking the button to add the point to the map won’t work yet. Let’s fix that!
First, access all of the buttons:
let resButtons = document.getElementsByClassName("restaurants")Next, loop through the buttons and listen for a click on all of them. When clicking any button, we find the chosen restaurant and add it to the map. Here’s the code:
for(let i=0; i<resButtons.length; i++) {
            resButtons[i].addEventListener("click", () => {
                let selectedRes = results.find((result) => {
                    return result.id == resButtons[i].id
                })

                const lat = selectedRes.position.lat
                const lon = selectedRes.position.lon

                const popup = new tt.Popup({ offset: 50 }).setText(selectedRes.poi.name)

                new tt.Marker().setLngLat({lat: lat, lng: lon}).setPopup(popup).addTo(map)
            })
        }
You’re done!
To test the app, run the following command and navigate your browser to http://127.0.0.1:5000.
python app.py Results
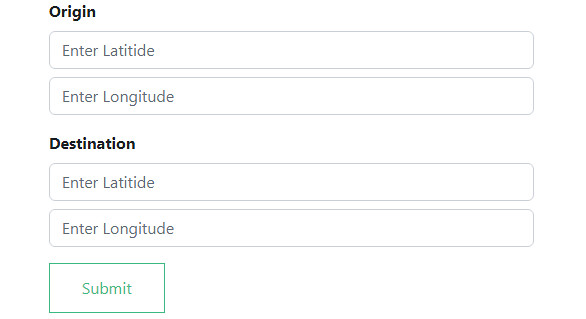
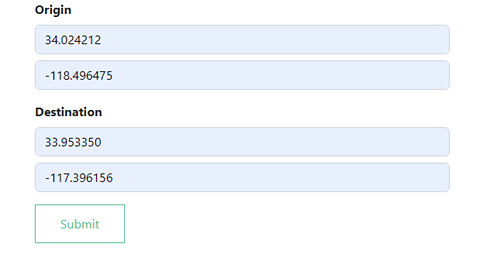
When opened, your app displays the following form:
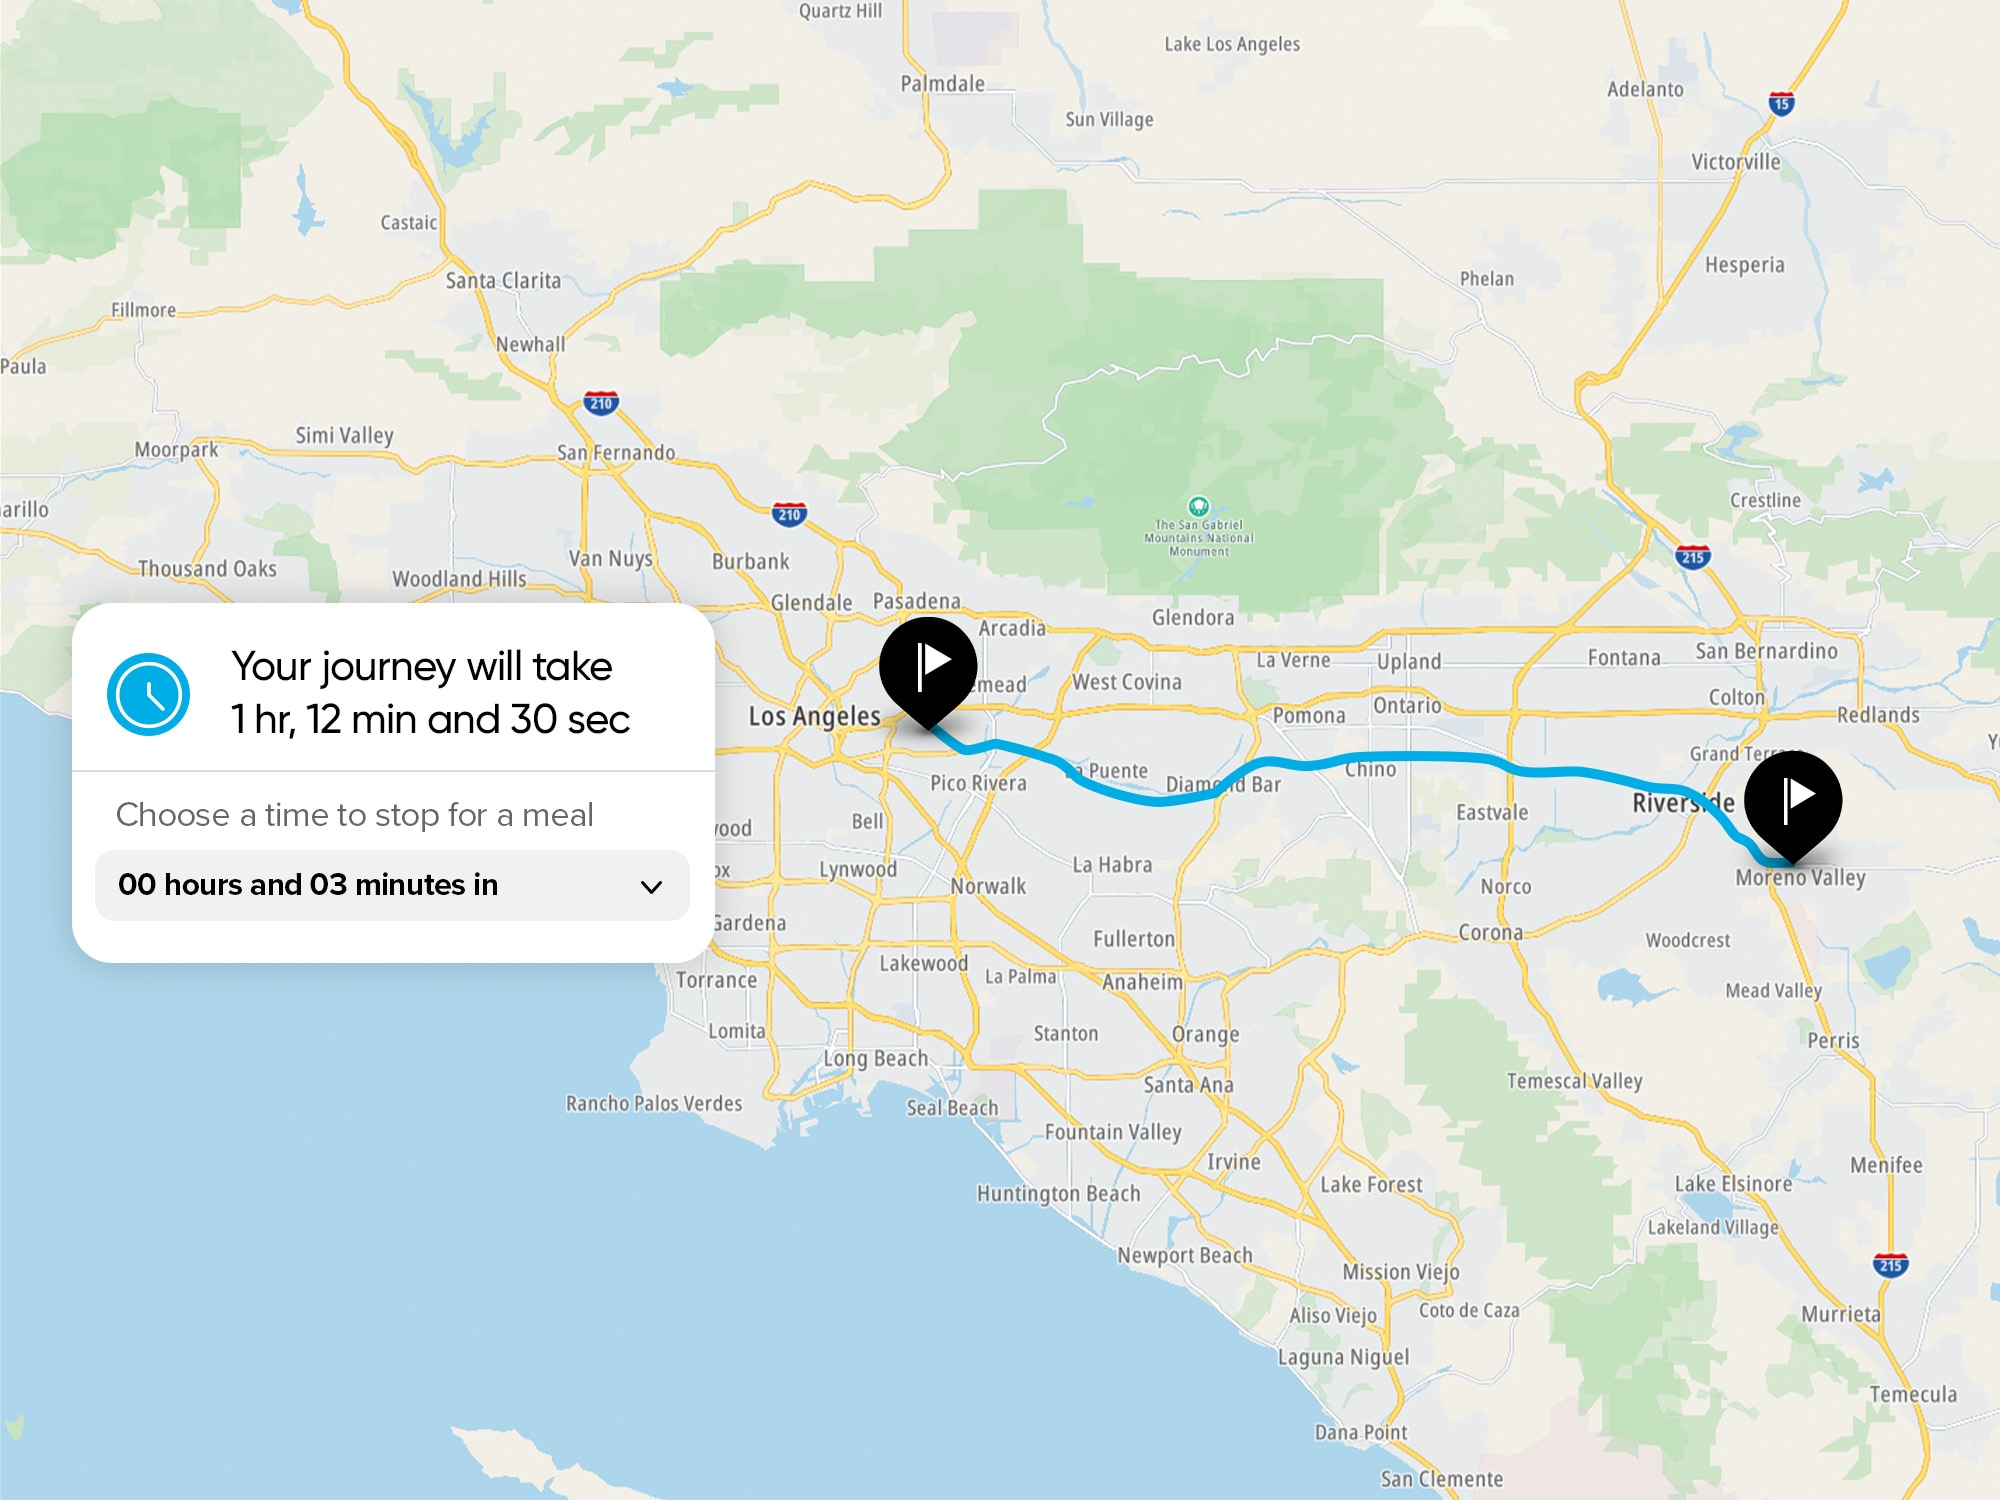
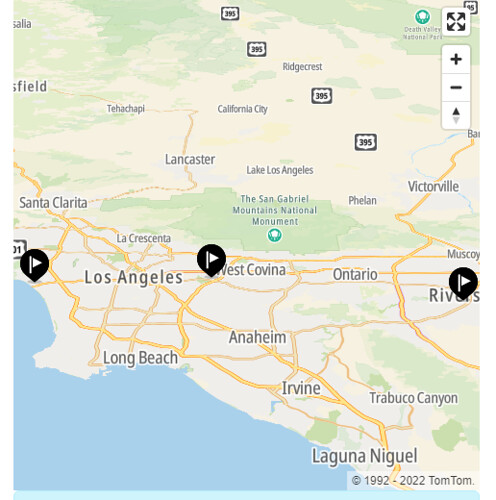
When a user submits the start and end points for their journey, a map is loaded with the total journey time, shown below:

The user can then select a stop time to display the list of nearby restaurants:

Then, the user can choose a restaurant and click Add to Map to add the marker for the location to their map instantly:
Next Steps
In this article, we created a JavaScript app that lets users choose our restaurants based on their road trip schedule, calculate the journey time, and fetch guidance instructions to generate stop points.
Now that you know how to create this app, you can try variations for other important stops, like gas stations. And this is only the beginning of what you can learn to build with TomTom!
Sign up for a free account to get started.
Want to learn more? Check out these related resources below:
Happy mapping!