Building Embedded TomTom Maps with HTML Web Components and JavaScript
) Shannon Stroud
Shannon Stroud
Web Components are an HTML standard that provide a great way to create reusable components that will work nicely with any web framework — or no framework at all. With Web Components, you can create a map component that’s easy to plug into any web page. This article will show how to embed a map in a Web Component using
Web Components
Producing reusable components has always been one of the pillars of professional software engineering. For the web this has been especially hard — changing paradigms, frameworks, and libraries have made the situation more complicated than necessary. One of the potential solutions to this problem are Web Components. Using Web Components, we can easily create a reusable map component based on the TomTom Maps SDK for Web that can be dropped in when we need.
Web Components are an HTML standard that provide a great way to create reusable components that will work nicely with any web framework — or no framework at all. With Web Components, you can create a map component that’s easy to plug into any web page.
This article will show how to embed a map in a Web Component using TomTom JavaScript Maps SDK for Web.
What are Web Components?
Web Components refers to a set of browser capabilities and APIs to allow creating reusable components using HTML, CSS, and JavaScript. The capabilities and APIs include things such as Shadow DOM, custom elements, CSS scope, HTML templates, and more recent ECMAScript features.
Shadow DOM is the structure that is used inside a custom element. It is pretty much separated from the "real" DOM, but can be accessed from the hosting custom element. Usually, we will construct a Shadow DOM from some kind of template. Ideally, we use the HTML template element for such constructions (together with some established APIs such as cloneNode).
In a nutshell Web Components would be used like any other HTML component, like writing <my-element my-attr="foo">This is the content</my-element> in the HTML source code. In this example we use a Web Component called my-element with some attribute (my-attr) and content. The dashed name is a convention that should be respected as "real" HTML elements will never have a hyphen in their name. Thus this convention prevents potential conflicts.
Statically, such as from the HTML source code alone, such custom elements would be pretty much useless. Instead, we can give them some life by using JavaScript to define their behavior. The magic for this lies in the define API of the customElements object.
The define method takes two parameters: the name of the custom element and its DOM implementation. The latter is usually a class deriving from the respective parent. In case of uncertainty, the super class is most likely HTMLElement.
customElements.define(
  'my-element',
  class extends HTMLElement {
    constructor() {
      super();
    }

    connectedCallback() {
      //Do something once connected
    }
  },
);
The connectedCallback can be used to do some initial setup actions. There are more methods that can be used to hook into the lifecycle of (custom) components, but for now this one is sufficient.
To use Web Components in recent browsers, we don't need to do anything. The support for all given technologies has been present in most browsers for quite a while. Nevertheless, for older browsers — most notably those without any immediate update possibility such as older versions of Internet Explorer — a set of polyfills exists.
In general, we are free to select which polyfills to use. In the simplest case we just apply the full bundle of polyfills that only supplies the functionality that is required. The full bundle can be installed with:
npm install @webcomponents/webcomponentsjsThe installed package can either be used directly from some JavaScript module (bundled via Webpack) or referenced as a side-bundle from the HTML pages where Web Components are actively used.
The necessary HTML looks like:
<script src="node_modules/@webcomponents/webcomponentsjs/webcomponents-bundle.js"></script>Now that we know the basics of Web Components, let's build something useful with them!
Building a TomTom Maps Web Component
Let's just build a map component using the TomTom Maps SDK for Web that can be used to display a mapped location.
For that we need to start by registering as a developer on the TomTom developer portal. This will give us an API key that we can use later for accessing the Map Display API.
After we registered successfully, we should also download the latest version of the TomTom Maps SDK for Web. This can be found at the Maps SDK for Web Downloads website.
The basic skeleton for our new web component tt-map is a file called tt-map.js. In this file we start with the following boilerplate code:
const template = document.createElement('template');
template.innerHTML = `
  <div id="map"></div>
`;

customElements.define(
  'tt-map',
  class extends HTMLElement {
    constructor() {
      super();
      console.log('constructed!');
    }

    connectedCallback() {
        console.log('connected!');
    }

    disconnectedCallback() {
        console.log('disconnected!');
    }

    attributeChangedCallback(name, oldVal, newVal) {
        console.log(`attribute "${name}" changed!`);
    }

    adoptedCallback() {
        console.log('adopted!');
    }
  },
);
The boilerplate gives us full access to the lifecycle and some useful debugging output. We also start with a template element that contains some div. We will now use this template element to construct the Shadow DOM.
Using the TomTom Maps SDK for Web
Assuming we placed the TomTom Maps SDK for Web in the same folder as our new tt-map.js file, we can just go ahead and load the JavaScript. Loading the JavaScript requires an explicitly created script element. We could either do this via a bundler (merging together the TomTom Map SDK for Web script and our custom element source code) or load the TomTom Map SDK script explicitly. In this tutorial we will do the latter.
Essentially, the code for loading the script boils down to:
const ttscript = document.createElement('script');
ttscript.src = './tomtom.min.js';
The most important part is missing though — we still need to connect it to the DOM. In our case we have to do this via the Shadow DOM, but the API call (appendChild) will be the same as with the "real" DOM.
In the constructor of our custom element we call:
this._shadowRoot = this.attachShadow({ mode: 'open' });
this._shadowRoot.appendChild(template.content.cloneNode(true));
this._shadowRoot.appendChild(ttscript);
Once the JavaScript loaded we want to set up the map component. For this we can use the onload handler.
ttscript.onload = () => {
  const map = this._shadowRoot.querySelector('#map');
  tomtom.L.map(map, {
    key: '<your-api-key>',
  });
};
Remark: Please use your own API key here. Other API keys may be revoked, blocked, or unsuitable for the tasks that you want to fulfill.
Customization Possibilities
We may want to bring in some additional possibilities for customization. As an example, using the custom elements in a call such as this:
<tt-map locale="de-DE"></tt-map>Specifying the de-DE locale gives us the map with German labels. To transport the attribute locale into the TomTom SDK options, we need to change the constructor as follows:
constructor() {
  super();
  const language = this.getAttribute('locale') || 'en-GB';
  const ttscript = document.createElement('script');
  ttscript.src = './tomtom.min.js';
  ttscript.onload = () => {
    const host = this._shadowRoot.querySelector('#map');
    const map = tomtom.L.map(host, {
      key: 'LZhuGBLl7Uw22kPxtEI2AEUNUscmqBnp',
      language,
    });
  };
  this._shadowRoot = this.attachShadow({ mode: 'open' });
  this._shadowRoot.appendChild(template.content.cloneNode(true));
  this._shadowRoot.appendChild(ttscript);
}
If we want to add a simpler marker, we would just use the TomTom API marker function. This is split in two parts: creating the marker and adding it to the map:
tomtom.L.marker([48.1375019, 11.6865543]).addTo(map)Consequently, to keep the possibility of adding markers to the map open, we should actually provide some nice API abstraction using custom elements on top of it.
Before we introduce an API abstraction for markers, let's take care of two essential map features:
defining the center of the map ("mapped location") and
setting the zoom level
For both of these settings we use attributes (center and zoom), which are then mapped by us to the respective TomTom Map SDK API calls (setView and setZoom respectively) within the constructor of the custom element.
const zoom = this.getAttribute('zoom');
const center = this.getAttribute('center');

if (zoom) {
  map.setZoom(+zoom);
}

if (center) {
  map.setView(center.split(',').map(m => +m));
}
This also brings us to the topic of changing attributes. Some of the introduced attributes may be immutable, such that the initial setting cannot be changed. However, others such as the center and zoom should be mutable and reflect their value in the displayed map as expected.
Luckily, we've already seen in the boilerplate that attributeChangedCallback may be available to help us out here. Furthermore, we need to notify which attributes to observe using a static observedAttributes field:
class extends HTMLElement {
  // ...
  static observedAttributes = ['zoom', 'center'];


  attributeChangedCallback(name, oldVal, newVal) {
    if (this.map && oldVal !== newVal && typeof newVal === 'string') {
      switch (name) {
        case 'zoom':
          return this.map.setZoom(+newVal);
        case 'center':
          return this.map.setView(newVal.split(',').map(m => +m));
      }
    }
  }
}
Now that we’ve set center and zoom,, we could introduce the abstraction previously mentioned and add custom elements.
Events
Besides the ability to receive notifications, such as about changed attributes, we may also want to emit events for somebody to receive, potentially including custom events.
The map instance in the TomTom Map SDK offers quite a few events we can use to listen for changes and emit a custom event ourselves. The code for the handler can be as simple as:
const handler = () => {
  const event = new CustomEvent('change', {
    detail: {
      zoom: this.map.getZoom(),
      center: this.map.getCenter(),
    },
  });
  this.dispatchEvent(event);
};
Here we create a new instance of a CustomEvent with type set to change. Users of tt-map can just use addEventListener('change') to register a handler.
But when are we emitting this change event? Let's start simple with changes to the zoom and center of the map.
this.map.on('zoom', handler);
this.map.on('moveend', handler);
Great! Now only the question with the markers is left.
For markers we can just provide another custom element called tt-map-marker. We then use standard techniques from object-oriented programming to call method on that custom element called onMapReady. This name was freely chosen.
Iterating through all children of the tt-map instance will lead to probing the specific method, which will then be called with the instantiated map component. At this point the custom element can choose what to do with the map in case of the marker it will just place a marker there.
The full JavaScript file now looks as follows:
const template = document.createElement('template');
template.innerHTML = `
<link href="./map.css" rel="stylesheet">
<style>
:host {
  width: 100%;
  height: 100%;
  display: block;
}
content {
  width: inherit;
  height: inherit;
}
#map {
  width: 100%;
  height: 100%;
}
</style>
<content><div id="map"></div></content>
`;

function getLatLng(val) {
  return val.split(',').map(m => +m);
}

customElements.define(
  'tt-map-marker',
  class extends HTMLElement {
    static observedAttributes = ['position'];

    onMapReady(map) {
      this.map = map;
      this.attributeChangedCallback('position', undefined, this.getAttribute('position'));
    }

    attributeChangedCallback(name, oldVal, newVal) {
      if (this.map && oldVal !== newVal && typeof newVal === 'string') {
        switch (name) {
          case 'position':
            return tomtom.L.marker(getLatLng(newVal)).addTo(this.map);
        }
      }
    }
  },
);

customElements.define(
  'tt-map',
  class extends HTMLElement {
    static observedAttributes = ['zoom', 'center'];

    constructor() {
      super();
      const ttscript = document.createElement('script');
      ttscript.src = './tomtom.min.js';
      ttscript.onload = () => {
        const host = this._shadowRoot.querySelector('#map');
        const zoom = this.getAttribute('zoom');
        const center = this.getAttribute('center');
        this.map = tomtom.L.map(host, {
          key: 'LZhuGBLl7Uw22kPxtEI2AEUNUscmqBnp',
          language: this.getAttribute('locale') || 'en-GB',
          zoomControl: this.hasAttribute('zoom-control'),
          panControl: this.hasAttribute('pan-control'),
          zoomsliderControl: this.hasAttribute('zoomslider-control'),
          traffic: this.hasAttribute('show-traffic'),
        });

        this.attributeChangedCallback('zoom', undefined, this.getAttribute('zoom'));
        this.attributeChangedCallback('center', undefined, this.getAttribute('center'));

        const handler = () => {
          const event = new CustomEvent('change', {
            detail: {
              zoom: this.map.getZoom(),
              center: this.map.getCenter(),
            },
          });
          this.dispatchEvent(event);
        };

        this.map.on('zoom', handler);
        this.map.on('moveend', handler);

        Array.prototype.forEach.call(this.children, child => {
          if (typeof child.onMapReady === 'function') {
            child.onMapReady(this.map);
          }
        });
      };
      this._shadowRoot = this.attachShadow({ mode: 'open' });
      this._shadowRoot.append(template.content.cloneNode(true), ttscript);
    }

    attributeChangedCallback(name, oldVal, newVal) {
      if (this.map && oldVal !== newVal && typeof newVal === 'string') {
        switch (name) {
          case 'zoom':
            return this.map.setZoom(+newVal);
          case 'center':
            return this.map.setView(getLatLng(newVal));
        }
      }
    }
  },
);
Sample Application
Let's use our Web Component on a demo website. The HTML code is as simple and straightforward as the following one:
<!doctype html>
<meta charset=utf8>
<title>TomTom Web Component Sample</title>
<style>
html, body {
  padding: 0;
  margin: 0;
  width: 100%;
  height: 100%;
}
body {
  display: flex;
  flex-direction: row;
}
body > div {
  flex: 1;
  height: 100%;
}
.container {
  padding: 1em;
}
</style>
<body>
<div>
  <div class="container">
    <h1>TomTom Map SDK</h1>
    <h2>Web Component Sample</h2>
    <p>On the right you see some variations of the map control.</p>
  </div>
</div>
<div>
  <tt-map locale="en-GB" zoom-control></tt-map>
</div>
<div>
  <tt-map locale="de-DE">
    <tt-map-marker position="48.1375019, 11.6865543"></tt-map-marker>
    <tt-map-marker position="40.0375019, 8.6865543"></tt-map-marker>
  </tt-map>
</div>
<div>
  <tt-map center="52.379189, 4.899431" id="map" zoom="12" zoom-control></tt-map>
</div>
<script src="tt-map.js"></script>
<script>
document.querySelector('#map').addEventListener('change', console.log);
</script>
</body>
The tt-map and tt-map-marker components comes from the referenced JavaScript file with the same content as seen earlier.
Opening the demo website gives us a simple four column layout. We re-use our map three times on the same page, just with different settings to see the difference.
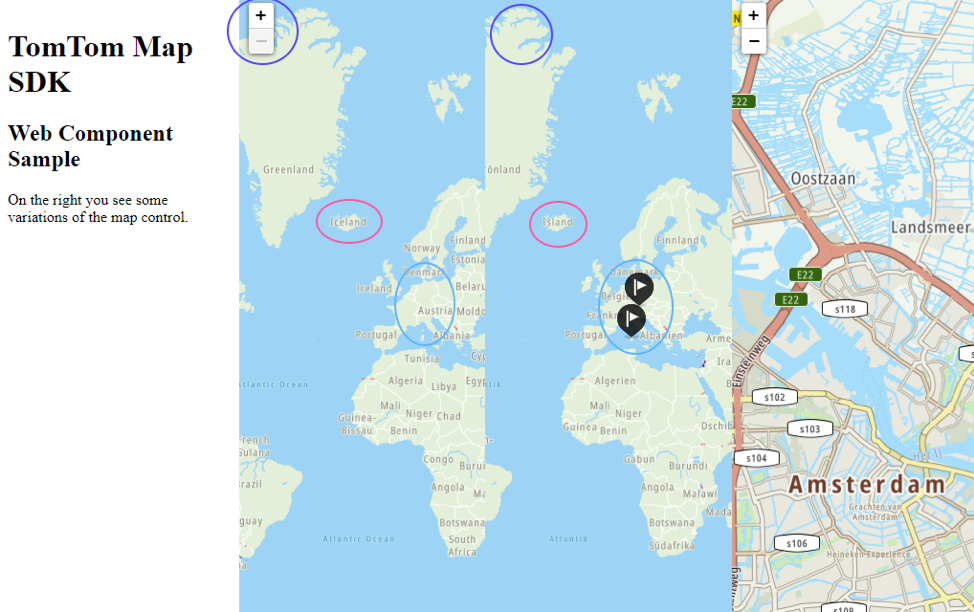
Most importantly, we are fully flexible and framework agnostic when it comes down to using this component. All the dependencies (the CSS and JavaScript coming from the TomTom Maps SDK for Web) are already referenced within the component. As an example, using the #map selector within our HTML document will not result in any conflict with the #map selector used within the Shadow DOM that is contained in our Web Component.
Conclusion
Using Web Components can help us to finally build some reusable code that just works on the web - independent of any specific UI library or framework.
The possibilities with Web Components are enormous. The component we just built can be used on multiple pages for multiple use cases. Examples include a map marker, route navigation, or other map related duties.
More learning resources can be found at:
What will you build? Share your project with us on the TomTom Developer Forum.