Using the TomTom Maps Web SDK in a React Native Web View App
) Ryan Peden
Ryan Peden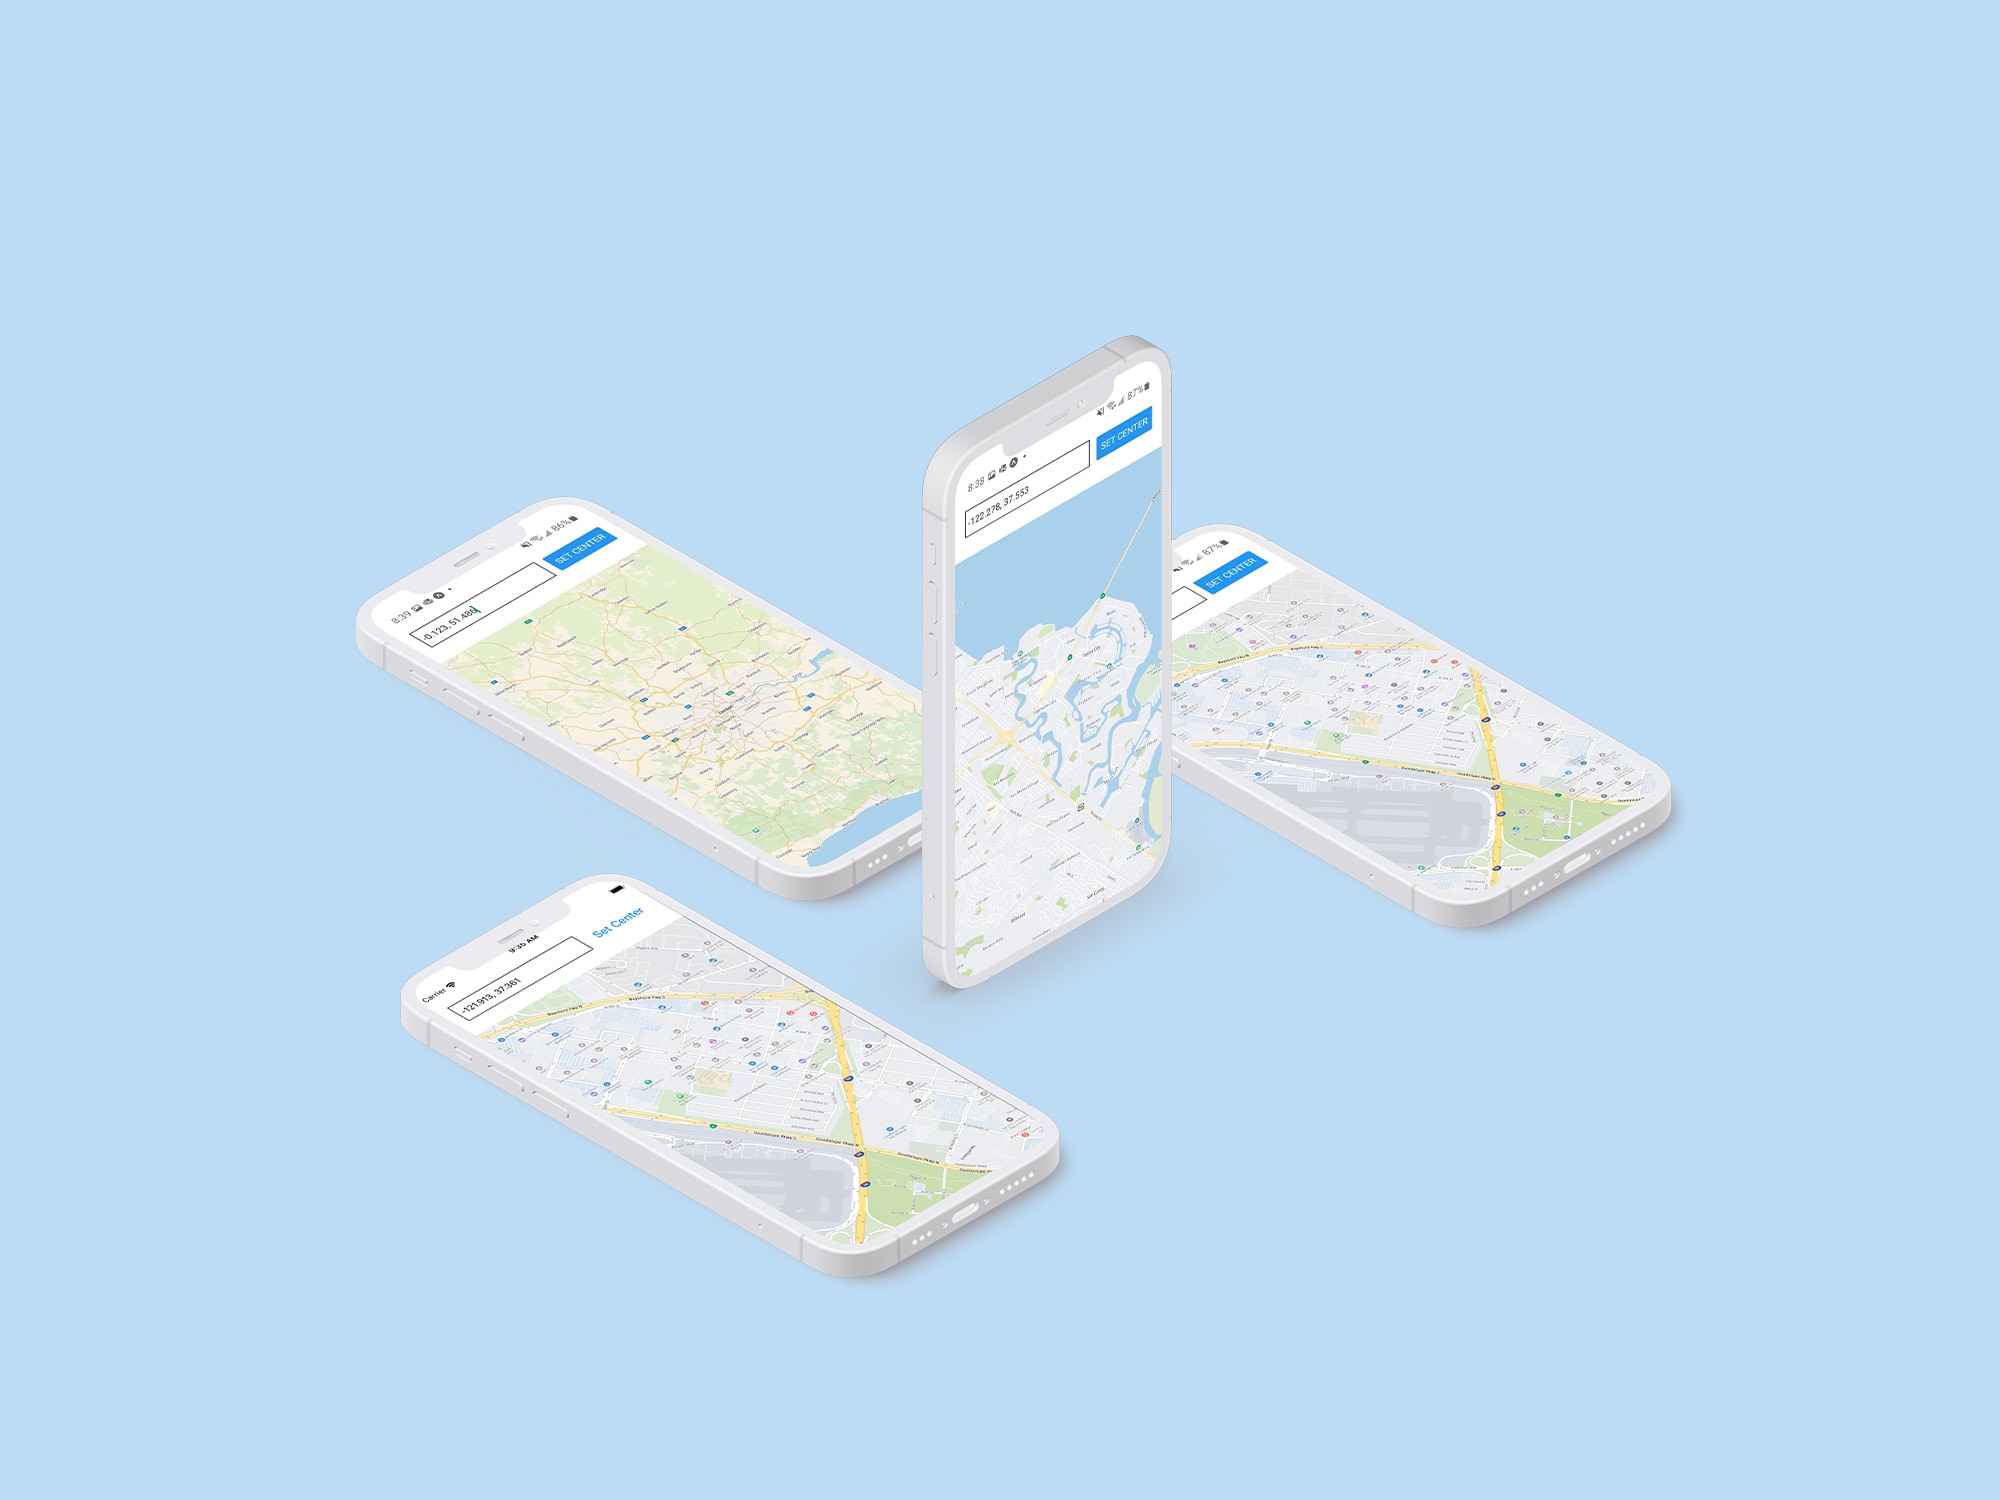
React Native WebView helps your JavaScript application's maps look great across all web platforms. Learn how to embed an interactive TomTom map in your application while ensuring a consistent look across iOS and Android devices — without coding twice.
Native mobile apps are great from an app user’s perspective. They load quickly, perform well, and can use every advanced capability of the device where they’re running.
But native mobile apps aren’t as great for development teams. Developing native apps can be slow, and native mobile developers are both challenging to find and expensive. Even worse, when you’re done, your app only runs on a single platform. If you want to build your app for both Android and iOS, you’ll need separate development teams and separate code bases.
React Native (RN) offers an alternative. It lets developers write mobile apps in JavaScript and renders the app’s user interface (UI) using native controls on every platform RN supports — including iOS, Android, and others. Developers can use React Native to write apps that are nearly as fast as entirely native apps, but that is much easier to create. And the best part: it’s easy to build cross-platform apps with React Native from a single codebase — meaning no duplication of effort.
While React Native is great, it’s not perfect. Historically, it’s been challenging to create RN apps that use maps. Wrappers for native mobile map widgets tend to be flaky and error-prone. And since they use a mapping widget supplied by the underlying mobile OS, there’s no guarantee your app will look the same when running on different devices.
Fortunately, there’s an easy solution: embedding a web view in a React Native app, then using it to render a TomTom map. In this article, we’ll show how to embed a TomTom Map in a React Native WebView component and enable bidirectional communication between native app components and the web map. For this tutorial, we assume you’re already familiar with React Native. If you’ve never used it before, we suggest first working through the official tutorial.
If you haven’t signed up already, you’ll need an account on the TomTom developer portal to register for an API key.
Let’s dive in and explore hands-on how to embed a map. If you’d like a preview of where we’ll end up, you can find the complete application code in this GitHub repository.
Getting Started with React Native
Before we start, you’ll need a React Native app to work on. We recommend following the official React Native instructions on setting up your first React Native app using the Expo CLI. Expo is a toolkit built atop React Native that makes it simple to create, build, and test apps on any mobile device or device simulator.
The best part is that all you need to do is scan an Expo QR Code to run and test your app on a physical device. If you follow the directions in the link, you’ll end up with something like:
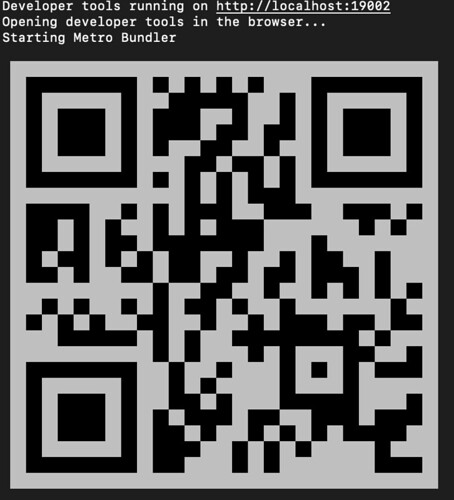
Scan it, install the Expo Go app when prompted, and your app will be ready to run!
Don’t worry if you’re working with a pre-existing React Native app that doesn’t use Expo. All the instructions you’ll see shortly work in an Expo-free React Native app as well.
Either way, we must install the cross-platform React Native WebView component before we proceed. To do this, open a terminal and navigate to the directory where your React Native app resides. If you created your app with Expo, run:
expo install react-native-webviewOtherwise, if you’re working with raw React Native, run:
npm install --save react-native-webviewThen follow the additional setup instructions on GitHub.
Now that we’ve installed the React Native WebView component, it’s time to add the component to our app then load it in a TomTom map.
Adding a WebView to the App
Let’s dive right in and add a WebView to our app.
The first step is adding an HTML template for the WebView component to render. In your React Native project, create a file named “map-template.js” and add the following code:
export default `
<div>
    <style>
            html, body {
                margin: 0;
            }

            #map {
                height: 100%;
                width: 100%;
            }
    </style>

    <div id='map' class='map'></div>

    <!-- load TomTom Maps Web SDK from CDN -->
    <link rel='stylesheet' type='text/css' href='https://api.tomtom.com/maps-sdk-for-web/cdn/6.x/6.13.0/maps/maps.css'/>
    <script src='https://api.tomtom.com/maps-sdk-for-web/cdn/6.x/6.13.0/maps/maps-web.min.js'></script>

    <script>
        // create the map
        tt.setProductInfo('TomTom Maps React Native Demo', '1.0');
        let map = tt.map({
            key: 'YOUR API KEY GOES HERE',
            container: 'map',
            center: [-121.913, 37.361],
            zoom: 15
        });

        map.on('dragend', function() {
            let center = map.getCenter();
            window.ReactNativeWebView.postMessage(center.lng.toFixed(3) + ", " + center.lat.toFixed(3));
        })
    </script>
</div>
`;
If you’ve worked with TomTom maps on the web before, this will look familiar. We create a simple stylesheet, add a div to hold our map, and call tt.map to create the map. By default, our map loads up centered on San Jose, California.
We also add a handler for the map’s dragend event. We’ll revisit this later when we discuss bidirectional communication between native app components and the WebView map.
Next, we’ll add the WebView component to our application.
If you use Expo, you’ll see an App.js file you can open. Otherwise, open the React Native component where you’d like to insert a WebView. Here’s what we end up with when starting with a bare-bones Expo app:
import React from 'react';
import { useState } from 'react';
import { StyleSheet, View, Button, TextInput } from 'react-native';
import { WebView } from 'react-native-webview';
import mapTemplate from './map-template';

export default function App() {
  let webRef = undefined;
  let [mapCenter, setMapCenter] = useState('-121.913, 37.361');

  const onButtonPress = () => {
    const [lng, lat] = mapCenter.split(",");
    webRef.injectJavaScript(`map.setCenter([${parseFloat(lng)}, ${parseFloat(lat)}])`);
  }

  const handleMapEvent = (event) => {
    setMapCenter(event.nativeEvent.data)
  }

  return (
    <View style={styles.container}>
      <View style={styles.buttons}>
        <TextInput
        style={styles.textInput}
        onChangeText={setMapCenter}
        value={mapCenter}></TextInput>
        <Button title="Set Center" onPress={onButtonPress}></Button>
      </View>
      <WebView
        ref={(r) => (webRef = r)}
        onMessage={handleMapEvent}
        style={styles.map}
        originWhitelist={['*']}
        source={{ html: mapTemplate }}
      />
    </View>
  );
}
To keep things brief, we’ve omitted the stylesheet since there’s nothing map-specific about it. You can find it in App.js in the GitHub repository if you’d like to refer to it.
Let’s step through the app component to see what’s going on. First, we create a webRef variable to store a reference to our WebView when it initializes. We’ll need this reference to inject JavaScript into the WebView.
Next, we create a React state hook by calling useState. We’ll use this to store the location string that displays and sets the map center’s latitude and longitude in a native text input component.
Then, we have a function called when a user taps the app’s “Set Center” button. This function parses longitude and latitude numbers out of the location string then uses them to set a new center location on the map. Let’s take another look at this call. It’s an important part of bidirectional communication between our app’s native components and the WebView:
webRef.injectJavaScript(`map.setCenter([${parseFloat(lng)}, ${parseFloat(lat)}])`);The WebView’s injectJavaScript method lets you run arbitrary JavaScript in a WebView. In our case, when we initialized our map in the WebView, we stored it in a top-level variable named map — so we’re able to call methods on map directly in JavaScript we inject into the view.
Next, we have a function named handleMapEvent that, as its name implies, handles events sent into the native part of our app from the WebView:
const handleMapEvent = (event) => {
    setMapCenter(event.nativeEvent.data)
}
It works hand-in-hand with the dragend event handler we saw earlier in our WebView HTML template:
map.on('dragend', function() {
            let center = map.getCenter();
            window.ReactNativeWebView.postMessage(center.lng.toFixed(3) + ", " + center.lat.toFixed(3));
})
The TomTom map fires the dragend event every time you finish tapping and dragging to a new location on the map. Our event handler gets the map’s center coordinates, parses them out into a string, and sends them to the native part of the app by calling window.ReactNativeWebView.postMessage.
On the native side of the app, the handleMapEvent function receives the event, unwraps its data, and calls setMapCenter to update the App component’s state, which automatically updates the coordinates displayed in the text input box.
We complete the App component by returning JSX that renders the UI. We start with a TextInput component that displays our map’s center coordinates and lets us edit them to specify a new location to center the map.
We follow with a Button component that, when pressed, calls the onButtonPress function we saw earlier, which calls into the WebView to update the map’s center.
We finish by adding the WebView component. Let’s take another look:
<WebView
    ref={(r) => (webRef = r)}
    onMessage={handleMapEvent}
    style={styles.map}
    originWhitelist={['*']}
    source={{ html: mapTemplate }}
/>
This component pulls together everything we’ve seen so far. When it loads, it sets the webRef reference we need to inject JavaScript into the WebView. The onMessage prop then tells the WebView to send all events to the handleMapEvent function we defined earlier. We use the style prop to refer to the map’s stylesheet entry, and the source prop injects our HTML template. Note that if you want to use your local HTML template, you’ll have to set the originWhitelist prop to {['*']} like we’ve done above.
And that’s it! We have a fully functioning app that works on both iOS and Android:

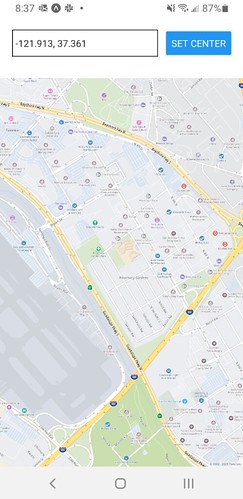
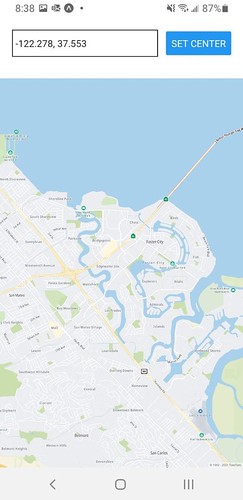
If we tap the map and drag our way from San Jose over to San Francisco, we’ll see the native TextInput’s location updates on the fly via events the web map sends:
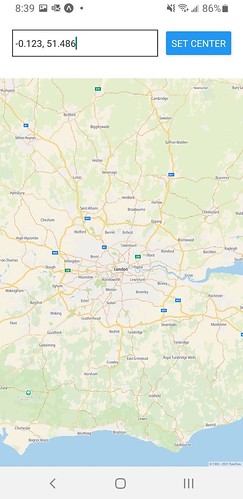
And if you manually enter coordinates into the input box and tap the Set Center button, you’ll see the map re-center itself on London, England, for example:
We’ve covered everything you’d need to know to create your own WebView based mapping apps. Just develop the WebView side of your app the same way you’d develop a web app with the TomTom Maps SDK for Web. Then, build the native side of your app the same way you’d create any other React Native app, and use postMessage and onMessage to communicate between the two. That’s all there is to it!
Conclusion
As we’ve seen, it’s surprisingly easy to create a cross-platform map-centric app using React Native WebView and TomTom maps. You can have your app up and running in 30 minutes or less, and it works flawlessly on both Android and iOS out of the box.
If you’re ready to create your own great React Native mapping app, why not sign up for a TomTom Developer account and get started? You get thousands of free requests daily, even for commercial use, or simply pay as you grow.