Using the TomTom Maps Web SDK in a NativeScript Web View App
)
NativeScript WebView helps your cross-platform mobile app’s maps look great across all web platforms. Learn how to embed an interactive TomTom map in your application while ensuring a consistent look across iOS and Android devices — without coding twice.
Smooth map browsing experiences are essential in today’s increasingly digital world. Convenience aside, online maps provide opportunities for users to find hidden gems they may have otherwise missed. So, it’s no surprise companies are racing to offer better map browsing capabilities.
There are a handful of ways to integrate maps into your site for a smoother user experience. Today we’re going to take a look at one such solution: TomTom Maps.
We here at TomTom built our Maps with innovative technology, enabling users to know the road ahead, stay on track with the freshest maps, stay ahead of changing regulations, and keep the world at their fingertips.
TomTom Maps is available in NPM and CDN. And now, developers can integrate TomTom Maps into mobile applications, especially in a NativeScript set up.
But, using TomTom Maps in a NativeScript application can pose some problems. Wrapping the map in a native component for every platform you deploy is tedious and time-consuming. Also, the maps aren’t able to maintain a consistent display on different platforms. This will lead to all sorts of difficulties when it comes to designing, testing, and debugging.
This article teaches you how to confidently use NativeScript in a WebView to solve the above pain points and how to ensure the smooth operation of TomTom Maps in different operating systems.
Requirements
To build your app, you need to have some knowledge of JavaScript, TypeScript, and how NativeScript works.
Additionally, ensure you have the following tools installed:
Node.js: NativeScript’s tooling depends on Node.js, so the Node.js binary must be available.
ns command: This is a NativeScript CLI tool we use to scaffold a NativeScript application, run and build NativeScript applications, and more. To install it, run the command: npm i NativeScript -g.
Java: NativeScript uses the Java Runtime for compiling the NativeScript applications to an Android mobile application. Right now, NativeScript supports JDK 15, so download the Java Runtime for your machine. Using Mac OS, you can install JDK 15 by running the command: brew tap AdoptOpenJDK/openjdk & brew install --cask adoptopenjdk15.
Android SDK: We use this for NativeScript when compiling and building an application for an Android file.
Android Emulator: This is a virtual Android phone that runs on our system. It comes bundled with the Android SDK, so make sure yours is running when building your application.
NativeScript Project Setup
Let’s look at how to set up a NativeScript application. Ensure your NativeScript ns CLI is available in your system by running the command ns --version.
Now, create the application:
ns create tomtomprjWhen prompted to select a template, choose React.js and press Enter. This creates a NativeScript project in the tomtomprj folder. NativeScript lets you create native mobile apps using React, Angular, and Vue.
We’ve chosen React because it’s widely known and trusted among JavaScript developers. Additionally, using React will also easily let us compare this app and the React Native equivalent we created in this earlier article.
Next, move into the folder by running cd tomtomprj. NativeScript’s built-in WebView component doesn’t support bidirectional communication between the WebView and our app’s native code. Fortunately, the nativescript-webview-ext plugin contains an enhanced WebView that provides everything we need. Install it by running:
npm install @nota/nativescript-webview-extLet’s try tunning the sample application. If you’re using an Android device or emulator, run:
ns run android
Or if you are running an iOS device or emulator, run:
ns run ios
The result will look like this:
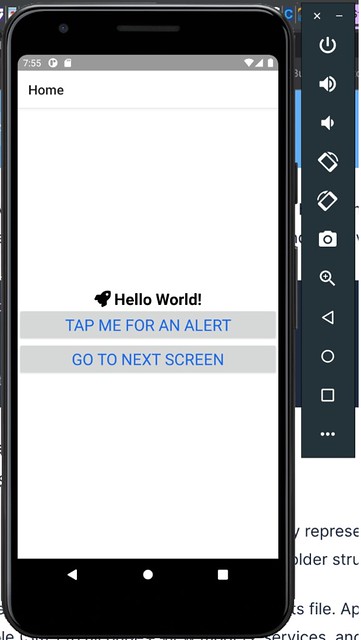
As shown above, NativeScript created our application with some template code. If you’d like to take a look at our app’s complete and final code before you proceed, it is available on GitHub.
How To Use TomTom Maps with NativeScript WebView
First, you need to get your TomTom API key. To do that, register in the TomTom Developer Portal. After, go to your email to activate the account. Then, go to our Developers TomTom dashboard and copy your API key.
The best practice for embedding a TomTom Map in NativeScript is to scaffold the NativeScript app, render the WebView component, and pass an HTML string to the WebView component’s src attribute.
Before we do any of that, however, we must register the nativesceipt-webview-ext plugin so we can use it in our app. We can do this by adding the following code to src/app.ts:
import { registerElement, NativeScriptProps } from "react-nativescript";
import type { WebViewExt } from "@nota/nativescript-webview-ext";

registerElement('webViewExt', () => require("@nota/nativescript-webview-ext").WebViewExt);

declare global {
    module JSX {
        interface IntrinsicElements {
           webViewExt: NativeScriptProps<any, WebViewExt>,
        }
    }
}
Now, open your src/components/HomeScreen.tsx file. We chose HomeScreen because it’s the first screen displayed when our app launches.
First, clear the original code up to the flexboxLayout element:
import * as React from "react";
import { RouteProp } from "@react-navigation/core";
import { Dialogs } from "@NativeScript/core";
import { FrameNavigationProp } from "react-NativeScript-navigation";
import { StyleSheet } from "react-NativeScript";
import { MainStackParamList } from "./NavigationParamList";


type HomeScreenProps = {
  route: RouteProp<MainStackParamList, "Home">;
  navigation: FrameNavigationProp<MainStackParamList, "Home">;
};


export function HomeScreen({ navigation }: HomeScreenProps) {
  return <flexboxLayout style={styles.container}></flexboxLayout>;
}
Next, we set up a variable to hold our HTML string. The HTML string renders a TomTom map in a div element.
const htmlString = `
<html>
  <head>
    <link
      rel="stylesheet"
      type="text/css"
      href="https://api.tomtom.com/maps-sdk-for-web/cdn/5.x/5.69.1/maps/maps.css"
    />
    <script src="https://api.tomtom.com/maps-sdk-for-web/cdn/5.x/5.69.1/maps/maps-web.min.js"></script>
  </head>
  <body style="width: 100%; height: 100%; margin: 0; padding: 0">
    <div
      id="map"
      style="width: 100%; height: 100%; background-color: orangered"
    ></div>
    <script>

      var map = tt.map({
        key: 'YOUR_API_KEY',
        container: 'map',
        style: 'tomtom://vector/1/basic-main',
        center: [-121.913, 37.361],
        zoom: 15
      });

      window.addEventListener("ns-bridge-ready", function(e) {
        var nsWebViewBridge = e.detail || window.nsWebViewBridge;
        map.on('dragend', function() {
          let center = map.getCenter();
          nsWebViewBridge.emit("mapCenterChanged",
            center.lng.toFixed(3) + ", " + center.lat.toFixed(3));
        });
      });

      function setCenter(lng, lat) {
        map.setCenter([lng, lat]);
      }    </script>
  </body>
</html>
`;
This is basic HTML that renders TomTom Maps in a div element. First, we imported the TomTom Maps stylesheet and the Maps SDK JavaScript file. Next, we set up a div element with an id. We have a script section where we initialized the map and rendered it in the RouteProp element. We call the map function on the tt instance inside the script section, passing an object to it. This object has these properties:
The key property is the API key for our TomTom developer account.
The container element is the HTML element where the map renders.
The style property sets our map’s style. Here, we’re using a default style, but you can customize your map’s look and feel with the TomTom Map Styler.
The center property sets the initial longitude and latitude on which the map is centered.
The zoom property sets the map’s zoom level.
Then, we add an event listener that sends the map’s new center coordinates back to the native part of our app when a user taps and drags the map view.
Finally, we add a setCenter function we can call into from our native code to change the map’s center position.
Now, we render WebView in our JSX and make its src attribute point to our htmlString variable.
Next, let’s look at the code in HomeScreen.tsx that generates our app’s user interface:
// ...code truncated
export function HomeScreen({ navigation }: HomeScreenProps) {
  let webView = undefined;
  let [mapCenter, setMapCenter] = useState('-121.913, 37.361');

  function onButtonPress() {
    const [lng, lat] = mapCenter.split(",");
    webView.executeJavaScript(`setCenter(${parseFloat(lng)}, ${parseFloat(lat)});`);
  }

  const handleMapEvent = (args: WebViewEventData) => {
    setMapCenter(args.data);
  }

  function initializeWebView(viewComponent) {
    webView = viewComponent;
    webView.on("mapCenterChanged", handleMapEvent);
  }

  return (
    <stackLayout style={styles.container}>
      <label style={styles.headingText}>TomTom NativeScript WebView</label>
      <flexboxLayout>
        <textField style={styles.textInput}
                   text={mapCenter}
                   onTextChange={(args) =>setMapCenter(args.value)}/>
        <button onTap={onButtonPress} text="Set Center" />
      </flexboxLayout>
      <webViewExt
        ref={(r) => { r && initializeWebView(r._nativeView);}}
        src={htmlString}
        style={styles.webView} />
    </stackLayout>
  );
}
There’s a lot going on here, so let’s go through it piece by piece.
We start by adding a webView variable to hold a ref to our WebView, and create a state hook to keep track of our map’s center coordinates.
Next, we add a buttonPressHandler function to change the map’s center coordinates in the WebView based on the coordinates entered in our Nativescript text editor component. Note that we’re calling executeJavascript here. This function is important because it lets our Nativescript code execute JavaScript inside the WebView.
Then, we add a handleMapEvent function to handle map coordinate updates passed back into Nativescript from the WebView. As we saw above, the JavaScript in our WebView emits an event whenever the user scrolls the map. We receive that event in handleMapEvent and use the event’s data to update the coordinates displayed in our text field.
We also do a bit of map initialization housekeeping in initializeWebView.
Finally, we return the JSX that actually renders our app. It’s made up of standard React Natievscript components. Note that we hook our button up to the handler function described earlier, set our text field to automatically update our center coordinates if the user enters new values in the textbox, and pass our WebView’s ref into initializeWebView.
Now, run the app again using ns run android or ns run ios. Our app starts up on our device or emulator, and our application appears:
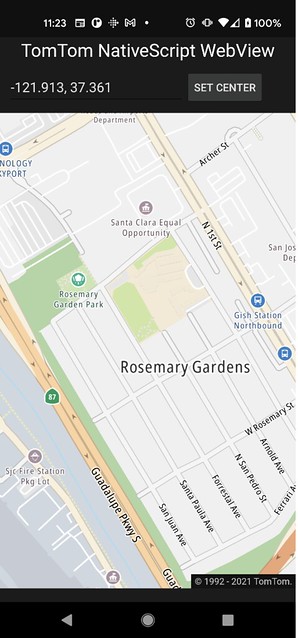
And that’s it! If you drag the map around, you’ll notice the coordinates in the text field update in real time as the map embedded in the WebView passes data back to Nativescript. You can also edit the coordinates in the box manually and tap the ‘Set Center’ button to see that the exchange works in both directions because Nativescript successfully runs code inside the WebView.
You can view the final source code for this project here.
Conclusion
As demonstrated, it’s straightforward to build a platform-agnostic map application using NativeScript WebView and TomTom Maps SDK.
To add TomTom Maps to a NativeScript WebView is very simple. The best practices are to scaffold your project, render the WebView element, set your HTML string in a variable, and then pass the HTML string to the src attribute in the WebView component.
To recap further, we installed the NativeScript CLI tool. Then we scaffolded a NativeScript app. We created an HTML string that contains the HTML that renders TomTom Maps. Next, we rendered a WebView component in our JSX and pointed the HTML string to the src attribute of the WebView component. We then rendered a TomTom Map in the WebView component.
All in all, TomTom Maps is an excellent tool for navigation purposes. Furthermore, this solution also offers:
Extended Search API
Routing API
Extended Routing API
Traffic API
Geofencing API
Location History API
Notifications API
Search API
To learn more about TomTom Maps and start using it in your applications, sign up for a TomTom Developer account today!