Using the TomTom Maps SDK for Web with ASP.NET Core, Part 2
)

It's easy to integrate the TomTom Maps SDK for Web into web apps built on HTML, CSS, and JavaScript — including popular JavaScript frameworks like Angular. In a previous article, we built the basic application. In this installment we add some more sophisticated features.
In our last article, we've shown how to quickly create and run a mapping-enabled website with ASP.NET Core MVC as a server component and TomTom Maps SDK for Web as our client JavaScript mapping library. The solution featured markers that helped users quickly visualize the location of landmarks on the map.
This time, we'll improve the existing website by building new features on top of the existing codebase. We'll learn how to draw polygons to highlight landmark boundaries, which separate famous places from their surroundings. Also, we'll add hyperlinks to the markers to zoom in to the selected locations.
To follow the separation of concerns principle, we'll modify our solution's architecture by creating a new ASP.NET Core Web API and make it store and serve mapping-related data to the MVC project.
Adding Areas
Let’s improve our web app to provide a rectangle to represent the perimeter of the landmark. The first step is to provide additional coordinates to our JSON file:
{

  "Places": [

    {

      "id": 1,

      "name": "Central Park, N.Y., United States",

      "zoom": 12,

      "center": [ -73.9712, 40.7831 ],

      "coordinates": [

        [

          [ -73.9582, 40.8007 ],

          [ -73.9491, 40.7968 ],

          [ -73.9730, 40.7642 ],

          [ -73.9819, 40.7681 ],

          [ -73.9582, 40.8007 ]

        ]

      ]

    },

    {

      "id": 2,

      "name": "Plaza Mayor, Madrid, Spain",

      "zoom": 17,

      "center": [ -3.7074, 40.4155 ],

      "coordinates": [

        [

          [ -3.70670, 40.41584 ],

          [ -3.70815, 40.41579 ],

          [ -3.70805, 40.41493 ],

          [ -3.70664, 40.41500 ],

          [ -3.70670, 40.41584 ]

        ]

      ]

    },

    {

      "id": 3,

      "name": "Taj Mahal Garden, Agra, India",

      "zoom": 13,

      "center": [ 78.0421, 27.1732 ],

      "coordinates": [

        [

          [ 78.04379, 27.17450 ],

          [ 78.04040, 27.17450 ],

          [ 78.04040, 27.17172 ],

          [ 78.04379, 27.17172 ],

          [ 78.04379, 27.17450 ]

        ]

      ]

    },

    {

      "id": 4,

      "name": "Red Square, Moscow, Russia",

      "zoom": 15,

      "center": [ 37.61970, 55.75432 ],

      "coordinates": [

        [

          [ 37.61897, 55.75521 ],

          [ 37.61825, 55.75478 ],

          [ 37.62172, 55.75322 ],

          [ 37.62222, 55.75363 ],

          [ 37.61897, 55.75521 ]

        ]

      ]

    }

  ]

}
Now we have two new properties: zoom, to adjust the map view, and coordinates, to provide the perimeter points. We’ll create those properties in the Place class as well:
public class Place

{

    ...

    public long zoom { get; set; }

    public double[][][] coordinates { get; set; }

}
Let’s then modify the showPlace() function to use the new zoom property:
function showPlace(id) {

    $.ajax('http://localhost:5000/Home/GetPlace/' + id)

        .done(function (place) {

            $('#placeName').html(place.name);

            map.jumpTo({

                zoom: place.zoom,

                center: place.center

            });

        });

}
With TomTom Maps SDK for Web, we can add a new layer where a polygon can be rendered to highlight the place of interest:
function initialize() {
map = tt.map({
key: myTomTomKey,
container: 'map',
style: 'tomtom://vector/1/basic-main'
});
map.on('load', function () {
for (var i = 0; i < famousPlaces.length; i++) {
let place = famousPlaces[i];
var marker = new tt.Marker().setLngLat(place.center).addTo(map);
var popupOffsets = {
bottom: [0, -40]
}
var popup = new tt.Popup({ offset: popupOffsets }).setHTML(place.name);
marker.setPopup(popup);
map.addLayer({
'id': 'overlay' + place.id,
'type': 'fill',
'source': {
'type': 'geojson',
'data': {
'type': 'Feature',
'geometry': {
'type': 'Polygon',
'coordinates': place.coordinates
}
}
},
'layout': {},
'paint': {
'fill-color': '#db356c',
'fill-opacity': 0.5,
'fill-outline-color': 'black'
}
});
}
});
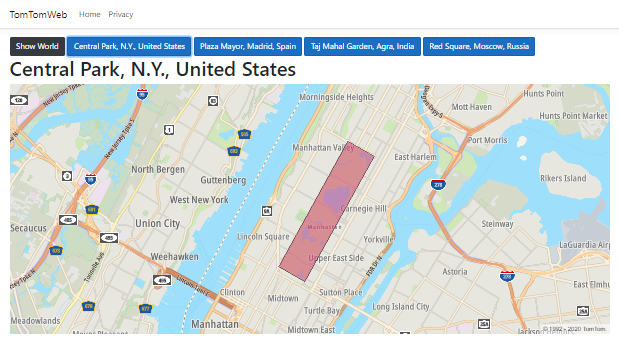
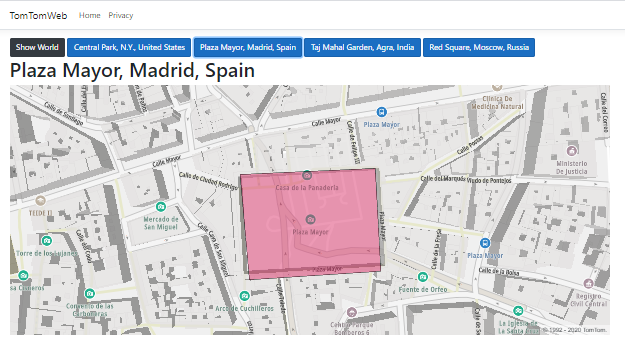
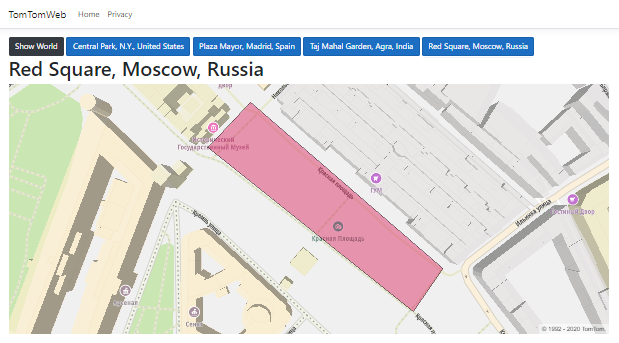
}When we run the app, we can see the borders of our landmarks:

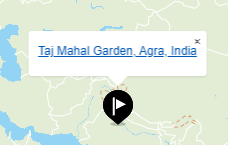
Let’s make our markers show a link for navigating to the particular map of each landmark:
var popup = new tt.Popup({ offset: popupOffsets }).setHTML('<a href="javascript: showPlace(' + place.id + ');">' + place.name + '</a>');And voilà! Now we can easily navigate to the Taj Mahal map:
Serving Data with the ASP.NET Core Web API
So far, we’ve been able to develop our web application using only the ASP.NET Core MVC Project. Working with a single ASP.NET Core project is quite simple. However, real-world scenarios might demand a more complex architecture.
Best practices and guidelines advise developers to split a solution into different projects, each with a distinct set of responsibilities. For example, an MVC project will deal with web application execution, but will not involve data storage or manipulation. Thus, we need a new project to fulfill those roles.
Let’s fill this gap by creating a new ASP.NET Core Web API project, and moving the data management from the MVC project to the Web API project.
First, create a new project as in the first part of this tutorial. Then right-click the project name, choose the Debug tab, and assign port 5001 to the Web API project URL:

Now we have a solution with two projects, which must run at the same time. Right-click the solution name, choose the Set Startup Projects menu, then choose Multiple startup projects:

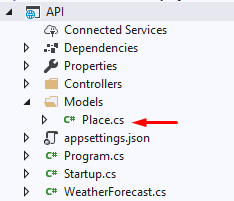
Create a new \Models folder for the project, then copy and paste the Places.cs file we’re using in the MVC project into that folder:
Next, create a new \Data folder and copy the famous-places.json file to that folder:

Now add a new controller, named PlacesController, to the Web API project. Include in it the following code, which is similar to what we created for the MVC project.
[ApiController]

[Route("[controller]")]

public class PlacesController : ControllerBase

{

    private readonly ILogger<PlacesController> _logger;

    public PlacesController(ILogger<PlacesController> logger)

    {

        _logger = logger;

    }

    [HttpGet]

    public async Task<PlaceCollection> Get()

    {

        return await GetPlaceCollection();

    }

    [HttpGet("{id}")]

    public async Task<Place> Get(int id)

    {

        var collection = await GetPlaceCollection();

        return collection.Places.Where(p => p.id == id).Single();

    }

    private async Task<PlaceCollection> GetPlaceCollection()

    {

        var file = Path.Combine(Directory.GetCurrentDirectory(),

            "Data", "famous-places.json");

        string json = await System.IO.File.ReadAllTextAsync(file);

        return PlaceCollection.FromJson(json);

    }

}
When the Web API app runs, you can test two endpoints. The first one gives you the full landmark collection:

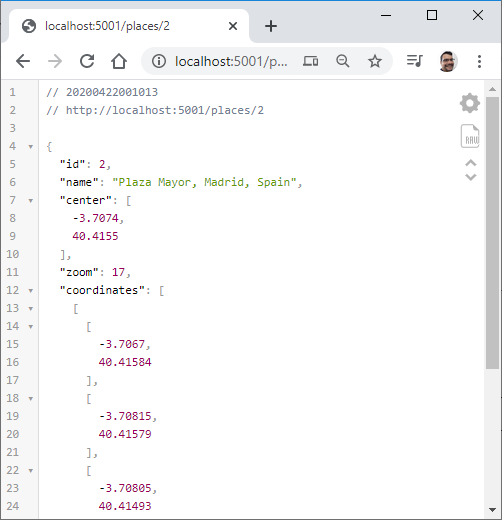
The second endpoint returns detailed data on a specific location:
Now let’s go back to the MVC project and refactor both the IndexAsync() and GetPlace() actions. Here, we implement calls to the Web API endpoints through the HttpClient class, and return the results as deserialized objects:
public async Task<IActionResult> IndexAsync()

{

    ViewData["MyTomTomKey"] = MyTomTomKey;

    using (var client = new HttpClient())

    {

        var response = await client.GetAsync("http://localhost:5001/places");

        var json = await response.Content.ReadAsStringAsync();

        var placeCollection = PlaceCollection.FromJson(json);

        return View("Index", placeCollection);

    }

}

public async Task<JsonResult> GetPlace(int id)

{

    using (var client = new HttpClient())

    {

        var response = await client.GetAsync($"http://localhost:5001/places/{id}");

        var json = await response.Content.ReadAsStringAsync();

        var place = Place.FromJson(json);

        return new JsonResult(place);

    }

}
After these changes, the responsibility for providing data will belong to the Web API project. If you want to secure the Web API connections, read the relevant Microsoft documentation.
Conclusion
As you can see, TomTom Maps SDK is easy to use for developers and software engineers working with the powerful ASP.NET Core.
Although TomTom Maps SDK for Web is a JavaScript library, data can be easily pushed to the client-side code using the ASP.NET Core’s Razor engine to dynamically render UI content. In addition to ASP.NET Core, developers can use TomTom Map SDK for Web with other server-side stacks, like Node.JS, Java/Spring, Python/Django, and Ruby on Rails. JavaScript code can also retrieve mapping data residing on the server side using AJAX requests.
Since ASP.NET Core is a server-side framework, it provides the ideal place to securely deliver data using RESTful web API data services to the client-side code.