Tilt and Rotation with TomTom JavaScript Maps SDK for Web v6
) Jose Jose Rojas
Jose Jose Rojas
TomTom JavaScript Maps SDK for Web 5.0 includes support for new mapping capabilities including the ability to rotate the map and the ability to change the map’s tilt programmatically. There’s even a new flyTo mode that animates the transition between views. In this article, we’ll build an application using the TomTom JavaScript Maps SDK for Web and write code to demonstrate how to set the map location, orientation, and perspective.
Map SDK Updates
The new TomTom JavaScript Maps SDK for Web v6 augments the previous version 5 with more support for new mapping scenarios. It was designed to work on a range of devices and interaction modes, from lower-power small-screen devices to more powerful devices with larger multi-touch screens with scalable vector-based maps. Code demonstrating the new functionality can be found in the functional sample project (available here) and detailed within the SDK documentation.
Let’s look at two of the new map capabilities:
The ability to rotate the map.
The ability to change the map’s tilt.
The best perspective for a map will depend on what a user is doing.
If a user is planning a trip, the preferred perspective is usually an overhead view with the north direction being in the direction of the top of the display.
When following directions, the preferred orientation is for the direction in which the user is travelling to be in the same direction as the top of the display, rotating as the user makes turns and as the direction of the path being travelled changes. Instead of an overhead view, a tilted perspective is preferred. This is closer to the perspective that a traveler will have when looking at the road.
In this article, we will:
Build an application using the TomTom JavaScript Maps SDK for Web.
Write code to demonstrate how to set the map location, orientation, and perspective.
Base Project
To get started, make a new HTML project with an index page and folders for the JavaScript and style components. Also, the latest version of the TomTom JavaScript Maps SDK for Web is needed and can be found here. The full documentation on using the SDK and its features can be found there as well. You can also use our content distribution network (CDN) to download the library and css style files, but for this sample we are downloading the files and placing them in a folder named ‘sdk'.
The index page has a script reference to the maps JavaScript file and style definitions.
<!doctype HTML>
<html>
    <head>
        <link rel="stylesheet" href="sdk/maps.css" />
        <style>
        .map {
            height: 100%;
            position: absolute;
            width: 100%;
        }
        </style>>
        <script src="sdk/maps-web.min.js"></script>
        <script src="js/main.js"></script>
    </head>
    <body>
        <div id="mapElement" class="map"></div>
    </body>
</html>
This is the JavaScript to create the map.
const APP_KEY = "YOUR_APP_KEY_HERE";

var map;

function start() {
    console.log("running")
    map = new tt.map({
        "key": APP_KEY,
        "container":"mapElement",
    });
}
window.onload = start;
To run the code, it should be accessed through an HTTP server. The easiest way to do this is to use the Node.js utility http-server. The utility can be installed with the Node package manager with the command:
npm install http-server –gOnce installed, from the command terminal, navigate to the folder that contains the project and type:
http-server .When the server is running, open a web browser and navigate to http://localhost:8080/index.html. You will see the application render a map.
function start() {
    console.log("running")
    map = new tt.map({
        "key": APP_KEY,
        "container":"mapElement",
        "basePath":"sdk",
        "source":"vector",
        // Adding the following two elements to
        //set initial map location
        "center": {lat:37.336634, lng: -121.891623},
        "zoom": 13
    });
}
Setting the Map Location
One of the first things that you’ll want to do in the map is change the location on which it is centered. Let’s center the map on San Jose. The coordinates for San Jose are {lat:37.336634, lng: -121.891623} .
When the map is initialized, there are a number of optional values that can be passed to its constructor. A center value (the latitude and longitude) controls the coordinates that will be at the center point of the map.
By default, the map will show the entire earth. Passing a zoom value will enlarge the area being viewed. Larger values will cause the map to be zoomed in more. The following code only differs from the previous code sample in values for center and zoom being set.
function start() {
console.log("running")
map = new tt.map({
"key": APP_KEY,
"container":"mapElement",
"basePath":"sdk",
"source":"vector",
// Adding the following two elements to
//set initial map location
"center": {lat:37.336634, lng: -121.891623},
"zoom": 13
});
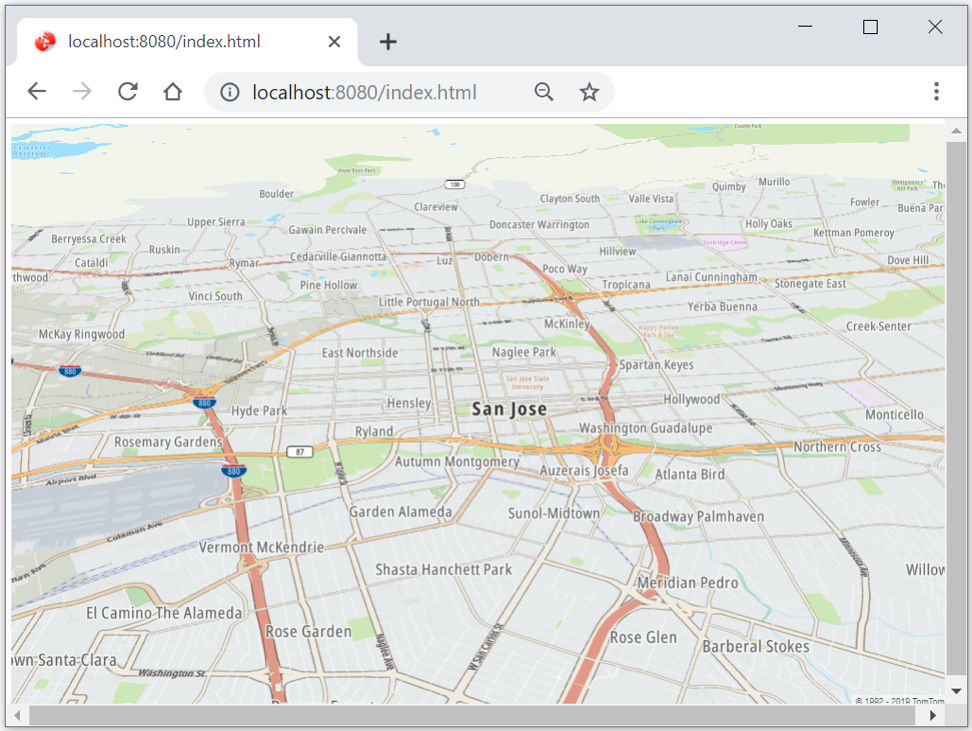
}When the page is loaded the map now centers on San Jose.

The zoom level and center point can also be set after the map is loaded through the map functions setCenter, setZoom, and flyTo. These functions could be used to set the map location in response to user action.
Both setZoom and setCenter have immediate effect.
flyTo will animate the transition from the maps current position to the selected position. In addition to accepting center and zoom values, flyTo can also accept pitch and bearing values (which will be discussed in a moment).
The following is a modification of the previous code example. After the map loads it will wait for six seconds and then animate in from a world view to San Jose.
function start() {
    console.log("running")
    map = new tt.map({
        "key": APP_KEY,
        "container":"mapElement",//this is the ID of the div element in
                                 //the HTML which will contain the map
    });

    map.on('load',function() {
        setTimeout( function() {
            //Using the flyTo function to smoothly animate
            // the map to a new position
            map.flyTo({
                "center:{lat:37.336634, lng: -121.891623},
                "zoom":13
            })
        }, 6000)
    });
}
To instantly jump to the same map position instead of animating to it, use the setCenter and setZoom functions.
map.on('load',function() {
    setTimeout( function() {
        //Instead of using flyTo here I am setting the map
        //center and zoom to jump to a specific position
        map.setCenter([ -121.891623, 37.336634,]);
        map.setZoom(13);
    }, 6000)
});
Using Tilt
The map will automatically start from an overhead view, as though a camera were looking straight down on the area being viewed. This is a perspective with no tilt or pitch (a zero-degree tilt). The camera can be adjusted to have up to a 60-degree tilt.
When combined with the 3D features of the new JavaScript Maps SDK for Web, such as visualization of terrain and buildings, the pitch of the map can be set with a single function call. The map object has a function named setPitch that accepts a number in the range of 0 to 60.
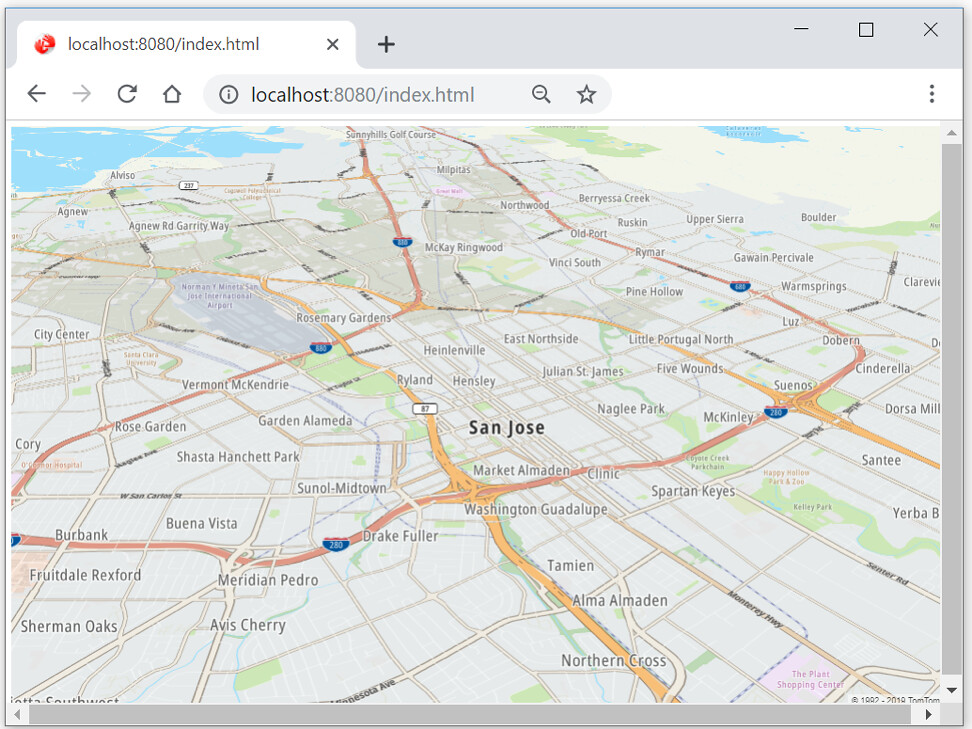
In the following code after the map is loaded the code waits for 6 seconds and then applies a 60-degree tilt.
function start() {
    console.log("running")
    map = new tt.map({
        "key": APP_KEY,
        "container":"mapElement",
        //Set the initial position of the map to San Jose
        "center": :{lat:37.336634, lng: -121.891623},
        "zoom": 13
    });

    map.on('load',function() {
        setTimeout( function() {
            //Tilting the map perspective 60 degrees
            map.setPitch(60)
        }, 6000)
    });
}The result looks like the following.

Using Rotation
Tilt gives a natural perspective of the map. But by itself the map is always facing the same direction. Maps are usually oriented with the top of the map being aligned with north.
Only being able to face north isn’t useful. When following a path, it is easier for a user to make decisions and follow directions if the map is reoriented with the top of the map to be aligned with the direction in which the user is moving. Instead of the need to mentally translate a change in direction on the map to the actual turn that a user needs to make changes in direction are aligned. The map is rotated by setting the direction (or bearing).
The map is reoriented through the setBearing function. The function accepts the direction that should be oriented in the upward direction in degrees.
North is 0 degrees
East is 90 degrees
South is 180 degrees
West is 270 degrees
Another way of thinking of this value is the number of degrees to rotate the map in a clockwise direction.
Apply both rotation and tilt together to give a better presentation of the map. With both effects applied the map can have a perspective that is close to the first-person perspective that the user will have. This could be done by calling setPitch and setBearing individually, or in a single call using flyTo.
If the flyTo function is used instead of the map popping to the desired state it will smoothly rotate and tilt to transition to the new state. In addition to being more visually pleasing, a user is able to better understand the relationship between a previous and updated perspective of the map through seeing the transition.
map.on('load',function() {
    setTimeout( function() {
        //using flyTo again, but with a different set of values.
        //Previously the center and zoom were being set. Now the
        //pitch and bearing are being set.
        map.flyTo (
            {
                "pitch":60,
                "bearing":65,
                "center": {lat:37.336634, lng: -121.891623},

            }
        )
    }, 6000)
});
Closing
Within this article we’ve seen how to make display a vector map using the TomTom JavaScript Maps SDK for Web v6. You have seen how to programmatically change the perspective of the map by setting the maps rotation and tilt, allowing the map to be changed to an overhead perspective for planning to a perspective closer to first person which is better for following directions and making navigation decisions on the go. These changes of perspective can be dynamically adjusted and in response to user interaction.