)
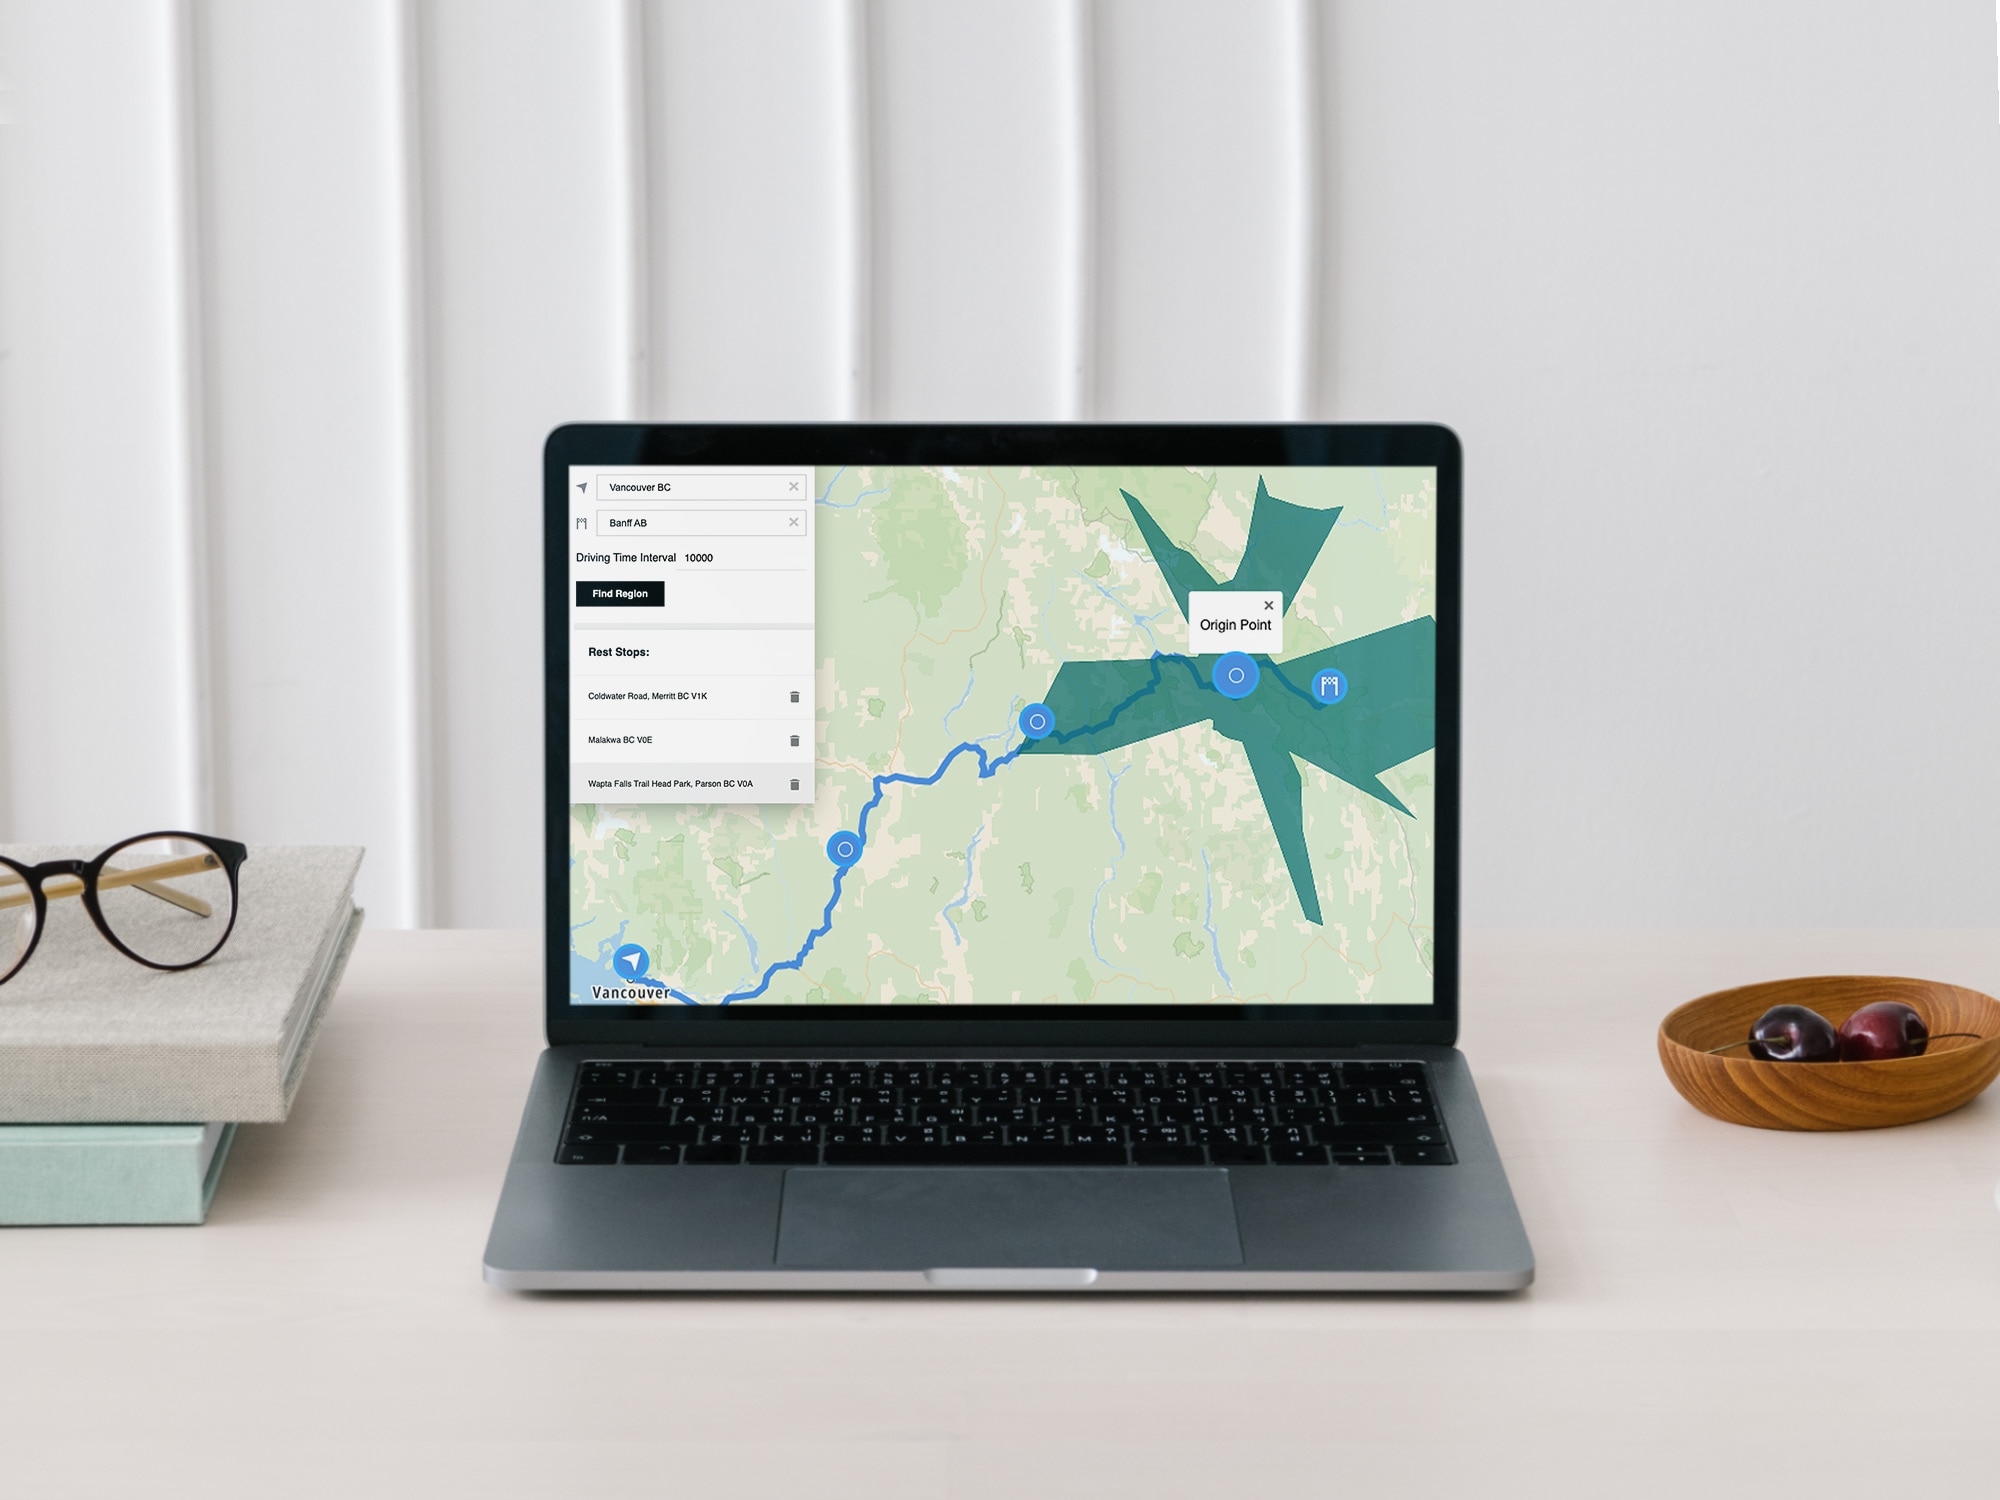
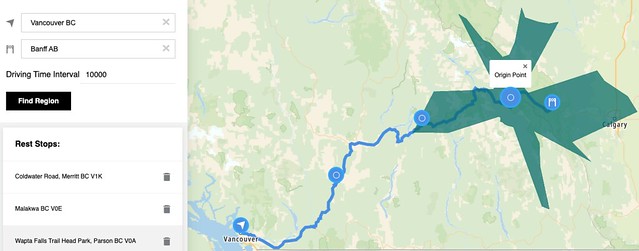
Truckers must time their rest stops to comply with regulations — and get a good meal at their favorite truck stop. Learn how to easily include TomTom’s reachable range in your routing app using CodePen, helping truckers get a much-needed rest.
Most map applications track routes from a start address to a destination address, which only gives you the route and time. TomTom’s Maps SDK for Web provides comprehensive APIs to allow you to build map applications with many exciting features. For example, we can create a truck routing application for truck drivers to choose rest stops after a specified driving time.
TomTom’s developer portal provides live functional examples. We can build our application based on existing examples that already have the essential functions we need.
This tutorial reviews how to build the truck routing application based on the Supporting Points example in CodePen. The Supporting Points example displays the best route between two points and allows adding stops by clicking on the map. To meet the needs of our use case, we can simply use the Reachable Range API to display a vehicle-reachable range within the specified time for the start point and each supporting point that the user picks.
Follow the tutorial in this article to build an application in CodePen and see the results immediately inside CodePen’s live editor. The only thing you need is a browser.
Getting Started
First, let’s do a little bit of housekeeping. We will need a TomTom developer account. If you don’t have one, register an account with TomTom.
Log into the TomTom Developer Portal and get an API key for the Map Display API, Search API, and Routing API.

Once you get your API key, do the following:
Log in to TomTom's Developer Portal.
Go to the Supporting Points example page.
On the example page, click CodePen.
Enter your API key and then click Open in CodePen.
This opens the CodePen online live editor with all the HTML, CSS, and JS code. We’ll use this as a starting point and build as we go. But, if you’d like to peek at the final application, you can find it here.
Calculating a Route
We can start interacting with the Supporting Points example by entering the start and the destination addresses. The map displays a route. We can then click on the map to add supporting points.

The Supporting Points example calculates the best route between the start point and the destination point, passing through supporting points using the tt.services.calculateRoute function. The markers are added using the tt.Marker function.
Adding UI Items
The Supporting Points example already has the input fields for the start and destination addresses. What we need is to add a time input field and a button to submit its value.
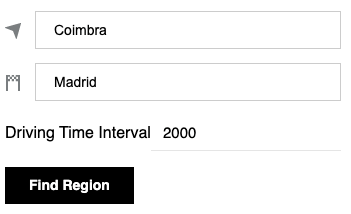
In the HTML box, add the following code before the </header> tag:
<div class= "tt-timeinput">
       <label class='tt-label'>Driving Time Interval</label>
       <input id='timebudget' class='tt-input' type='number' value='2000'>
   </div>
        <div class='tt-spacing-top-24'>
        <input id='submit-button' type='submit' class='tt-button -primary tt-spacing-top-24' name='submit' value='Find Region'>
   </div>
Also change the result header text from “Supporting Points” to “Rest Stops” for our use case. To do so, find <div class='result-header'>Supporting Points:</div>, and change it to <div class='result-header'>Rest Stops:</div>.
Add the following code at the end of the CSS box. The code formats the Driving Time Interval input field:
       .tt-label{
            width:160px
        }
    .tt-timeinput{
            align-items: center;
            display: flex;
            margin-top: 12px;
        }
Finding a Region
Next, enter a desired driving time interval in seconds, then click Find Region to see the reachable region overlaid on the map.

Use Calculate Reachable Range to find the reachable region within the time interval of the origin. To do so, provide the origin and the timeBudgetInSec parameters to the tt.services.calculateReachableRange function:
The origin parameter is a pair of longitude and latitude lines for the “origin point.”
The timeBudgetInSec parameter is the maximum driving time interval in seconds.
The request returns a JSON object that contains a polygon boundary in counterclockwise orientation and the precise polygon center (the result of map-matching the “origin point”). We can add a map layer that fills the polygon with the desired color and opacity with the returned results. We define the handleServiceResponse and the drawPolygon functions to handle this.
Add the following JavaScript code at the end of the JS box:
function handleServiceResponse(serviceData, response) {
           var bounds = new tt.LngLatBounds();
           var groupedResponseData = {};
            response.batchItems.forEach(function(polygonData, i) {
               var locationData = serviceData[i];
               var polygon = polygonData.toGeoJson();


               if (!Array.isArray(groupedResponseData[locationData.location]))                  {
                   groupedResponseData[locationData.location] = [];
               }
               groupedResponseData[locationData.location].push({
                   locationData: locationData,
                   polygon: polygon
               });
               polygon.geometry.coordinates[0].forEach(function(point) {
                   bounds.extend(tt.LngLat.convert(point));
               });
           });
           drawPolygon(groupedResponseData);
           map.fitBounds(bounds, { padding: 50 });
       }


  function drawPolygon(groupedResponseData) {
            Object.keys(groupedResponseData).slice().reverse().forEach(function(locationName, i) {
               var locationData = groupedResponseData[locationName];
               var polygonLayers = [];


               locationData.forEach(function(data, i) {
                   map.addLayer({
                       'id': locationName,
                       'type': 'fill',
                       'source': {
                           'type': 'geojson',
                           'data': data.polygon
                       },
                       'paint': {
                           'fill-color': '#006967',
                           'fill-opacity': 0.7
                       }
                   });
                   polygonLayers.push({
                       id: locationName,
                       color: '#006967'
                       });
                   });
                   layersOnTheMap[locationName] = polygonLayers;
                   var polygonMarker = new tt.Marker().setLngLat(OriginPoint[locationName]).addTo(map);
                   polygonMarker.setPopup(new tt.Popup({ offset: 30 }).setText(locationName));
                   polygonMarker.getElement().addEventListener('click', function() {
                       layersOnTheMap(function(layer) {
                       map.setPaintProperty(layer.id, 'fill-color', '#006967');
                       map.setPaintProperty(layer.id, 'fill-opacity', 0.5);
               });
               });
               markersOnTheMap.push(polygonMarker);
                   polygonMarker.togglePopup();
           });
       }
Users can then pick a rest stop within the polygon or anywhere they want. The map displays the rest stop address when clicking on it. This recalculates the route from the origin to the chosen rest stop.

When users select their first stop location in the Rest Stops section and click Find Region again, the map no longer shows the reachable region. To do this, we must define a cleanMap function for it.
Add the following JavaScript code at the end of the JS box:
  function cleanMap() {
            Object.keys(layersOnTheMap).forEach(function(layerGroudKey) {
                layersOnTheMap[layerGroudKey].forEach(function(layer) {
                    map.removeLayer(layer.id);
                    map.removeSource(layer.id);
                });
            });
            layersOnTheMap = {};
            markersOnTheMap.forEach(function(marker) {
                marker.remove();
            });
            markersOnTheMap = [];
        }
Recalculate the reachable region using the new location. Use the new location as the “origin point” to calculate the new reachable area and overlay it on the map.
Add the following JavaScript code at the end of the JS box:
   var OriginPoint = {'Origin Point':route.start};
        var errorHint = new InfoHint('error', 'bottom-center', 5000).addTo(document.getElementById('map'));
        var loadingHint = new InfoHint('info', 'bottom-center').addTo(document.getElementById('map'));
        var layersOnTheMap = {};
        var markersOnTheMap = [];

        document.getElementById('submit-button').addEventListener('click', function(e) {
            e.preventDefault();
            errorHint.hide();
            loadingHint.setMessage('Loading...');
            cleanMap();

if (markerSelected){
OriginPoint = {'Origin Point':[markerSelected._lngLat.lng,markerSelected._lngLat.lat]};
}else{
OriginPoint = {'Origin Point':[startMarker._lngLat.lng,startMarker._lngLat.lat]};
}

        var serviceData = [];
serviceData.push({
timeBudget: {time: document.getElementById('timebudget').value, color: "#006967"},
origin: OriginPoint['Origin Point'],
location: "Origin Point"
});

        tt.services.calculateReachableRange({
            batchMode: 'sync',
            key: 'INSERT YOUR API KEY HERE',
            batchItems: serviceData.map(function(data) {
                return {
                    timeBudgetInSec: data.timeBudget.time,
                    origin: data.origin
                };
            })
        }).then(function(response) {
            handleServiceResponse(serviceData, response);
            loadingHint.hide();
        }).catch(function() {
            loadingHint.hide();
            errorHint.setMessage('There was an error with the request, please try again');
        });
        });
You’ll need to insert your own API key after key: as noted in the code above.
Removing a Region
Users can pick the next rest stop and so on until they finally reach their destination.
Remove the last reachable region and keep all the rest stops on the map. To do so, add another button to remove the reachable area. Users can also use this button to remove the reachable area at any time.
In the HTML box, add the following code right after the “Find Region” input tag:
<input id='submit-button-clear' type='submit' class='tt-button -primary tt-spacing-top-24' name='submit-clear' value='Remove Region'>Add the following JavaScript code at the end of the JS box:
  document.getElementById('submit-button-clear').addEventListener('click',              function(e) {
       e.preventDefault();
cleanMap();
});
Conclusion
And that’s it! We’ve just created a truck routing application in CodePen. Now, you can play with it. If you haven’t looked at the final application in CodePen yet, you can find it here.
In this tutorial, you have learned how to create a truck routing application that allows truck drivers to pick rest stops within a specified driving time. You can see how easy it’s to make an application based on an existing example in TomTom’s developer portal. To see other examples of a reachable region, check out Reachable Region and Batch Reachable Region.
For more information about the APIs used in this use case, including additional options and capabilities, you can review the documentation about Search API, Routing API, and Map Display API at any time.