Fitness Mapping with the Strava API and TomTom Maps
)

Fitness apps for runners, bikers, and hikers can collect useful information, including location data. Strava is a popular service used by athletes to track running, biking, and other exercise. And the cool thing is, Strava provides an API that lets you use that workout information in your own apps. The TomTom location APIs and Maps SDKs make it easy to incorporate location and routing information into almost any app. In this example we'll take route data from Strava and plot it on a web page with TomTom Maps SDK for Web.
The TomTom location APIs and Maps SDKs make it easy to incorporate location and routing information using a sophisticated map, where we can layer more information if we’d like. This information can be incorporated into almost any app. When you combine the flexibility and ease of integration of TomTom technology with other data sources, you can do some interesting things.
Strava is a popular service used by athletes to track running, biking, and other exercise. And the cool thing is, Strava provides an API that lets you use that workout information in your own apps.
In this article, we’re going to combine the TomTom Maps SDK for Web with the data provided by the Strava APIs. You’ll need a (free) TomTom developer account and a (free) Strava account.
Additionally, you should download the Strava app for your phone and go for a walk or a bike ride so you have at least one activity to work with. Using this activity, we’ll take route data and plot it using the TomTom SDK for Web. This will allow us to potentially use this activity information for even more purposes – giving a runner the ability to create a totally custom map visualization of their runs and include any information they would like, using advanced routing.
Setting Up the App
In this article, you’re mainly going to use JavaScript. I’m developing this on Windows, so some commands may vary for Mac and Linux systems, but overall shouldn’t be too different.
For starters, let’s create a small Node.js back end. If you don’t have it yet, install Node.js and include npm (which is done by default).
Create a folder somewhere on your computer, name it tomtomapp, and use the command prompt to browse to the folder.
Now, use the npm init command to initialize npm, and keep all the defaults.
Next, install Express by using the command:
npm install express -s In your folder, create a file and name it index.js. Add the following code to it:
var express = require('express');

var app = express();

app.get('/map', function(req, res) {

    res.send('This is the map page!');

});

var server = app.listen(80, '127.0.0.1');
Next, go back to your command prompt and install nodemon using the command:
npm install nodemon -g Once it’s installed, run it by typing nodemon. This will start your Node.js app. Nodemon will watch your files and automatically restart when you change them. Now, browse to localhost/map to see if your app works. If it does, you should see “This is the homepage!”
Add the TomTom Maps SDK
Now, create a map.html page. You can copy-paste your first version from the TomTom tutorials, but I’ll repeat it here:
<!DOCTYPE html>

<html class='use-all-space'>

<head>

    <meta http-equiv='X-UA-Compatible' content='IE=Edge' />

    <meta charset='UTF-8'>

    <title>My Map</title>

    <meta name='viewport'

           content='width=device-width,initial-scale=1,maximum-scale=1,user-scalable=no'/>

    <link rel='stylesheet' type='text/css' href='https://api.tomtom.com/maps-sdk-for-web/cdn/5.x/5.49.1/maps/maps.css'/>

    <style>

       #map {

           width: 100vw;

           height: 100vh;

       }

    </style>

</head>

<body>

    <div id='map' class='map'></div>

    <script src='https://api.tomtom.com/maps-sdk-for-web/cdn/5.x/5.49.1/maps/maps-web.min.js'></script>

    <script>

        const tomtomKey = '<YOUR KEY>';

        // Initialize the map.

        tt.setProductInfo('TomTom App', '1.0.0.0');

        const map = tt.map({

            key: tomtomKey,

            container: 'map',

            style: 'tomtom://vector/1/basic-main'

        });

    </script>

</body>

</html>
There are a few things to note here. You can find the different versions of the API on the TomTom Maps SDK for Web downloads page. TomTom recommends linking to the CDN hosted version, as we're doing here. The example uses version 5.49.1.
You should replace <YOUR KEY> with, well, your key. If you created an account on TomTom, you should find your key on your dashboard where you get an initial key, named My First API Key.
While I’m using the TomTom CDN to load the JavaScript and CSS files, you can also use npm to load them locally (https://www.npmjs.com/package/@tomtom-international/web-sdk-maps).
In your index.js file, require the path package and change the res.send line file to the following:
var path = require('path');

app.get('/map', function(req, res) {

    res.sendFile(path.join(__dirname, 'map.html'));

});
If you now browse to localhost/map again, you should see a map of the world.
Connecting to Strava
I’m assuming you already have a Strava account. If you haven’t already, go make a route. For this demo, I’ve created a private route through the dunes near my house.
Next, you should go into your Strava account and create an API Application. You need to give it the following information:
A name (TomTom App)
A website (https://localhost.com)
An authorization callback domain (localhost)
A logo (cook up something beautiful in Paint)
The Strava API gives access to a user’s profile, activities, routes, and other data.
Implementing OAuth2 Authentication for Strava
Strava works with OAuth2 for authentication with their API service. This works as follows:
Your website asks users to log in at Strava, providing a redirect URI.
Strava logs you in and redirects to the redirect URI with a code.
The code can be used once to get an access token and a refresh token.
The access token can be used to access the Strava API for several hours.
Once the access token expires, you can use the refresh token to get a new one.
Because I’m keeping everything front-end, we don’t have a session, cache, or database to store access and refresh tokens. The result is that you’ll have to log into Strava every time to get a new code and do the OAuth2 thing again. For more information on Strava’s OAuth2 process, see Authentication in the Strata Developers documentation.
First, you need a login page for your website. This is very easy. All you need is to get people to log in with Strava, so create an index.html and put the following code in it:
<a href="https://www.strava.com/oauth/authorize?client_id=<YOUR CLIENT ID>&response_type=code&redirect_uri=http://localhost/map&approval_prompt=auto&scope=read_all">Login</a> Replace <YOUR CLIENT ID> with your client ID, which can be found on your Strava API Application page.
Furthermore, see the redirect_uri, which is set to localhost/map, the page you just created. The scope is set to read_all, meaning you need permission to read all your data, including private data (that’s because the route is set to private).
The approval_prompt can be set to auto or forced, meaning Strava can redirect you automatically if you already gave permission. That last part doesn’t seem to work for scope read_all and localhost though, so you’re always getting the login prompt.
In your index.js, add another route to the index page:
app.get(['/', '/index'], function(req, res) {

    res.sendFile(path.join(__dirname, 'index.html'));

});
If you now browse to localhost, you should see the Login link, which takes you to the Strava login and authorization page, which then returns you to your map page with a code in the URL.
Accessing the Strava API
You can now use the code in your JavaScript on the map.html page. You need to:
Request the access code
Request the route information
Make some calls to the TomTom API
This can result in some JavaScript callback confusion, so the first thing you should do is create a helper method to wrap the XMLHttpRequest in a Promise object so you can use it instead:
function makeRequest(url, options) {

    options = options || {};

    const request = new XMLHttpRequest();

    return new Promise(function (resolve, reject) {

        request.onreadystatechange = function () {

            if (request.readyState !== 4) {

                return;

            }

            if (request.status >= 200 && request.status < 300) {

                resolve(request.response, request);

            } else {

                reject({

                    status: request.status,

                    statusText: request.statusText

                });

            }

        };

        request.open(options.method || 'GET', url, true);

        const headers = options.headers;

        if (headers) {

            for (var header in headers) {

                if (Object.prototype.hasOwnProperty.call(headers, header)) {

                    request.setRequestHeader(header, headers[header]);

                }

            }

        }

        if (options.data) {

            request.setRequestHeader('Content-Type', 'application/json');

            request.send(JSON.stringify(options.data));

        } else {

            request.send();

        }

    });

}
Usage is straightforward. You’re first going to request the access token:
makeRequest('https://www.strava.com/oauth/token', {

        method: 'POST',

        data: {

            client_id: '<YOUR CLIENT ID>',

            client_secret: '<YOUR CLIENT SECRET>',

            code: code,

            grant_type: 'authorization_code'

        }

    })

    .then(function (response) {

        // Use our access token to get the logged in users routes.

    })

    .then(function (response) {

        // Process the GPX data.

    });

    .catch(function (error) {

        console.error(error);

    });
Again, replace <YOUR CLIENT ID> and <YOUR CLIENT SECRET> with your API details. <YOUR CLIENT SECRET> can be found on the Strava API Application page.
The makeRequest helper method converts the data to JSON for you. Because you can chain with it and catch your code, you won't have problems with callbacks and it's more readable.
Requesting Route Info
The next step is to get route information. The oauth/token request returns the access token as well as athlete information. To get the logged-in users’ routes, you need a call to athletes/{id}/routes. For this demo, take the first route and request the GPX (GPs eXchange format) data, which is a common GPS data format:
// Use our access token to get the logged in users routes.

const data = JSON.parse(response);

console.log(data);

return makeRequest(https://www.strava.com/api/v3/athletes/${data.athlete.id}/routes, {

    headers: {

        'Authorization': Bearer ${data.access_token}

    }

})

.then(function (response) {

    // Get the details of the first route.

    const firstRoute = JSON.parse(response)[0];

    return makeRequest(https://www.strava.com/api/v3/routes/${firstRoute.id}/export_gpx, {

        headers: {

            'Authorization': Bearer ${data.access_token}

        }

    });

});
GPX is an XML format. JavaScript really doesn’t handle XML very well — JSON is the native data format for JavaScript — so you need to somehow parse the XML to plain JavaScript objects.
For more information on the Strava API, see the API and SDK reference at http://developers.strava.com/docs/reference/.
Here’s a small, naive helper method that parses the XML to a JavaScript object:
function parseDom (dom) {

    return parseNode(dom.documentElement, {});

}

function parseNode(node, obj) {

    if (node.children.length === 0) {

        obj[node.nodeName] = node.textContent;

    } else if (node.nodeName !== 'trkseg') {

        let count = 0;

        const len = node.children.length;

        const newObj = {};

        for (count; count < len; count += 1) {

            obj[node.nodeName] = parseNode(node.children[count], newObj);

        }

    } else {

        // trkseg node.

        let count = 0;

        const len = node.children.length;

        let arr = [];

        for (count; count < len; count += 1) {

            const trkptNode = node.children[count];

            const trkpt = {};

            let attrCount = 0;

            const attrLen = trkptNode.attributes.length;

            for (attrCount; attrCount < attrLen; attrCount += 1) {

                trkpt[trkptNode.attributes[attrCount].nodeName] = trkptNode.attributes[attrCount].textContent;

            }

            arr.push(parseNode(trkptNode.children[0], trkpt));

        }

        obj[node.nodeName] = arr;

    }

    return obj;

}
This works for the specific GPX request. All XML elements have child elements with either other child elements or text values. The trkseg element is an exception. It has child elements, but it’s a collection. Furthermore, the trkpt elements inside the trkseg element have lon and lat attributes instead of elements. This whole exercise is basically to get those lon and lat (longitude and latitude) attributes.
Working with the TomTom Maps SDK
Now that you can convert the GPX data to objects, you can put them on the map.
First, here’s a little helper function that returns the style of the route you’re going to draw:
function buildStyle(id, data, color, width) {

    return {

        id: id,

        type: 'line',

        source: {

            type: 'geojson',

            data: data

        },

        paint: {

            'line-color': color,

            'line-width': width

        },

        layout: {

            'line-cap': 'round',

            'line-join': 'round'

        }

    };

}
You can now parse the GPX data and use it to create an array of longitude and latitude values, [[lon, lat], [lon, lat]…]. Using this, you can create a GeoJSON object, which is another standard for representing simple geographical features. It's basically a JSON object optimized for geographical data.
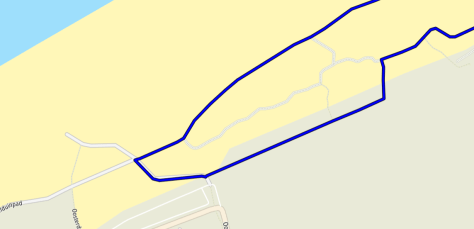
Then, using the map.addLayer function and the buildStyle function, you draw a line on your map. You call it twice to draw a border around your route. Finally, you zoom and set the center of the map to the first coordinate so your route is visible.
// Process the GPX data.

const dom = new DOMParser().parseFromString(response, "application/xml");

const jsResponse = parseDom(dom);

const lngLats = jsResponse.gpx.trk.trkseg.map(seg => {

    return [+seg.lon, +seg.lat];

});

const routeGeoJson = {

    "type": "Feature",

    "geometry": {

        "type": "LineString",

        "coordinates": lngLats

    }

};

map.addLayer(buildStyle('1', routeGeoJson, 'black', 6))

    .addLayer(buildStyle('2', routeGeoJson, 'blue', 4));

map.setZoom(15);

map.setCenter(lngLats[0]);
For me, this draws a nice line in the dunes.
This looks good, but there’s more you can do.
Drawing Markers
Since my route finishes where it starts, it’s a closed circle and I can’t see where it starts and ends. So let’s place a marker at the start. This is easy with the TomTom Maps SDK:
new tt.Marker().setLngLat(lngLats[0]).addTo(map); And the result is a marker at the start.
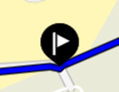
Let’s customize the marker so that it shows a walking figure instead. For this, use Font Awesome in your HTML:
<link rel="stylesheet" href="https://cdnjs.cloudflare.com/ajax/libs/font-awesome/5.13.0/css/all.min.css" integrity="sha256-h20CPZ0QyXlBuAw7A+KluUYx/3pK+c7lYEpqLTlxjYQ=" crossorigin="anonymous" />
<script src="https://cdnjs.cloudflare.com/ajax/libs/font-awesome/5.13.0/js/all.min.js" integrity="sha256-KzZiKy0DWYsnwMF+X1DvQngQ2/FxF7MF3Ff72XcpuPs=" crossorigin="anonymous"></script>
Next, you need to create an HTMLElement that you can pass to the markers constructor:
const divElem = document.createElement('div');
const divClassAttr = document.createAttribute('class');
divClassAttr.value = 'fa-3x';
divElem.setAttributeNode(divClassAttr);
const iconElem = document.createElement('i');
const iconClassAttr = document.createAttribute('class');
iconClassAttr.value = 'fas fa-walking';
iconElem.setAttributeNode(iconClassAttr);
divElem.appendChild(iconElem);
new tt.Marker(divElem).setLngLat(lngLats[0]).addTo(map);
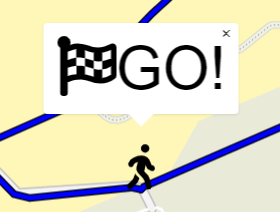
Last, you need to associate a popup with your marker:
var marker = new tt.Marker(divElem).setLngLat(lngLats[0]).addTo(map);
var popupOffsets = {
bottom: [0, -50],
};
var popupHtml = '<div class="fa-4x"><i class="fas fa-flag-checkered"></i>GO!</span></div>';
var popup = new tt.Popup({offset: popupOffsets})
.setHTML(popupHtml);
marker.setPopup(popup).togglePopup(); The marker looks pretty awesome now.
Next Steps (or Runs, or Bikes…)
In just a short time, you were able to get your Strava data and display it in TomTom Maps with relative ease.
There’s lots more you can do with the TomTom Maps SDK and the individual TomTom APIs. For a complete reference on the TomTom Maps SDK, see the reference guide at https://developer.tomtom.com/maps-sdk-web-js/documentation. The SDKs are also available for Android and iOS, so whether you’re building a web or mobile app, you can start integrating TomTom maps today.