Displaying Multiple Maps with React and TomTom Maps SDK for Web
)
Learn how to add and display multiple locations on a TomTom map using modern, idiomatic React. You’ll see how React’s build-in state management can store and manage map locations. Follow this tutorial to discover how to add this feature to your applications to support fleets and help everyday users.
There are many instances where users of your web applications might need to view multiple locations on a map. TomTom Maps SDK for Web makes this process simple through using React. Using a Function Component alongside TomTom Maps SDK for Web makes displaying multiple maps on the screen smooth and straightforward.
React enables us to create an app that contains all related functions within a component with the ability to replicate it many times. It’s one of the most popular client-side frameworks available, as it makes it easy for developers to create components and reuse them as building blocks for larger and more complex applications.
In this tutorial, we’ll review how to display multiple maps using TomTom Maps SDK for Web. We’ll begin by creating a React Functional Component for the map. Then, we’ll display multiple maps on the app using the component. We’ll also explore interacting with multiple maps in our single-page application (SPA) by adding markers to each of the components. Finally, we’ll expose parameters to change the map styling.
Let’s get started!
Prerequisites
This article uses TomTom Maps SDK for Web Version 6 and React 17 or above. You’ll need a free API key from the TomTom Developer portal to follow along. A Freemium account offers thousands of requests daily and is suitable for commercial use — just pay as you grow.
You’ll also need to create the react app using the command:
npx create-react-app my-appAlso, install Maps SDK for Web using the command inside the my-app folder:
npm i @tomtom-international/web-sdk-maps –saveFinally, you should be familiar with JavaScript and React to follow this tutorial. We’ll show you how to work with TomTom’s solutions.
Creating the Map Function Component
There are four basic steps in creating a map Function Component. The first step is to create a map.js file for the component.
Next, import the SDK and the default CSS sheet. Note that you may want to make a copy and customize it to your liking.
import "@tomtom-international/web-sdk-maps/dist/maps.css";
import * as tt from "@tomtom-international/web-sdk-maps";
Then, create a new functional component with the following:
export function Map(props) {
    return <></>
}
Inside the functional component, use the useEffect hook to initialize the map:
    let map = tt.map({
    /*
    This key will API key only works on this Stackblitz. To use this code in your own project,
    sign up for an API key on the TomTom Developer Portal.
    */
   key: {your API Key},
    container: mapElement.current,
    language: language,
    style: { map: style },
    center: [mapLongitude, mapLatitude],
    zoom: mapZoom,
    });
    setMap(map);
    setInitialized(true);
    return () => map.remove();
}, []);
Finally, render the map using the following code:
return <div ref={mapElement} className="mapDiv" />If you’re interested in seeing a detailed example of how to create a map component centered around a given point (mapLongitude and mapLatitude) using hooks, check out this blog post.
Using the Map Component
It’s easy to use the map component. Go to App.js and add the map component in the return:
function App() {
    return (
        <div className="App">
            <Map />
            <Map />
        </div>
    );
}
Using a component allows us to add many instances of the map at will. For example, this will put two identical maps on the app.
function App() {
    return (
        <div className="App">
            <Map />
            <Map />
        </div>
    );
}
Use as many components as desired. To change the size of the container, use .mapContainer and .mapDiv selector in the CSS file:
.mapContainer {
margin-top: 25px;
}
.mapDiv{
height: 300px;
width: 300px;
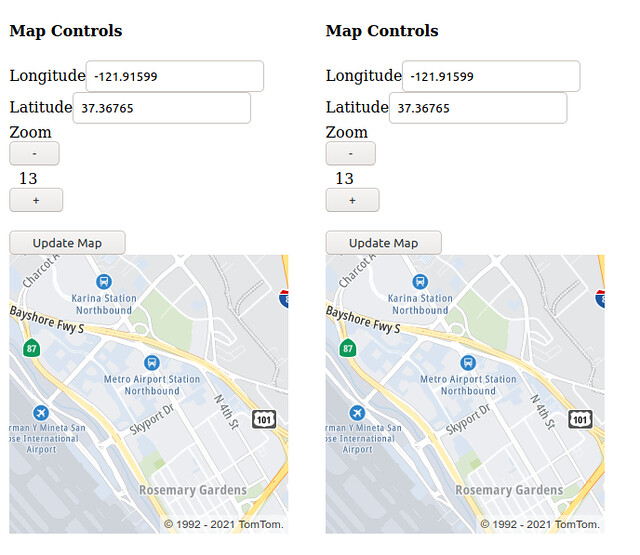
}Your app should look like this screenshot with two maps:
The code from this step is available on StackBlitz.
Creating and Adding Markers
Markers are the pins we see on maps indicating a specific location. We can add markers to the map using the Maps SDK for Web’s Marker APIs.
var marker = new tt.Marker()
             .setLngLat([longitude, latitude])
             .addTo(map);
We can create an Add Marker button that takes latitude and longitude coordinates and makes a marker using the given coordinates to demonstrate this functionality.
Begin by defining the states for the coordinates:
const [mapLongitude, setMapLongitude] = useState(-121.91599);
const [mapLatitude, setMapLatitude] = useState(37.36765);
Then, create inputs that map to these values:
<Input
    type="text"
    name="longitude"
    value={mapLongitude}
    onChange={(e) => setMapLongitude(e.target.value)}
/>

<Input
    type="text"
    name="latitude"
    value={mapLatitude}
    onChange={(e) => setMapLatitude(e.target.value)}
/>

<Button color="primary" onClick={addMarker}>
    Add Marker
</Button>
Next, create the addMarker function:
const addMarker = () => {
const targetCoordinates = [mapLongitude, mapLatitude];
const marker = new tt.Marker().setLngLat(targetCoordinates).addTo(map);
};
Now, we can add a popup box that displays when users click on the marker:
var popupOffsets = {
top: [0, 0],
bottom: [0, -50],
left: [25, -35],
right: [-25, -35]
}
var popup = new tt.Popup({ offset: popupOffsets })
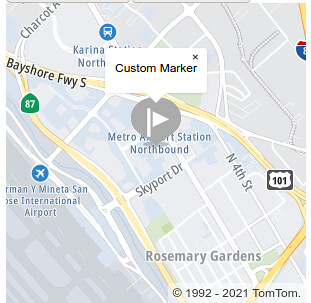
.setHTML("Custom Marker");
marker.setPopup(popup);Use marker.togglePopup to control the popup’s visibility.
Now we have all the functionality we need to add multiple markers on the same map, like the screenshot below.

Loading the Marker on Load
Creating a marker for when the map initiates lets the user see the area around the map’s center point.
We can accomplish this using the useEffect hook. The useEffect hook executes its code when a given parameter in the component changes.
We’ve already seen how to use it to initiate the TomTom map. The useEffect hook has a parameter list of [], meaning it executes once when the app first creates the component.
Markers need to wait for the map to finish initializing. The first attempt would be to call addMarker after the setMap call.

The map hasn’t finished initializing yet, resulting in an error. However, we can introduce another state to indicate the map finished loading. Then, we use another useEffect hook to react to the initialized state.
useEffect(() => {
    if (initialized) {
        addMarker();
    }
}, [initialized]);
If needed, we can customize the markers. For example, we can change the marker’s color, width, and height by specifying these properties in our new tt.Marker() call.
new tt.Marker({
    color: ‘#ABABAB’,
    width: ‘50px’,
    height: ‘50px’,
}
Customizing the Map Component
Now that we’ve explored how to style a marker, we can see the benefit of making the map component. We can pass in parameters to style each map instance differently.
There are four steps involved in creating the map component:
Pass a props variable into our component, so the declaration becomes export function Map(props).
Create a variable/state inside the component that corresponds to the property we define, like const color = props.markerColor ?? '#CCCCCC'; .
Use the variable to customize the map. For example, we can change new tt.Marker() call to be const marker = new tt.Marker({color: color}) to change the marker’s color.
Pass in the property when the component is instantiated — for example, <Map markerColor="#ABABAB" />.
Similar to the markers, the TomTom map is also customizable.
As discussed earlier, one of the options available when creating the map is the coordinate as a combination of longitude and latitude. To pass it in as a parameter, all we need to do is change the state initialization from this:
const [mapLongitude, setMapLongitude] = useState(-121.91599);
const [mapLatitude, setMapLatitude] = useState(37.36765);
to one that uses the incoming property:
const [mapLongitude, setMapLongitude] = useState(props.longitude ?? -121.91599);
const [mapLatitude, setMapLatitude] = useState(props.latitude ?? 37.36765);
Now we can set latitude and longitude when putting a map on the screen:
useEffect(() => {
    let map = tt.map({
/*
This API key only works on this StackBlitz. To use this code in your own project,
sign up for an API key on the TomTom Developer Portal.
*/
    key: {your API Key},
    container: mapElement.current,
    language: language,
    style: { map: style },
    center: [mapLongitude, mapLatitude],
    zoom: mapZoom,
    });
    setMap(map);
    setInitialized(true);
    return () => map.remove();
}, []);
Style can either be a property passed in or a state toggled within the component, see full implementation here.
<Button color="primary" onClick={() => {
    const toggleStyle = style === 'basic_main' ? 'basic_night' : 'basic_main';
    setStyle(toggleStyle);
    map.setStyle({map: toggleStyle})
}}>Toggle Style</Button>
Putting it Together
With TomTom, you can build mapping applications quickly and easily. In this tutorial, we’ve discussed making a React Component using TomTom Maps SDK for Web, enabling developers to adjust the parameters they want to display around the component. The component also allows us to show several maps on the screen simultaneously with their appropriate parameters.
Similarly, we can introduce more properties to alter this component’s behavior. The use of title and markerText here are great examples of adjusting the component to suit our needs.

Next Steps
The map display offers many more options. For example, we can display traffic information, incidents, and Points of Interest (POIs) on the map. We can also attach many event handlers to the map, including zoom and Click&Touch. Check out the map and marker documentation for the full details of what’s available with the TomTom Web SDK.
It’s easy to get started with TomTom! Sign up for a free API key and start creating today.