Adding TomTom Maps to a Vue + Quasar App
)
Learn how to add advanced location technology to your Quasar app in just a few minutes. In this tutorial, we create a sample Quasar application and create a route with restrictions for trucks using TomTom’s truck routing API with Vue and JavaScript.
Maps enhance web applications across all industries, telling stories and answering questions, all while helping customers find your business. Quasar applications are no exception. With TomTom, you can add advanced location technology to your Quasar app in just a few minutes. TomTom’s easy-to-use maps enhance user experience.
In this tutorial, we create a sample Quasar application. Its JSON file contains example store location information we render on a TomTom map using markers. We then create a route with restrictions for trucks using TomTom’s truck routing API. To follow this tutorial, you should be familiar with Quasar, or at least Vue, and JavaScript.
Installing Quasar
To get started, we must install the Quasar command-line interface (CLI) using:
javascript
$ yarn global add @quasar/cli
# or
$ npm install -g @quasar/cli
Ensure you have Node.js version 10 or higher installed on your machine. Once the installation is done, create a project folder with the Quasar command:
$ quasar create <folder_name>This command prompts you to enter a project name, project product name, project description, and author details. Most developers should find the installation steps easy to follow. When all dependencies are installed, a default web browser tab opens automatically:

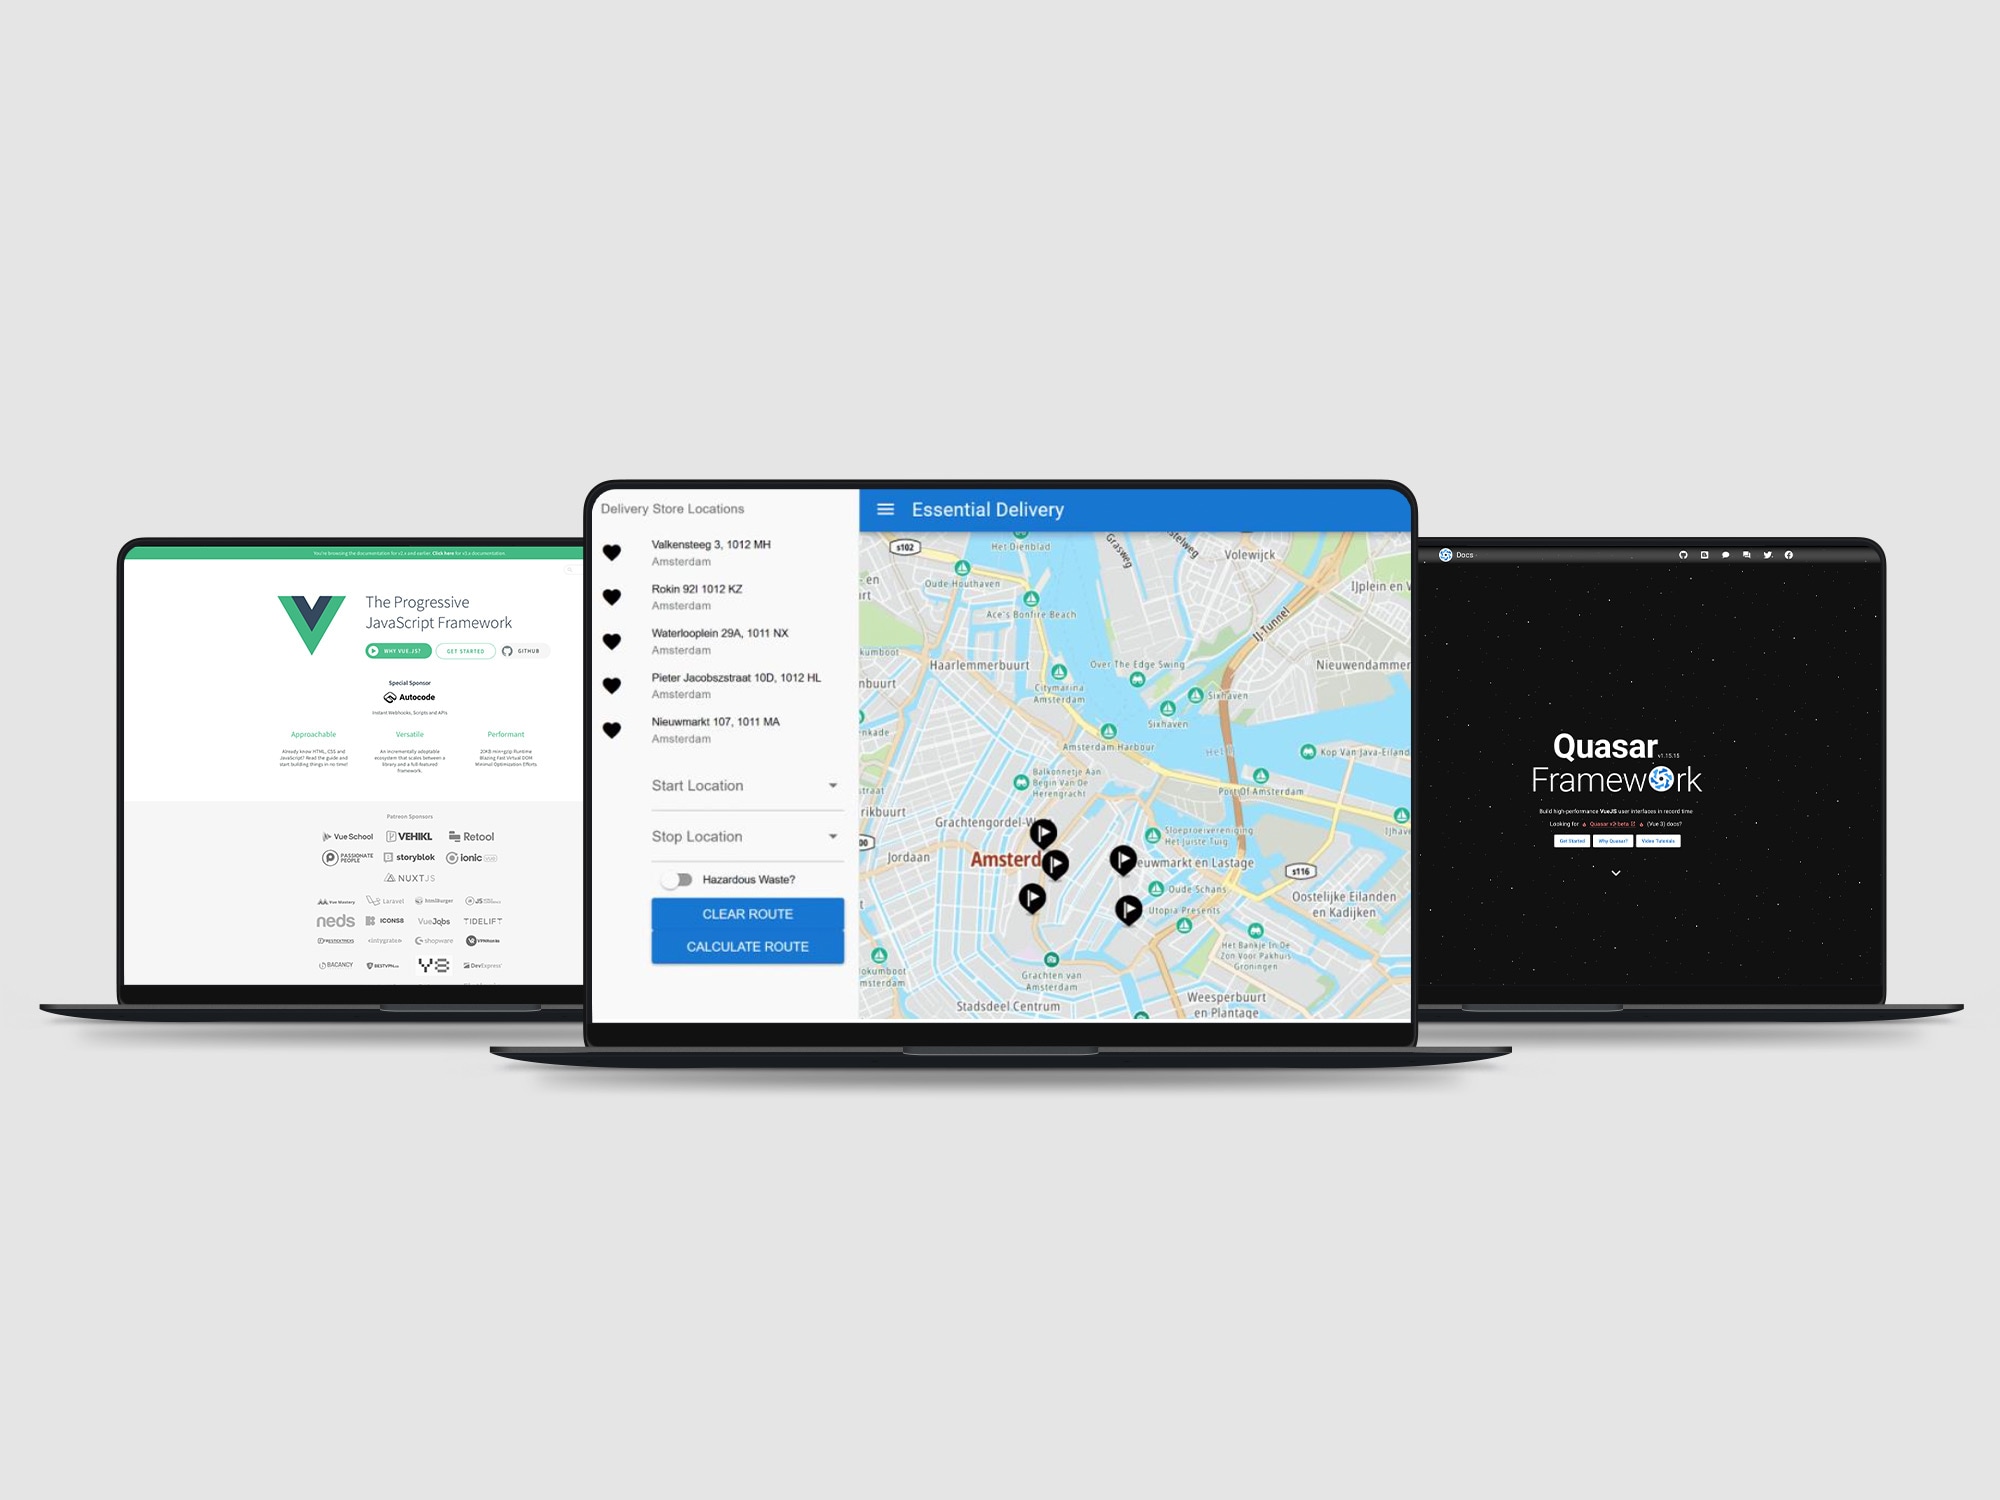
Our default app already has some data. Change the header to “Essential Delivery” in the main layout file and erase the data accordingly.
Setting Up TomTom
We next set up TomTom to enhance our location-based application using Map APIs and SDKs. First, register your free account on TomTom Developer Portal. Then, install the TomTom Web SDK with:
npm install @tomtom-international/web-sdk-maps @tomtom-international/web-sdk-servicesTo use TomTom Maps SDK and other services, you will need to first get your API key from TomTom Developer Portal. In the sample codes that follow, be sure to replace "YOUR_API_KEY" with your non-expiring TomTom API key.
You can also explore documentation within the Developer Portal to learn how to use TomTom’s various tools to create other great applications.
Displaying the TomTom Map
Before we add a TomTom map to our application, we must add the maps.css file to our application page header. Without this, it would be challenging to display certain parts of our map and objects that interact with it. So, in index.template.html, add this snippet:
<link rel='stylesheet' type='text/css' href='https://api.tomtom.com/maps-sdk-for-web/cdn/6.x/6.13.0/maps/maps.css'>We need a component to hold our maps and related items. Let’s start by editing the EssentialLink.vue file in src > components. This file helps us display stores in our application’s left drawer. Paste this code in the EssentialLink.vue file:
javascript
<template>
<div>
  <q-item
    clickable
    tag="a"
    target="_blank"
  >
    <q-item-section
      avatar
    >
      <q-icon name="favorite" />
    </q-item-section>


    <q-item-section>
      <q-item-label>{{ properties.address }}</q-item-label>
      <q-item-label caption>
        {{ properties.city }}
      </q-item-label>
    </q-item-section>
  </q-item>
</div>
</template>


<script>
export default {
  name: 'EssentialLink',
  props: {
    properties: {
      type: Object,
      required: true
    }
  }
}
</script>
This file’s properties prop helps us display store names and addresses on our page. The list in this component gets its data from a JSON file. We don’t have that yet, so let’s add it. In src, create a file called “stores.json” and paste in this data:
json
{
    "type": "FeatureCollection",
    "features": [{
            "type": "Feature",
            "geometry": {
                "type": "Point",
                "coordinates": [
                    4.892951,
                    52.373564
                ]
            },
            "properties": {
                "address": "Valkensteeg 3, 1012 MH",
                "city": "Amsterdam"
            }
        },
        {
            "type": "Feature",
            "geometry": {
                "type": "Point",
                "coordinates": [
                    4.891881,
                    52.369741
                ]
            },
            "properties": {
                "address": "Rokin 92I 1012 KZ",
                "city": "Amsterdam"
            }
        },
        {
            "type": "Feature",
            "geometry": {
                "type": "Point",
                "coordinates": [
                    4.901278,
                    52.369070
                ]
            },
            "properties": {
                "address": "Waterlooplein 29A, 1011 NX",
                "city": "Amsterdam"
            }
        },
        {
            "type": "Feature",
            "geometry": {
                "type": "Point",
                "coordinates": [
                    4.900800,
                    52.372008
                ]
            },
            "properties": {
                "address": "Nieuwmarkt 107, 1011 MA",
                "city": "Amsterdam"
            }
        }
    ]
}
This JSON file stores address and coordinate data that helps us display markers and calculate routes.
Next, we create a file called “Search.vue” inside the components folder. This file helps us display and zoom in on a city using the TomTom Search service. Paste in this code:
javascript
<template>
  <div class='text-h4'>{{ cityName }}</div>
</template>


<script>
import tt from '@tomtom-international/web-sdk-services'


export default {
  name: 'TomTomSearch',
  props: ['apikey', 'city'],
  mounted () {
    const _this = this
    tt.services.fuzzySearch({
      key: this.apikey,
      query: this.city
    }).then(function (response) {
      _this.$emit('cityFound', response.results[0].position)
      _this.cityName = response.results[0].address.freeformAddress + ' ' +
      response.results[0].address.country
    })
  },
  data () {
    return {
      cityName: 'Hello, I am searching...'
    }
  }
}
</script>
Now, let’s create just one more component, called “TomTomMap.vue”. This holds our map as well as search and link components. Paste in this code:
javascript
<template>
  <div id='map' class='window-height'>
    <q-drawer
      v-model="leftDrawerOpen"
      show-if-above
      bordered
      content-class="bg-grey-1"
    >
      <q-list>
        <q-item-label
          header
          class="text-grey-8"
        >
          Delivery Store Locations
        </q-item-label>
        <EssentialLink
          v-for="store in storeLinks"
          :key="store.properties.name"
          v-bind="store"
        />
              </q-list>
    </q-drawer>
    <TomTomSearch :city='city'
    @cityFound='handleSearchResult'
    :apikey='apikey'/>
  </div>
</template>


<script>
import tt from '@tomtom-international/web-sdk-maps'
import TomTomSearch from 'components/Search.vue'
import EssentialLink from 'components/EssentialLink.vue'
import Stores from '../stores.json'


const storeData = Stores.features


export default {
  name: 'TomTomMap',
  props: ['city', 'apikey'],
  components: { TomTomSearch, EssentialLink },
  methods: {
    handleSearchResult (location) {
      this.ttmap.easeTo({
        center: location,
        zoom: 16
      })
      this.init()
    },
    init () {
      var map = this.ttmap
      Stores.features.forEach(function (store, index) {
        const location = store.geometry.coordinates
        new tt.Marker().setLngLat(location).setPopup(new tt.Popup({ offset: 35 }).setHTML(store.properties.address)).addTo(map)
      })
    },
      },
  mounted () {
    var names =     var coord =     var loc = {}
    var map = tt.map({
      container: 'map',
      key: this.apikey
    })
    this.ttmap = map
    Stores.features.forEach(store => {
      names.push(store.properties.address)
      coord.push(store.geometry.coordinates)
      loc[store.properties.address] = store.geometry.coordinates
    })
    this.shopLoc = loc
  },
  data () {
    return {
      ttmap: undefined,
      storeLinks: storeData,
      leftDrawerOpen: false,
      routeID: 'route_background',
      shopLoc: {},
      routes: [],
      startLoc: null,
      hazards: false,
      stopLoc: null
    }
  }
}
</script>
The top of this code contains the EssentialLink and Search components. In the script section, we import our components, services, and JSON file containing store information.
The handleSearchResult method pans our map to the location of choice, then calls the init method. The init method initializes our map and creates markers for items in our JSON file. Markers are easier to see if they are in the city you specify.
In mounted, we initialize our map object and build an object called shopLoc. This object stores the name and coordinates of each shop and makes them easier to manipulate and reference.
Now, all this only works if we place our TomTomMap component on a page. So, in pages, open Index.vue and paste in this code:
javascript
<template>
  <q-page class="flex-center">
    <TomTomMap city='Amsterdam' apikey='YOUR_API_KEY'/>
  </q-page>
</template>


<script>
import TomTomMap from 'components/TomTomMap.vue'
export default {
  name: 'PageIndex',
  components: { TomTomMap }
}
</script>
We place our API Key here and specify a city to zoom in on. In this example, the city is Amsterdam.
We can now start using TomTom Routing API. To import the Maps SDK for Web, place this line at the top of the <script> section of your TomTomMap.vue file:
import tts from '@tomtom-international/web-sdk-services'Next, place two drop downs to help users select the start and stop location, and buttons to clear a route and make a route. Additionally, add a toggle switch to tell TomTom API if we are carrying hazardous goods. If true, the API returns the safest route for that cargo. It’s an interesting (and helpful) feature.
To do this, paste this code right below the <EssentialLink /> component in TomTomMap.vue:
<q-item
  >
    <q-item-section
      avatar>
      <q-icon name="" />
    </q-item-section>
    <q-item-section>
      <q-select v-model="startLoc" :options="Object.keys  (shopLoc)" label="Start Location" />
      <q-select v-model="stopLoc" :options="Object.keys(shopLoc)" label="Stop Location" />
      <q-toggle v-model="hazards" label="Hazardous Waste?" />
                <q-btn @click="clearRoute()" color="primary" label="Clear Route" />
                <br>
                    <q-btn @click="makeRoute()" color="primary" label="Calculate Route" />
    </q-item-section>
        </q-item>
Now, for the logic behind it all, paste this code in the methods section of your TomTomMap.vue file:
javascript
buildStyle (id, data, color, width) {
      return {
        'id': id,
        'type': 'line',
        'source': {
          'type': 'geojson',
          'data': data
        },
        'paint': {
          'line-color': color,
          'line-width': width
        },
        'layout': {
          'line-cap': 'round',
          'line-join': 'round'
        }
      }
    },
    makeRoute () {
      var map = this.ttmap
      const routeBackgroundWeight = 5
      tts.services.calculateRoute({
        key: this.apikey,
        locations: this.shopLoc[this.startLoc] + ':' + this.shopLoc[this.stopLoc],
        travelMode: 'truck',
        vehicleLoadType: this.hazards ? 'otherHazmatExplosive' : ''
      }).then(routeData => {
        const routeGeoJson = routeData.toGeoJson()
        const routebackgroundlayerid = this.routeID
        map.addLayer(this.buildStyle(routebackgroundlayerid, routeGeoJson, 'black', routeBackgroundWeight))
      })
    },
    clearRoute () {
      var map = this.ttmap
      map.removeLayer(this.routeID)
      map.removeSource(this.routeID)
    }
This code has three functions. One function’s details help draw a route on your map called buildStyle. The function makeRoute finds and builds out a route on your map. It does this by calling TomTom Routing API to find the best route. This parses your response data, too, and uses the addLayer to map a route on the page. Lastly, clearRoute clears your route in case you want to change start and stop locations.
Your app should now look pretty cool. Remember the toggle switch we mentioned? Try it out! TomTom API provides optimized routes by passing certain parameters about your cargo type. It suggests alternative routes that comply with local rules and regulations for transportation of goods by vehicles, such as hazardous waste.
This image displays a route from Valkensteeg 3, 1012 MH to Waterlooplein 29A, 1011 NX:

Notice how the route changes when we toggle Hazardous Waste.
Our app is now complete. This app’s foundation comes from this GitHub repo.
Next Steps
We have set up everything needed to create a basic Quasar app, added a TomTom map from a JSON file, and showed routing for restricted and unrestricted routes. Easy, right?
Now that you know how to integrate TomTom maps into Quasar, you can create and design applications for different regions, different business types, different route options, and more. Sign up for a developer account and get your free API key to get building today.
Happy mapping!