Adding TomTom Maps to a Svelte App
)
Enhancing your Svelte apps with interactive maps is quick and easy. Learn how to add a map to your app, center the user's current location, and link the location and chosen destination, using the TomTom Maps SDK and a little bit of JavaScript.
Adding TomTom Maps to a Svelte App
Adding maps to a web application improves user experience dramatically. Maps help your user find a location, plan a route, avoid traffic, see route progress, visualize boundaries, and so much more. They’ve become increasingly popular web app features through the rise of location-embed services.
Although maps may seem complex, it’s surprisingly easy to integrate maps into web apps using client-side libraries from TomTom. Front-end developers need effective and efficient options. TomTom Maps make adding interactive maps to Svelte apps a breeze, making them our ideal choice.
In this article, we’ll demonstrate how to add TomTom maps into a Svelte web application. We'll explore how to install the map SDK library, initialize it, and manipulate the map. To follow along, you should know JavaScript and be familiar with Svelte.
Setting Up
To create a Svelte app, first ensure you have Node.js installed on your computer. You can check for Node.js by typing the following command into your terminal:
node -vIf not, simply go to the Node.js website to download the latest version.
Also, you’ll need to install the degit library so you can clone the Svelte template:
npm install -g degitWhen that finishes, we can get started with our Svelte app by creating an empty folder and cloning the template into our project named “tomtom":
npx degit sveltejs/template tomtom Then, we go to our project folder on the terminal:
cd tomtomNow that we’ve set it up, we can install our project’s dependencies:
npm installWe then run the Svelte app with:
npm run devInstalling the TomTom Library
To use TomTom’s search and route services, we first need to install TomTom Maps SDK. Use this command to install this library:
npm i @tomtom-international/web-sdk-mapsTo use the services in your app, register as a TomTom developer. You get thousands of free requests daily, even for commercial apps. You can simply pay as your app grows and expands.
When you register a developer account, you get an API key. Take note of the API key, because we’ll get back to it shortly.
Building the App
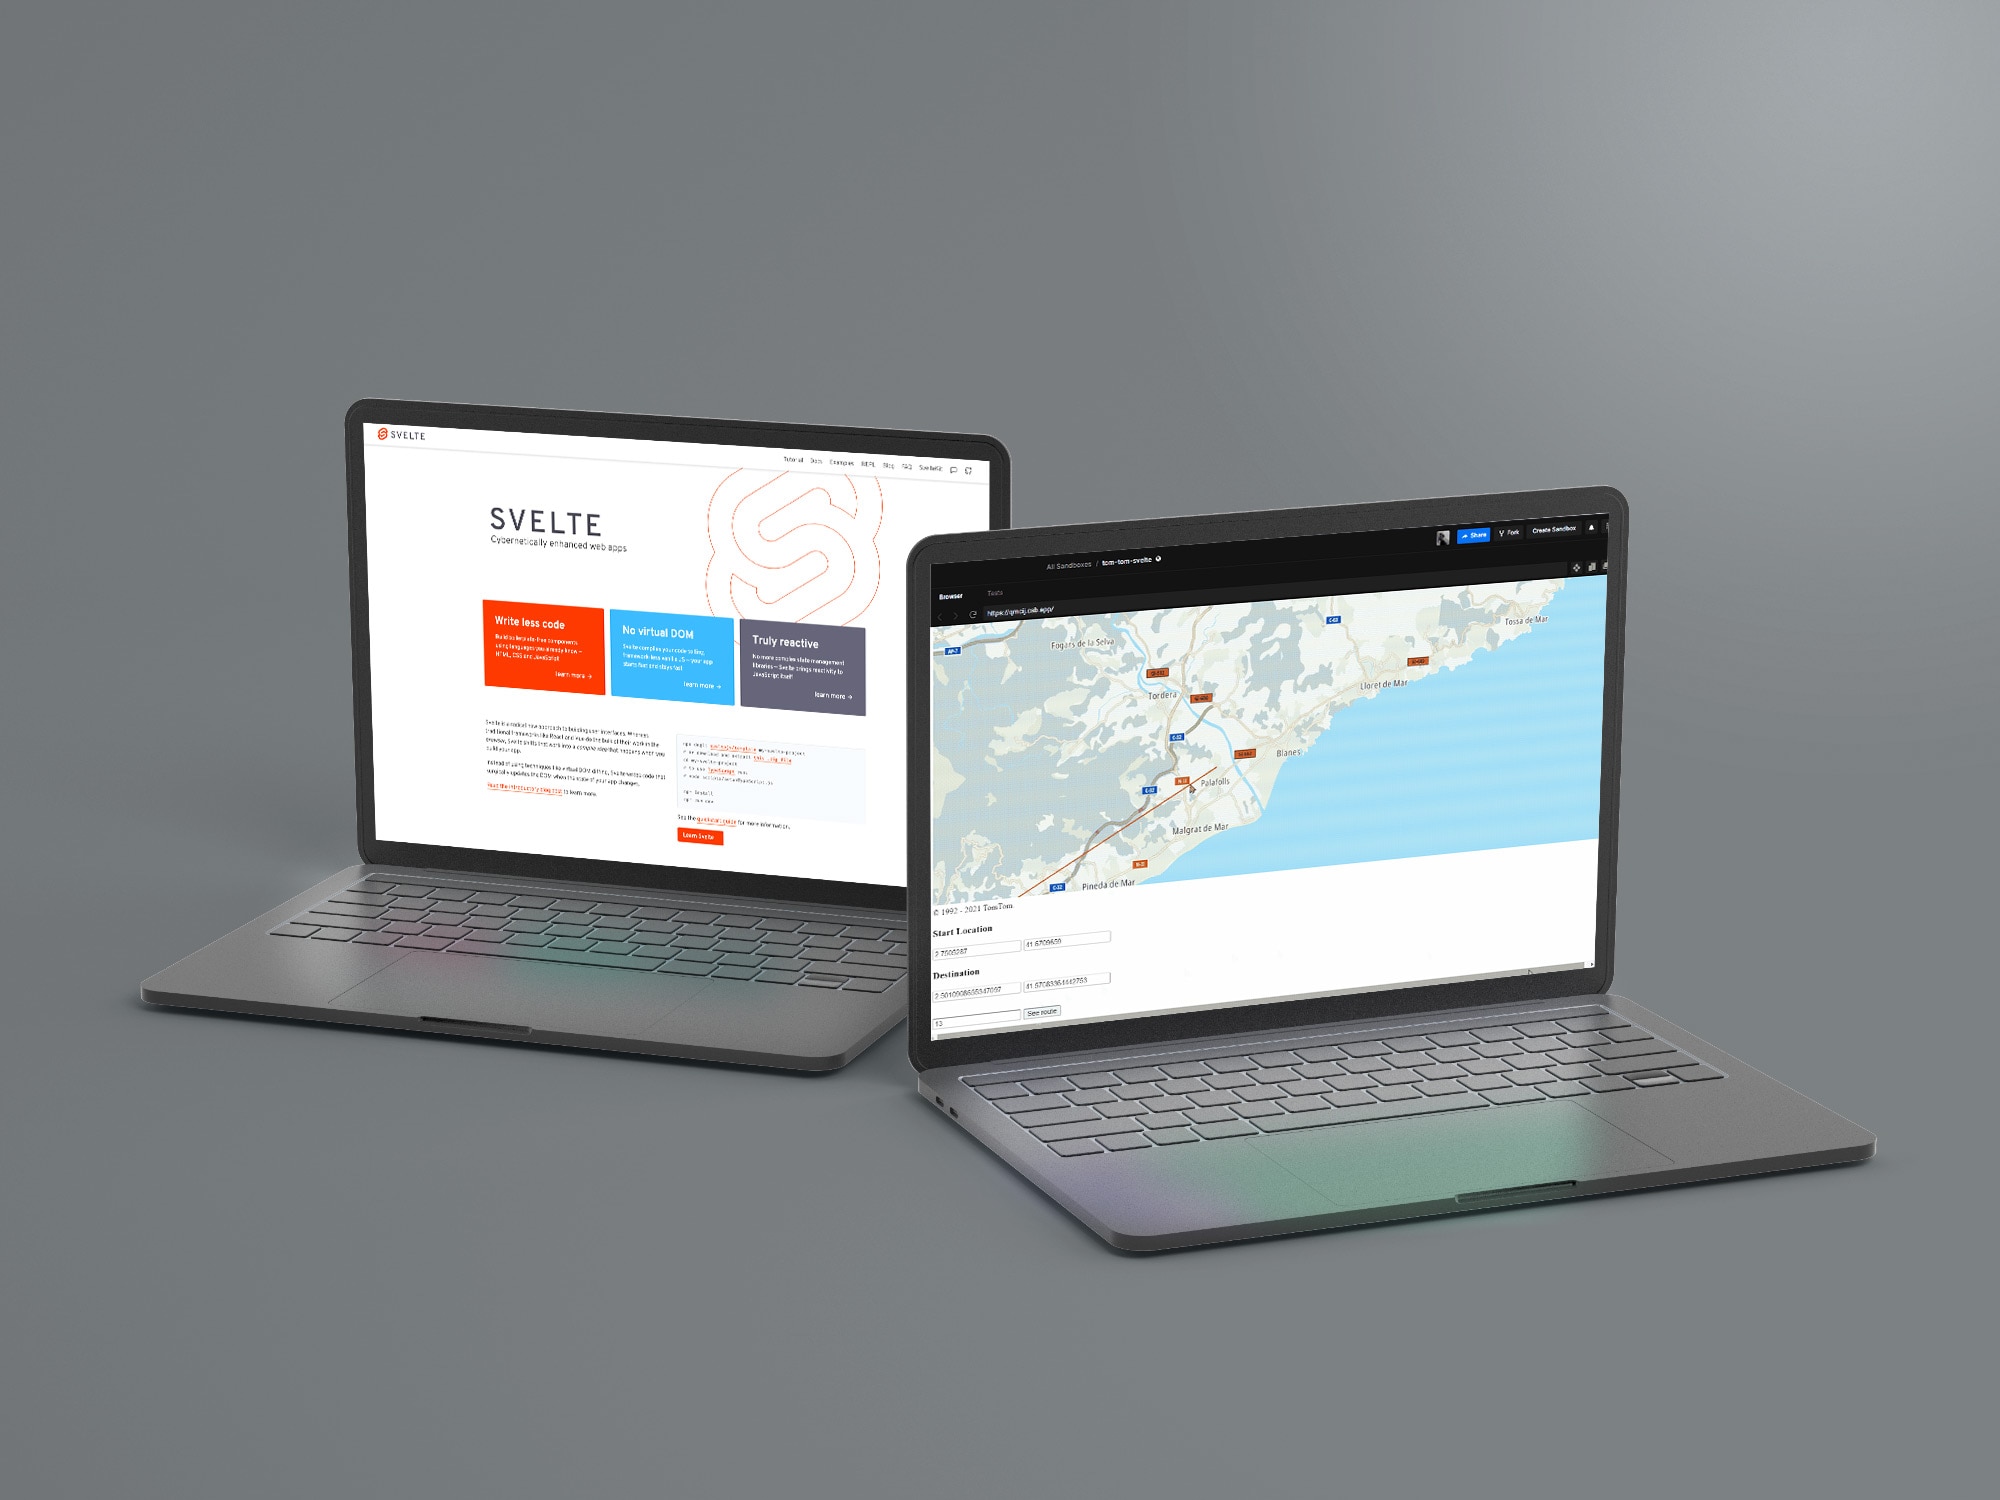
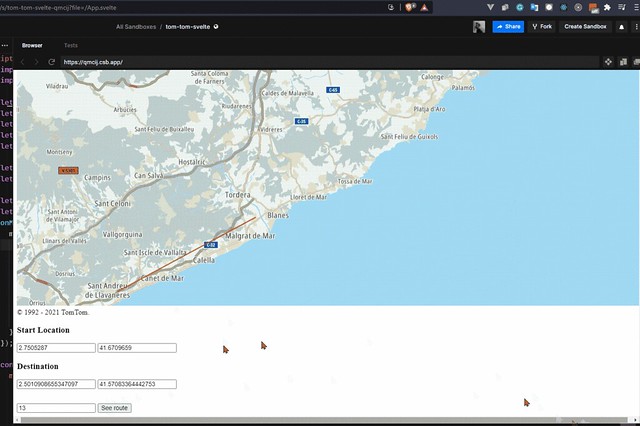
We’re building an app that initializes with a real-time map. Then, within that map, we can set the latitude and longitude of a start location and destination. The map will zoom in on that location, drawing a line between the two points. You can check out the demo on CodeSandbox.
First, to start building our app, let’s import the library and its default stylesheet into our component by adding them to the script tag. We also need to import onMount into our component so we can initialize our map when the component mounts on the Document Object Module (DOM):
import tt from "@tomtom-international/web-sdk-maps";
import '@tomtom-international/web-sdk-maps/dist/maps.css'
import { onMount } from "svelte";
Then, we need to add the variables we’ll use in the app. The zoom variable selects the level of zoom we want on the map. The longitude and latitude are the initial longitude and latitude that the map displays when it loads.
import tt from "@tomtom-international/web-sdk-maps";
import '@tomtom-international/web-sdk-maps/dist/maps.css'
import { onMount } from "svelte";
We’ll bind these variables directly with their <input/> element, so our app is always in sync when we change anything.
Then, within our onMount(), we’ll start the TomTom map itself and assign it to the map variable. Plus, we set the container to hold the map on the user interface (UI) as mapElement.
We use longitude, latitude, and zoom variables similarly. The center variable holds the default coordinates the map shows the user once the page loads.
onMount(() => {
      map = tt.map({
        key: "<Your API Key",
        container: mapElement,
        stylesVisibility: {
          trafficIncidents: true,
          trafficFlow: true
        },
        center: [longitude, latitude],
        zoom: zoom
      });
    });
We will eventually display these elements on the UI. The div that holds the map displayed on the UI binds directly to the mapElement that we declared and assigned earlier within the onMount.
There’s also a pair of <input/> tags for each of the Start Location and Destination sections, with the four input tags bound to the variables. Then, there’s one extra <input/> tag we similarly use for the zoom variable.
We call this two-way data binding within Svelte. It enables a user to share data in two directions within the application. Our app shares data directly from the UI templates to business logic and vice versa.
This data binding makes automatic data synchronization between the user-controlled interface and logic happen seamlessly. Data binding can simultaneously handle setting the element value and listening to the element change events in our project. This method is what makes Svelte reactive.
Now, back to our project. In the code below, we declare the variables within the logic, and when the value of the input elements changes, it immediately syncs up with the variables.
This method makes data sharing within our component straightforward.
<main>
  <div class="map" bind:this={mapElement}></div>
  <div>
   <h3>Start Location</h3>
   <input placeholder="latitude" bind:value={startLatitude}/>
   <input placeholder="latitude" bind:value={startLongitude}/>
  </div>
  <div>
   <h3>Destination</h3>
   <input placeholder="latitude" bind:value={destinationLatitude}/>
   <input placeholder="latitude" bind:value={destinationLongitude}/>
  </div>
  <input placeholder="Zoom number" type="number" bind:value={zoom}/>
  <button on:click={showRouteLayer}> See route</button>
</main>
We then add a button that triggers a showRouteLayer function when the user clicks it. This function takes the inputs the user adds, draws a line between the two locations, and zooms into these newly-selected locations:
const showRouteLayer = () => {
  map.addLayer({
    id: "123",
    type: "line",
    source: {
      type: "geojson",
      data: {
        type: "FeatureCollection",
        features: [
          {
            type: "Feature",
            geometry: {
              type: "LineString",
              properties: {},
              coordinates: [
                [parseFloat(startLatitude), parseFloat(startLongitude)],
                [parseFloat(destinationLatitude), parseFloat(destinationLongitude)]
              ]
            }
          }
        ]
      }
    },
    layout: {
      "line-cap": "round",
      "line-join": "round"
    },
    paint: {
      "line-color": "#ff0000",
      "line-width": 2
    }
  });
  map.setCenter([parseFloat(startLatitude), parseFloat(startLongitude)]);
  map.setZoom(zoom);
};
Here, we use TomTom’s out-of-the-box addLayer method to receive the coordinates we’ve set earlier. It then draws a line between the two coordinates.
We also set the line width and color. Then, the UI centers the map on the startLatitude and startLongitude coordinates and zooms in. This centering and zooming in help create a smooth user experience.
Next Steps
Congratulations, you’ve successfully built your first Svelte app with integrated TomTom maps! Adding a map to your application might initially seem tricky and advanced, but using TomTom maps simplifies the entire process. TomTom enables your users to have a smooth, location-targeted experience within your applications.
TomTom helps your users better visualize and interact with the maps. TomTom maps use a user's current coordinates to determine where they are. Plus, users can add their destination's coordinates to have us can calculate the distance and navigation route to get to their destination.
Explore the TomTom documentation and check out all the mapping features you can build with it: heatmaps, animations, traffic flow, search, and so much more. The developer portal offers several code examples to get you started.
Visit the developer portal, register for free, and grab your API key to get started building your map-powered app today.