Adding TomTom Maps to a Django App: Building a Django Back End
) Ryan Peden
Ryan Peden
Server-side frameworks like Django read and generate pages in milliseconds — perfect for apps accessing a store information database. Learn how to build a simple store locator app’s back end using Django with a location model linked to TomTom Maps APIs.
In 2021, front-end frameworks like React, Vue, and Angular got the most attention in web development. Front-end frameworks let developers build complex interactive single-page apps (SPAs) that dazzle users. But these SPAs are challenging to develop, and the complexity isn’t always necessary.
Server-side frameworks that can read data and generate pages in milliseconds better serve many business applications and websites — especially those that must store information in a database. Django is one such framework. It’s the most-used Python web app framework and powers popular sites like Instagram and Pinterest.
Mapping has become a critical capability for most business websites. Specifically, any business with brick-and-mortar locations typically has a store locator on its website to let site visitors view a list of store locations. In addition, the locator typically displays the store locations on an interactive map.
In this two-part series, we’ll build a simple store locator app using Django and TomTom Maps. It helps to be familiar with Django, but if you’re not, don’t worry. We’ll begin from nothing and walk through each step. In part one, we will create the Django app and a database model for saving store locations. Then, we will add view code that lets us display locations from the database on a TomTom map in part two.
Initial Setup
If you already have Python and Django installed, you can skip this section. The code in this tutorial has been tested on Django 3.2, but it should work on 2.2 or later.
Before we start, we’ll need Python 3.6 or later installed on your computer. Installation instructions vary depending on the operating system, but we can find both installation files and instructions for our OS on the official Python download page.
Next, use the Pip package manager, included with Python, to install Django. Open a terminal and run:
pip install django And with that, we’re ready to create the application. We can find the code for the entire application, complete with a database pre-populated with store locations, in this GitHub repository.
Creating the App
Now we can create a new Django app. We’ll select the folder where we’d like to create the app and run:
django-admin startproject tomtom_django When the command finishes running, we’ll see that it created a tomtom_django folder. Inside it, there are two things: a manage.py file and a tomtom_django sub-folder. Unfortunately, the sub-folder has the same name as the parent folder, which can be confusing. So, the remainder of this tutorial specifies “top-level” or “sub-folder” when working with one of the tomtom_django folders.
Every Django project can contain multiple apps, and our tomtom_django subfolder is an app that represents the top level of our Django website. Diving into detail about how apps work is beyond the scope of this tutorial. If you’d like to know more, the official Django tutorial is a great starting point.
Next, we’ll create an app inside the tomtom_django project for the store locator. In the top-level tomtom_django folder, run:
python manage.py startapp locator
When the command completes, your top-level tomtom_django folder should contain:
db.sqlite3
manage.py
locator/
tomtom_django/
Django generates a database for us because Django apps come with built-in authentication, so our app needs to store user login information. The default SQLite database is sufficient for this tutorial app, but we should use a more robust database like PostgreSQL or MySQL in production. To create the initial set of database tables our app needs, run:
python manage.py migrate We also must tell Django to add our locator app to the list of apps it looks at when it runs the site. In the tomtom_django subdirectory, open settings.py and edit the INSTALLED_APPS array, so it looks like this:
INSTALLED_APPS = [
   'locator.apps.LocatorConfig',
   'django.contrib.admin',
   'django.contrib.auth',
   'django.contrib.contenttypes',
   'django.contrib.sessions',
   'django.contrib.messages',
   'django.contrib.staticfiles',
]
Then, run Django’s local development server:
python manage.py runserver Then open a web browser and navigate to http://localhost:8000. We should see something like this:

We can leave the local development server running in the background. We’ll never need to restart the server because it automatically detects when we’ve changed your Django app’s code and reloads itself. However, if we leave it running, we’ll need to open a second terminal to run the commands in the next section.
Adding a Location Model
Before we can put store locations on a map, we need a way to store them in the database. Fortunately, Django comes with an object-relational mapper (ORM) that lets us create and use database tables by writing a bit of Python. In the locator folder, open the models.py file. We’ll see it already contains some code:
from django.db import models

# Create your models here.
Beneath the existing code, add the following:
class Location(models.Model):
   name = models.CharField(max_length=250)
   address = models.TextField()
   latitude = models.FloatField()
   longitude = models.FloatField()
This class extends Django’s Model class and defines a database table that stores all the information we’ll need to render a store location on a TomTom map. Now we can ask Django to create a database migration to create a database table for a model by running:
python manage.py makemigrations locatorand then run:
python manage.py migrate This runs the migration and creates the table in the database. It might seem like a waste to have two separate steps, but when we’re building a complex app, the ability to generate migrations before you apply them is helpful. This prepares us in case we find it necessary to alter our models before committing schema changes to the database.
We’re nearly ready to add store locations to our database! Thanks to Django’s built-in admin site, we don’t have to add pages for users to edit database entries manually. Django creates them automatically based on an app’s model classes. We just need to create a user account to sign in to the admin site by running:
python manage.py createsuperuser The createsuperuser command prompts us to enter a username, e-mail address, and password. Finally, add the Location model to the admin site by editing locator/admin.py, so it contains:
from django.contrib import admin
from .models import Location

# Register your models here.
admin.site.register(Location)
Finally, load http://localhost:8000/admin in your web browser and log in with our superuser credentials. We should see:
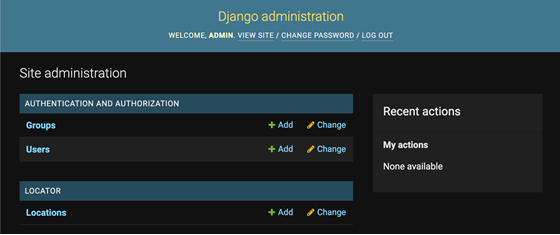
Adding Locations
On the Django administration screen, click the link beside Locations to load the Add location page:

Add several locations to the database by entering a name, address, latitude, and longitude for each location.
Manually entering latitude and longitude for each location is awkward, so feel free to use the db.sqlite3 file from the GitHub repository. It already has sample store locations. We’re using the Django admin site to keep things simple since our focus in this tutorial is on adding a map to a Django app. But, in a production application, users wouldn’t need to know the coordinates of every story location they enter.
As an excellent finishing step, we might consider adding a Location add/edit page that uses the TomTom Search API’s Geocode service to automatically look up latitude and longitude for an address.
Next Steps
With that, we’ve built out the core of a Django store locator app. We have a location model, a database, and we’ve entered store locations. In the second part of this series, we’ll build out our app’s front end, complete with a TomTom map to display store locations from our database.
Register for a developer account on our Developer Portal and get building today.
Happy mapping!