Add Live Traffic Data to Your Site in 5 Minutes
)
There are several benefits to displaying real-time traffic on your TomTom map, like knowing about accidents and construction, anticipating ETAs, and more. In this article, we’ll see how to add live traffic data to your TomTom map in five minutes.
Displaying real-time traffic data has many benefits, ranging from early safety alerts to establishing the most effective route for commuters to determining exact journey times and projections for delivery and on-demand services.
In the past, we had to listen to radio stations or wait for someone to report any traffic accidents on our path. Now, we can find the most efficient route based on data from other users, thanks to real-time data sharing.
TomTom APIs use anonymized, real-time data from GPS devices all over the world to provide a live view with helpful traffic information. We can easily add live traffic data to our website with TomTom Maps. This tutorial will show how to do this in five minutes.
Sound good? Let’s start!
Prerequisites
To follow this, ensure you have:
Basic knowledge of HTML and CSS.
B basic knowledge of React Native and JavaScript.
Node.js and npm installed on your local development machine.
Project Setup
It’s free and simple to use TomTom Maps SDK. You must first create a TomTom Developer Portal account to obtain an API key. This key grants you access to TomTom’s services, which instantly appears on your dashboard when you sign in.
Creating a React App
Let’s start by creating a new React project. This demonstration uses Vite, but you’re welcome to use your bundler of choice, like Vite or Create React App (CRA), for example.
# vite
npm init vite@latest live-traffic-maps --template react
# create react app
npx create-react-app live-traffic-mapsOnce it’s finished, run:
cd live-traffic-maps
npm install
If you’re adding TomTom Maps to an existing React app, skip this step and install the TomTom Maps SDK.
Installing TomTom’s Tools
To install TomTom Maps SDK, navigate to the app’s root directory, and run the following command:
npm i @tomtom-international/web-sdk-mapsTomTom Services SDK provides the search API we use in this article, so install it using the command:
npm i @tomtom-international/web-sdk-servicesAdding a TomTom Map
To add a TomTom map, first, we must import the TomTom Maps JavaScript SDK and the default map stylesheet.
In the App.js component, add the following code:
import "./App.css";
import "@tomtom-international/web-sdk-maps/dist/maps.css";
import * as ttmaps from "@tomtom-international/web-sdk-maps";
Now, we also import React Hooks, namely useRef, useEffect, and useState, into the app.
import { useRef, useEffect, useState } from "react";useRef helps to manipulate the DOM directly within React by holding a reference to the actual (non-virtual DOM) element. We use it to add our map during the initial loading of the site:
const mapElement = useRef();We use the useState hook to hold the variables used in this app. With the hook, we initialize the app’s values that we want to preserve.
Starting at the top, we set the state variable map, which has a reference to the TomTom map object we create.
Set the map’s initial longitude and latitude to null because the position of the map will depend on the user’s location.
Following that, we define the state variables that handle the result object we get back after sending the query:
const [map, setMap] = useState({});
const [mapLongitude, setMapLongitude] = useState(null);
const [mapLatitude, setMapLatitude] = useState(null);
const [query, setQuery] = useState("");
const [result, setResult] = useState({});
Next, we use the useEffect hook to initialize the map. This is the key to making our TomTom map work seamlessly with React. It runs after the component mounts, calling the TomTom Maps Web SDK’s tt.map function to create our map.
Inside the functional component App, add the following code:
useEffect(() => {
  let map = ttmaps.map({
    key: "<Your API Key>",
    container: "map-area",
    center: [mapLongitude, mapLatitude],
    zoom: 15,
    pitch: 50,
    style: {
      map: "basic_main",
      poi: "poi_main",
      trafficFlow: "flow_relative",
      trafficIncidents: "incidents_day",
    },
    stylesVisibility: {
      trafficFlow: false,
      trafficIncidents: false,
    },
  });
  setMap(map);
  return () => {
    map.remove();
  };
}, []);
We created a map instance by calling the TomTom Maps SDK’s tt.map function. Then, we passed an options object to the method containing the following properties:
key — Your API Key, accessed in the developer dashboard.
container — The container to which we attach the map, defined with useRef.
center — The initial focus and the center point of the map.
zoom — The initial zoom level of the map.
pitch — The tilt level of the map.
style — The map style. Here, we pass in a configuration object containing the default styles. However, there are also many alternative styles you can use.
styleVisibility — Contains the options representing visibility of style parts. Here, we set the trafficFlow and trafficIncidents options to false, so we can toggle the style visibility on and off in the UI by setting them to true or false.
Next, we will obtain the user’s GPS coordinates using the Geolocation API. This will be done immediately after the map has been created. To do this, we use the useEffect hook since it works exactly like the componentDidMount lifecycle method. Here’s the code:
useEffect(() => {
    navigator.geolocation.getCurrentPosition(
      (position) => {
        setMapLongitude(position.coords.longitude);
        setMapLatitude(position.coords.latitude);
      },
      (error) => {
        alert(error.message);
      }
    );
  }, []);
By using the geolocation.getCurrentPosition method, our app will prompt the user to give access to their location. If the user grants permission, the state gets updated and the user’s GPS coordinates get saved. If the user declines permission, then it will display an error message.
Now that we have the user’s coordinates saved, we will display that location on the map. Using another useEffect, but this time, representing a componentDidUpdate lifecycle method, we can set the center of the map to the user’s location.
useEffect(() => {
    if (mapLongitude && mapLatitude) {
      map.setCenter([mapLongitude, mapLatitude]);
    }
  }, [mapLongitude, mapLatitude]);
By placing the mapLongitude and mapLatitude in the dependencies array, the map’s center gets updated anytime the user changes their current location.
Finally, add the following code to render the map. It defines a layout in which to place the map.
<div ref={mapElement} id="map-area"></div>Now, a bit of styling to define the height and width of the map container:
#map-area {
  height: 90vh;
  width: 100%;
}
Then, run the app using the command:
#vite
npm run dev#Create react app
npm startIn the browser, you’ll see a popup asking for permission. If you choose to share your location, you will see a map similar to this:
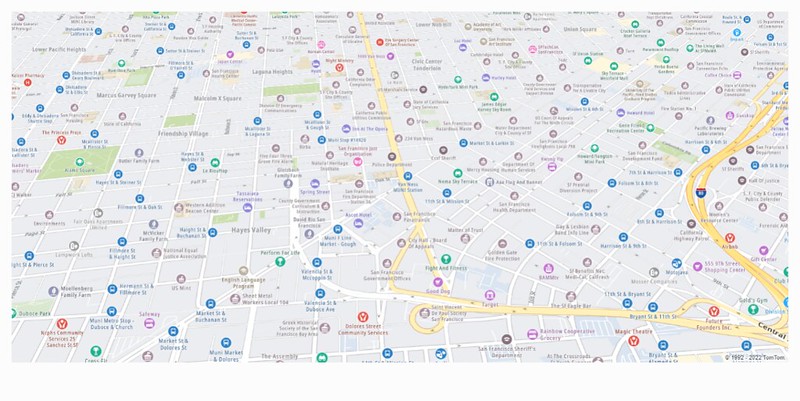
Adding Search Functionality
We can use TomTom’s Search API to find a location through a process called geocoding, which means that we’re turning the description of a location into coordinates on a map.
We do this by adding the default fuzzy search option, which performs a search for a partial match and extends a query result by adding near-match entries and nearby points of interest (POIs).
This works by calling a fuzzySearch function, which returns a list of coordinates that correspond to the given address query.
Begin by adding the following code to import the services library. This step is important as it gives us access to the Search API.
import tt from "@tomtom-international/web-sdk-services";Now, in the functional component, we create a function called fuzzySearch to handle the search logic:
const fuzzySearch = (query) => {
  tt.services
    .fuzzySearch({
      key: "<Your API Key>",
      query: query,
    })
    .then((res) => {
      const amendRes = res.results;
      setResult(amendRes);
      moveMapTo(res.results[0].position);
    })
    .catch((err) => {
      console.log(err);
    });
};
In the code above, we called the fuzzySearch API method, passing in the API key and the query (the query being the location the user searches).
The fuzzySearch method returns an object containing several properties related to the search query. The results property will then hold an array of locations returned from the search.
When the response is ready, we assign the results — res.results — from the query to the result state using setResult. Then we call the moveMapTo method, passing in the position property of the first match.
The moveMapTo function handles the moving of the app to the search location:
const moveMapTo = (newLoc) => {
  map.flyTo({
    center: newLoc,
    zoom: 14,
  });
};
Here, the map moves from the current location to the location that matches the search query best. So, when the user searches for a location, the map moves to the new location with a smooth animation.
Use the jumpTo method if you want the map to update without an animated transition.
Then, using the map function, we loop through the search results and display them in the UI. If there are no results for the searched location, it displays “No locations.”
{
  result.length > 0 ? (
    result.map((resultItem) => (
      <ResultBox result={resultItem} key={resultItem.id} />
    ))
  ) : (
    <h4>No locations</h4>
  );
}
Within the function scope, we define the ResultBox component, which represents each individual result:
const ResultBox = ({ result }) => (
  <div
    className="result"
    onClick={(e) => {
      moveMapTo(result.position);
      setMapLongitude(result.position.lng);
      setMapLatitude(result.position.lat);
    }}
  >
    {result.address.freeformAddress}, {result.address.country}
  </div>
);
In the code above, each result displays the address and country. When clicked, the coordinates are set and the map moves to that specific location.
Displaying the Components
Now, that we’ve set up the search functionality, let’s display the complete app layout. To do this, we return this in the App component:
return (
  <div className="App">
    <div className="control">
      <h2>Map Controls</h2>
      <div className="search-wrapper">
        <div className="search-control">
          <input
            className="input"
            type="text"
            placeholder="Search Location"
            value={query}
            onChange={(e) => {
              setQuery(e.target.value);
            }}
            onKeyPress={(e) => {
              if (e.key === "Enter") {
                fuzzySearch(query);
              }
            }}
            required
          />
          <button type="submit" onClick={() => fuzzySearch(query)}>
            Search
          </button>
        </div>

        <div className="results">
          {result.length > 0 ? (
            result.map((resultItem) => (
              <ResultBox result={resultItem} key={resultItem.id} />
            ))
          ) : (
            <h4>No locations</h4>
          )}
        </div>
      </div>
    </div>
    <div ref={mapElement} id="map-area"></div>
  </div>
);
In the code snippet above, we’ve included the search controls, which include input tags and a button to handle the search functionality.
Now, let’s add the following styles into the App.css file:
.App {
display: flex;
justify-content: space-around;
margin: 1.5rem;
}
.control {
text-align: center;
margin-right: 1.5rem;
}
.search-wrapper {
max-width: 100%;
background: white;
border: 1px solid lightgray;
overflow: hidden;
}
.search-wrapper:hover,
.search-wrapper:focus {
border: 1px solid #ccc;
}
input {
outline: none;
font-size: 1rem;
border: 1px solid lightgray;
padding: 0.5rem;
margin: 1rem;
border-radius: 15px;
}
.search-control {
display: flex;
justify-content: center;
}
button {
background: #01ac01;
border: 1px solid lightgray;
color: white;
padding: 0.5rem;
margin: 1rem;
font-size: 1rem;
cursor: pointer;
}
.result {
cursor: pointer;
text-align: left;
padding: 0.5rem;
font-size: 0.85rem;
}
.result:hover {
background: whitesmoke;
}
#map-area {
height: 90vh;
width: 100%;
}
/* Responsive Media Queries */
@media screen and (max-width: 800px) {
.App {
flex-direction: column;
}
.control {
margin-right: 0;
}
.result {
text-align: center;
}
}
@media screen and (max-width: 400px) {
.search-control {
display: block;
}
button {
margin: -1rem 0 0.5rem;
}
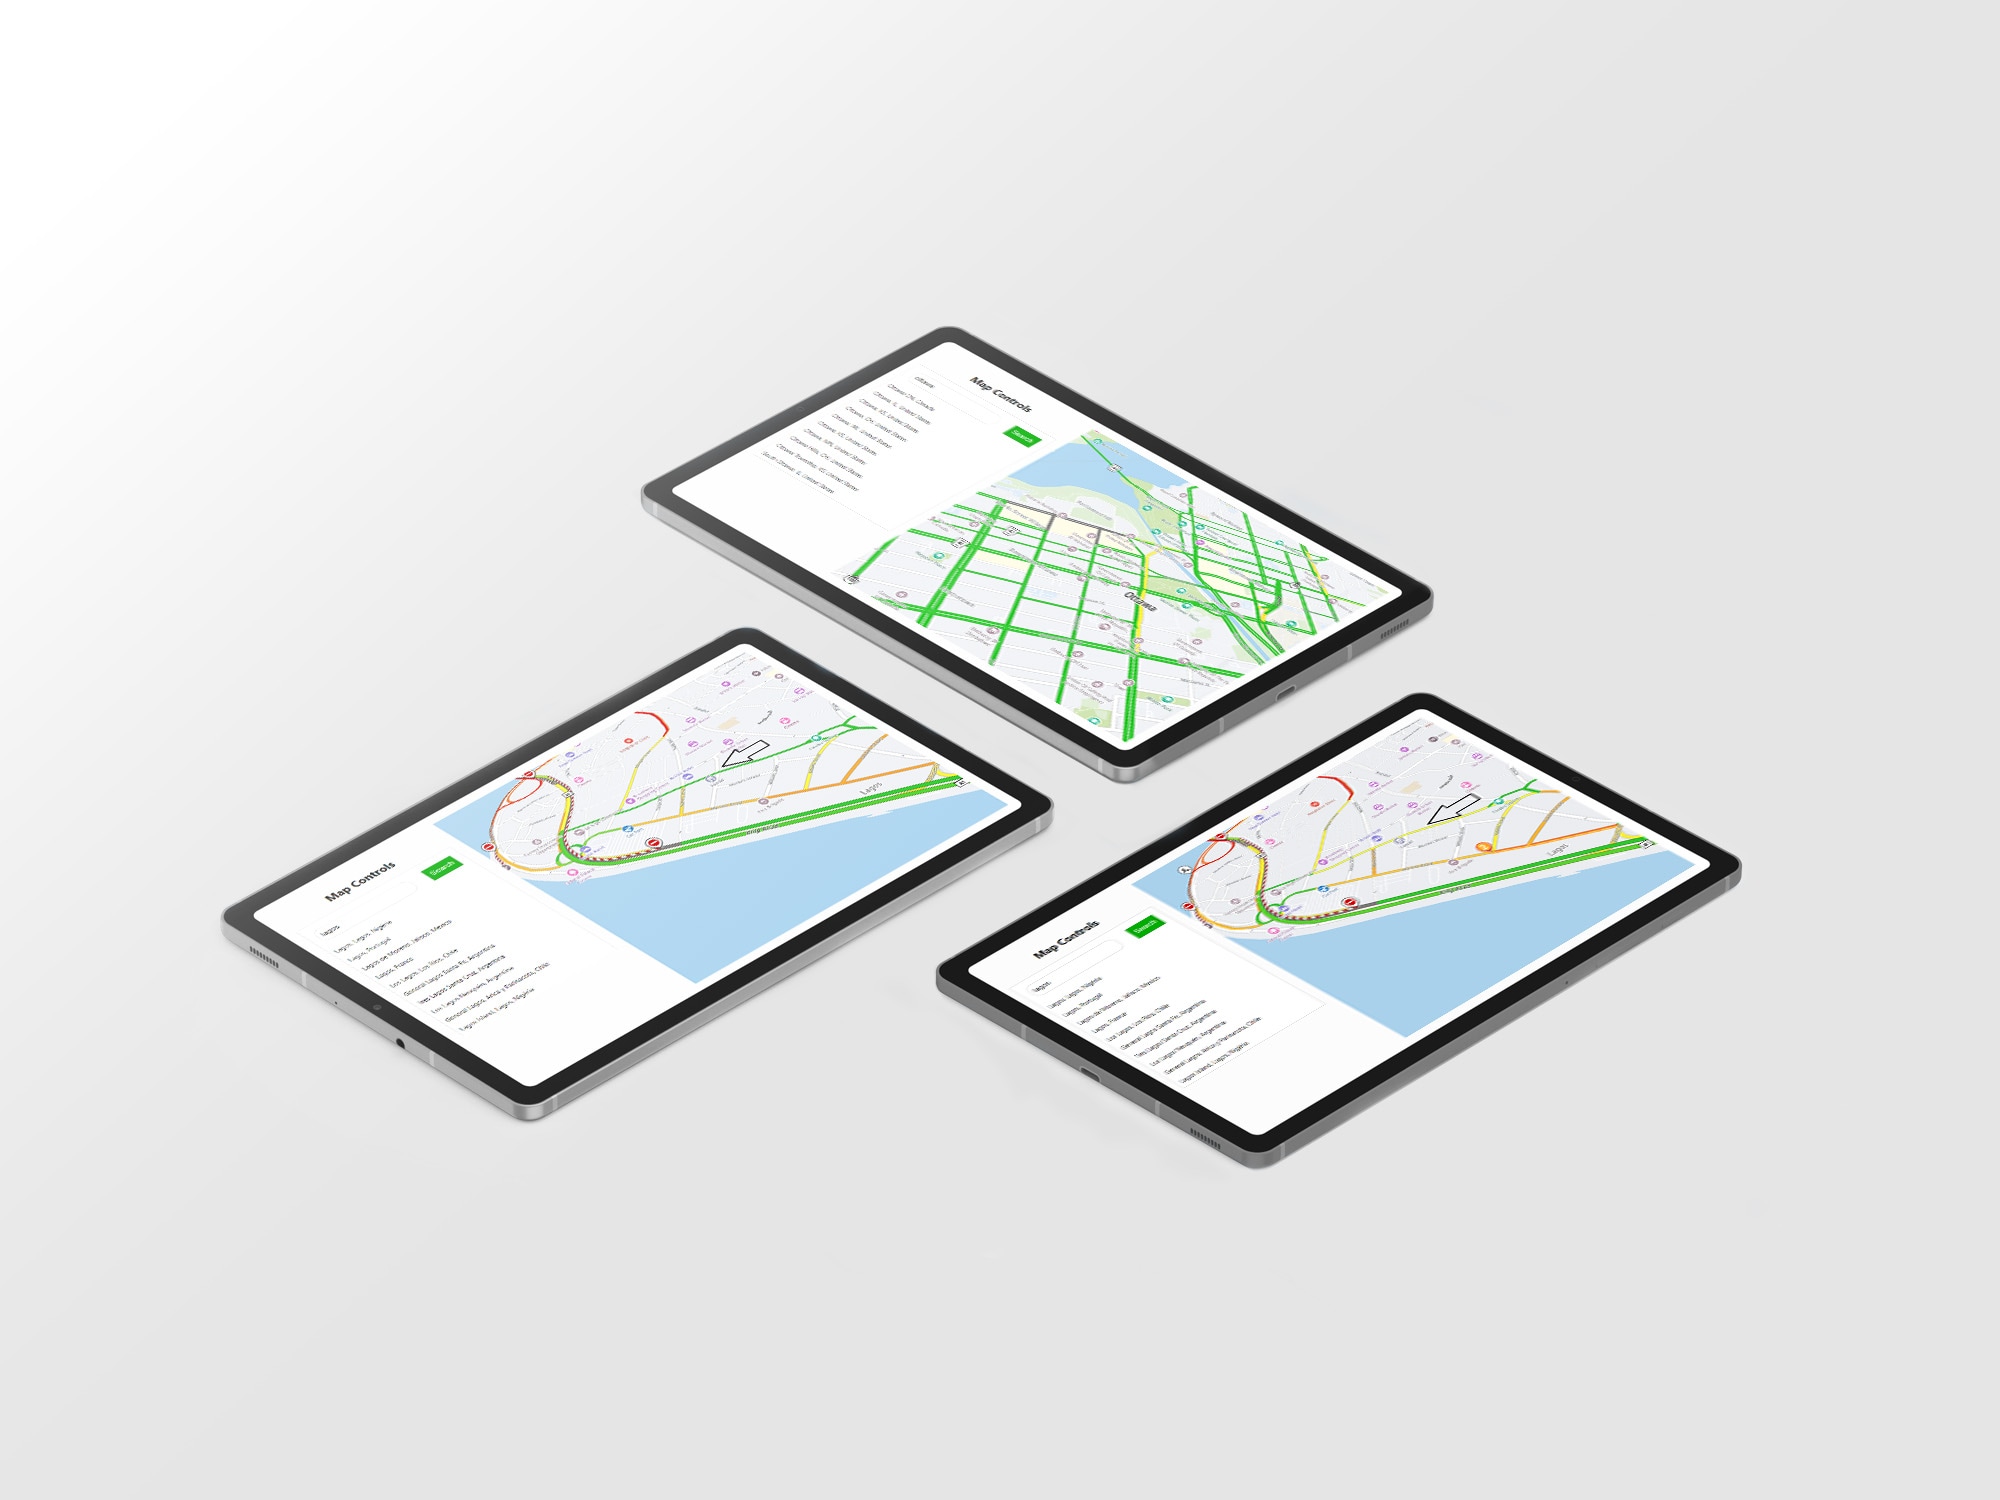
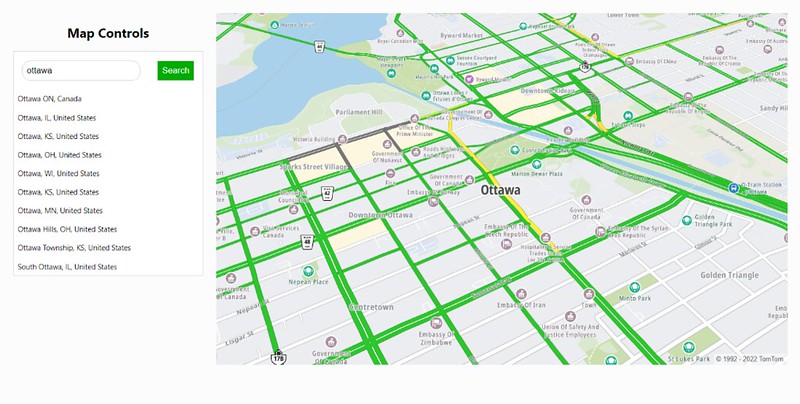
}You should have a UI like the image below:

App Demo
Now to demonstrate how the app works, let’s search for Ottawa, Canada, Lagos, and Nigeria respectively. The app moves to the location and displays it.
To see the traffic flow on the map, change the stylesVisibility flag, trafficFlow to true. Here’s the resulting UI:
To see the traffic incidents on the map, change the stylesVisibility flag, trafficIncidents to true. Here’s the resulting UI:
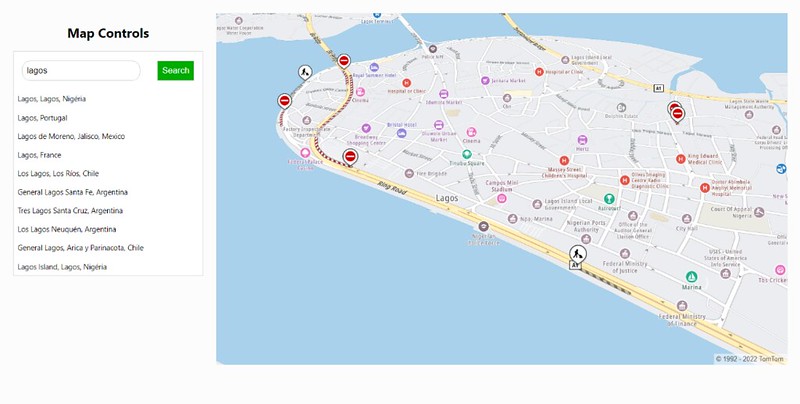
We can also observe that the map automatically changes in real time. See the screenshots below:

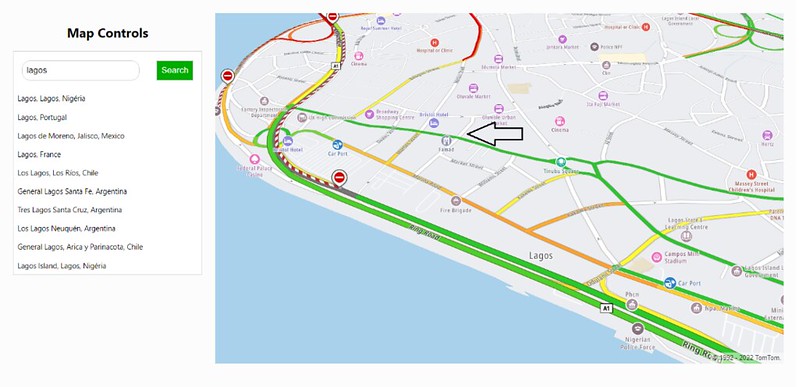
On closer look, we’ll see that within a minute, the traffic flow around the highlighted location turns from yellow to green, indicating a free flow of traffic.
Conclusion
And that’s a wrap! We’ve added an interactive map that shows real-time traffic for the searched area, and demonstrated how easy it is to set up.
By integrating TomTom APIs into your website, you can inform users and visitors on the best route to take to get them to their destination as quickly as possible, based on current traffic conditions.
There’s still a lot you can do using TomTom APIs. For instance, the Routing API can be used to compute road mileage and travel time, as well as visually indicate the best route for a trip.
Learn more about integrating TomTom’s Maps APIs into your websites and applications to manage your fleets, locate vehicles, and track assets on a map in real-time. Sign up for a free developer account today and start using TomTom’s Traffic APIs!