How to Schedule Routing for Truck Drivers in an iOS App
&w=256&q=90)

The TomTom Maps SDK for iOS makes it easy to include powerful mapping and location services in your iOS applications, and we’re going to show you that today.
Do your fleet drivers need to figure out the best route from one place to another, while keeping traffic in mind? Does your app need the ability to schedule trips so drivers arrive at a certain time? The TomTom Maps SDK for iOS makes it easy to include powerful mapping and location services in your iOS applications, and we’re going to show you that today.
Why would you want to do this? Uber cars want to know how to get to the pickup at the right time. Delivery drivers often need to know how long it will take to get to the next location. But if you think on a bigger scale — a program could be set up to manage dozens or hundreds of vehicles, deploying the right vehicles to go to the right places at the right time. And they could find the best coffee and doughnut shops along the way.
In addition to being able to easily use TomTom location and routing services by just adding the Maps SDK to your project, the underlying TomTom Routing API provides some unique features that make it a flexible tool for your applications. You can choose the fastest, most fuel efficient, or shortest route and the API takes car or truck parameters into account to make the route compliant with vehicle requirements (such as routing for hazardous cargo). TomTom also supports electric vehicle (EV) routing.
In this article, we'll take a look at building an iOS application, written in Swift, that gives drivers accurate route scheduling using fuzzy search and geocoding.
Prerequisites
You’re going to need a developer account at TomTom. You can get one for free at the TomTom Developer Portal using the Register button.
Once you register and log in, you’ll see the developer Dashboard. Each application you create will need a key. You create the key from the Dashboard with the Add New Key button. Enter the name you’ll use for the app and check the boxes for the services your app is going to need.

When you’re done, you’ll get a key you can copy (in reality, it’s longer than the one in the screenshot).

Once you have the key, we can start working on the project.
iOS apps are built with Xcode, a free tool provided by Apple. You’ll also need to get a developer account at Apple before you can create an app and post it for sale.
You can create applications in Swift or Objective-C. Swift is by far the more popular language and that’s what we’ll use for these samples. If you haven’t worked with the TomTom Maps SDK for iOS before, you’ll find the following helpful:
- Getting Started with the TomTom Maps SDK for iOS: Project Setup
- Embedding TomTom Maps in an iOS App with SwiftUI
Project Setup
We’re going to create a project and choose to develop a Single View App. Give it a Product Name. I use the same name as I did in the developer portal on TomTom when creating the key. Select the Swift language and leave all the other checks empty. Note that we used XCode 10.3 and Swift version 5 for this example.
To use the TomTom libraries in our iOS app we’ll use CocoaPods. I know we just finished creating the app, but now we have to close it. Then open a terminal window, change to the project’s folder, and issue the command:
pod initThis creates a podfile. Open it with this command:
open -a xcode podfileMake sure your podfile looks like this:
# Uncomment the next line to define a global platform for your project
# platform :ios, '9.0'

target 'TruckRoute' do
  # Comment the next line if you don't want to use dynamic frameworks
  use_frameworks!

  # Pods for TruckRoute
  pod 'TomTomOnlineSDKMaps'
  pod 'TomTomOnlineSDKSearch'
  pod 'TomTomOnlineSDKRouting'
  pod 'TomTomOnlineSDKMapsUIExtensions'

end
Save the changes and close the file, then issue this command in the terminal window.
pod installWith this, we initialize the pods and download the TomTom pods we need. From now on we open the project in Xcode using the Workspace file rather than the project file. There’s a new subproject for the pods linked to the workspace.
We have one more housekeeping task before we can make a call to the service: we have to add our project’s key to the Info.plist file for each of the services we need.
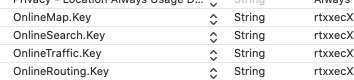
Open Info.plist and add string values for the services the app needs: OnlineMap.key, OnlineSearch.Key, OnlineTraffic.Key, and OnlineRouting.Key.
That’s it. The app is now ready to use TomTom online services.
Next, we’ll start working on the nuts and bolts of the application. Some developers like using storyboards and laying things out visually, others prefer creating the items at runtime using only code. In this example, I use a storyboard to help identify the pieces. It can’t be seen in the view, but you can see the select handles for the map in the bottom half.

The names on the storyboard are pretty self-explanatory — txtAddress, txtDeliveryTime, btnSchedule, and so forth. And, of course, mapView.
There are some class member variables we’ll need to use. We set these up at the top of the class:
let search = TTSearch()
var results:[TTSearchResult]!
let routePlanner = TTRoute()
Our class will be a delegate for a number of these, but note that production apps might put these items in separate classes. Notice the TTSearchDelegate and the TTRouteResponseDelegate:
class ViewController: UIViewController, UITableViewDataSource, UITableViewDelegate, CLLocationManagerDelegate, TTSearchDelegate,TTRouteResponseDelegateWe’ll need to set those items in the viewDidLoad function.
search.delegate = self
routePlanner.delegate = self
We’ve set ourselves as the delegate for the search and the routePlanner. We have to create implementations for those. We’re going to use the search first, so we’ll do that one now:
//MARK: TTSearchDelegate
func search(_ search: TTSearch, completedWith response: TTSearchResponse) {
       progress.hide()
       displayResults(response.results)
}

func search(_ search: TTSearch, failedWithError error: TTResponseError) {
       progress.hide()
       handleError(error)
}

func displayResults(_ results:[TTSearchResult]) {
       self.results = results
       tblResults.reloadData()
}

func handleError(_ err: TTResponseError) {
       showToast(message: err.localizedDescription)
}
When a search finishes, it calls either the completedWith response item or the failedWithError item. If we get a response, the response.results will be an array of TTSearchResult. In this case, we’ll put that result in an array, and tblResults will show a piece of that data. Let’s take a look at the table processing:
func tableView(_ tableView: UITableView, cellForRowAt indexPath: IndexPath) -> UITableViewCell {
       // dequeue a cell
       cell.textLabel?.text = self.results?[indexPath.row].address.freeformAddress
       return cell
}
As you can see, the function looks in the results at the table’s row and pulls out .address.freeformAddress. This is a one-line address that includes the street and city. Now we have all the pieces to respond to the results of a search. Let’s go ahead and make the request.
Search for an Address
We can react to changes in the text and call for a search as text is entered. Back in the viewDidLoad function, add this line:
txtAddress.addTarget(self, action: #selector(textFieldDidChange), for: .editingChanged)Then create a new function textFieldDidChange like this:
func textFieldDidChange(textField: UITextField) {
       let term = txtAddress.text ?? ""
       if (term.count > 5) {
              searchForTerm(term)
       }
}
(Note that you might need to add @objc in front of the function, depending on your versions of Xcode and Swift.)
There’s no check for an address format in the text. In fact, you can enter and search for anything. Alcatraz, WalMart, Pittsburg CA, 123 Main St. It doesn’t matter. The search will return results with the closest one first. It also provides information about building entry points, which is very helpful for drivers to know where to park and make deliveries most efficiently.
To avoid unwanted results, let’s not start searching until we have at least five characters. The function takes the text from the txtAddress text field and passes it to the searchForTerm function.
func searchForTerm(_ term: String) {
       let query = TTSearchQueryBuilder.create(withTerm: term)
              .withMinFuzzyLevel(2)
              .build()
       search.search(with: query)
}
We create a TTSearchQueryBuilder and provide one setup parameter: MinFuzzyLevel. You can find out more about the TTSearchQueryBuilder and its parameters in the API reference.
Remember how we stored the results of the search in an array of TTSearchResult? In the table cell we used the address portion of that, which is a TTAddress. You’ll find more information on these and all the search-related components in the TomTomSDKSearch Reference.
Getting a route
A route will contain at least two points, the origin and the destination. We can call upon our device’s services to get and track our position at runtime so it’s handy. First, we need two variables, the locationManager and the locValue (the current location value).
let locationManager = CLLocationManager()
var locValue:CLLocationCoordinate2D!
In the viewDidLoad function we initialize:
if CLLocationManager.locationServicesEnabled() {
       locationManager.delegate = self
       locationManager.desiredAccuracy = kCLLocationAccuracyNearestTenMeters
       locationManager.requestAlwaysAuthorization()
       locationManager.startUpdatingLocation()
}
Then we need the function for the CLLocationManagerDelegate:
func locationManager(_ manager: CLLocationManager, didUpdateLocations locations: [CLLocation]) {
       locValue = manager.location?.coordinate
}
Now, the location will be available in locValue whenever we need it.
At this point we have the address entered and the current location. We just need to ask for the route. Once again, we need a member variable, we need to initialize, and we need functions. We need a function connected to the button and we need a delegate function to handle the response.
Let’s start with the class member variables again.
let routePlanner = TTRoute()You can refer to the API reference for TTRoute for more information. Our class needs to be a TTRouteResponseDelegate so we set that in viewDidLoad:
routePlanner.delegate = selfFor the routePlanner, we’ll need the delegate functions, too.
func route(_ route: TTRoute, completedWith result: TTRouteResult) {
       guard let plannedRoute = result.routes.first else {
              return
       }
       // get the departure and arrival time
       let departureTime = plannedRoute.summary.departureTime
       let arrivalTime = plannedRoute.summary.arrivalTime

       // format time for display
       let dateFormatter = DateFormatter()
       dateFormatter.timeZone = TimeZone(abbreviation: "CST")
       dateFormatter.dateFormat = "hh:mm aaa"

       // put the route times in the text box
       txtDeliveryTime.text = dateFormatter.string(from: departureTime)

                      + " to " + dateFormatter.string(from: arrivalTime)
       // create a TTMapRoute from the results and options for start and end images
       let mapRoute = TTMapRoute(coordinatesData: plannedRoute,
                                            with: TTMapRouteStyle.defaultActive(),
                                      imageStart: TTMapRoute.defaultImageDeparture(),
                                        imageEnd: TTMapRoute.defaultImageDestination())
       // add the route to the map, bring it to the front,

       // and adjust the view to see it

       mapView.routeManager.add(mapRoute)
       mapView.routeManager.bring(toFrontRoute: mapRoute)
       mapView.routeManager.showAllRoutesOverview()
}

func route(_ route: TTRoute, completedWith responseError: TTResponseError) {
       handleError(responseError)
}
We have two functions, one for success and one for failure.
In the case of a successful return of a result, we might actually get more than one. We’re not doing anything with these — we just take the first one, plannedRoute = result.routes.first. This value is a TTFullRoute type. We can get the times from the summary portion, then create a route for the map by passing in the plannedRoute value.
Finally, we add the mapRoute to the map and center the view on it.
There’s one final thing we need: to trigger the search for the route when the user clicks the button:
btnSchedule.addTarget(self, action: #selector(btnScheduleDidClick), for: .touchUpInside)That goes in the viewDidLoad function. Then we have the handler function for it:
func btnScheduleDidClick(btn: UIButton) {

       // using the first result just for demo
       let result: TTSearchResult = results[0]

       // getting the time the user entered (assumes they entered hh:mm)

       // and creates the arriveDate value

       let timeEntered = txtDeliveryTime.text ?? ""

       let timeParts = timeEntered.components(separatedBy: ":")

       var arriveDate = Calendar.current.date(bySettingHour: Int(timeParts[0]) ?? 0,

                      minute: Int(timeParts[1]) ?? 0, second: 0, of: Date())!


       // request the route using current location, the position from

       // the search result we selected, the .truck option, and the time

       // we want to arrive.

       requestRoute(locValue,

                    destination: result.position,

                    byWhat: .truck,

                    arriveAt: arriveDate)

}
There you have it. This action, attached to the button click, will grab the first result stored in the array, parse the time the user entered to create the arrival time, and request the route from the service.
To learn more about how to create routes for trucks and commercial vehicles in general, check out our video tutorial:
Wrapping Up
Today we created a project using the TomTom SDK for iOS. We used CocoaPods to download the TomTom libraries and include them in the project. We used the TTSearch feature to search for addresses by text, and caught the results and stored them for later. We used TTRoute to request a route from the online library, caught the results, and displayed the first one on the map.
There’s a lot more we can learn online at the Maps SDK for iOS.
To learn more about the TomTom offerings for fleets and logistics, check out these resources below.