Getting Started with the TomTom Geofencing Service
&w=256&q=90)

Geofencing involves defining an area with a virtual "fence" boundary, then tracking device locations to determine whether they’re inside or outside a geofenced area. TomTom provides a Geofencing service that provides APIs for creating and managing geofencing projects, objects to be tracked, and defining the geofences themselves. In this article we'll take a look at the TomTom Geofencing service from a developer's point of view, covering the elements of the service and APIs.
Geofencing is a set of services for defining an area with a virtual "fence" boundary. These services allow us to add objects and record their position for transition checking to determine whether they’re inside or outside a geofenced area.
To enable this, TomTom provides geofencing APIs for performing various functions, including creating and managing projects, objects, and fences. Once these items are set up, we can use the service to record the locations of objects and the system will keep track of the "transitions"—when an object crosses a fence. Typically, such a transition will trigger some sort of event.
There are many ways geofencing can be used to benefit individuals and businesses, such as tracking fleet vehicle assets, targeting ad content to a specific area of town, or linking to smart home technology to adjust the thermostat when we go to work.
In this article we'll take a look at the TomTom Geofencing service from a developer's point of view, covering the elements of the service and APIs.
If you'd like to learn via video tutorial, this Devisode with our developer advocates Jose Jose Rojas and Olivia Vahsen goes over how to track assets with the TomTom Geofencing, Location History, and Notification APIs.
Otherwise, read on!
Getting Started
As with any TomTom API service, you need an account. If you don’t have an account already, go to https://developer.tomtom.com/ and click the "Register" button at the top of the page. You’re going to need two keys: an API key and an Admin key. Once you’ve registered and logged in, go to the dashboard, make sure you’re looking at "Keys" on the left-hand menu, and click the "Add New Key" button.
Enter a name for the key you're creating, make sure you've checked the Geofencing API box and any others that you want to use, and click the "Create Key" button.
The dashboard displays the new name and the API key.
Once we have the API key, we can take a look at the Geofencing API and the services it provides, starting with the Configuration service. We'll use this service's Register method.
All of the services are accessed via an API endpoint, which is formatted with a base URL, followed by the name of the API (all lowercase), its version number, and the name of the function. The base URL we'll be using is api.tomtom.com. The name of the particular API is geofencing, the version is 1, and the function we're using is register. Put it all together and we have:
https://api.tomtom.com/geofencing/1/registerThe function expects two inputs. The API key we created from the dashboard, and a secret phrase we put in the body. The API key is added to the end of the URL:
https://api.tomtom.com/geofencing/1/register&key=YOUR_API_KEYThe secret text is added as JSON content in the body. I used Postman to create the request, as shown in the screenshot:
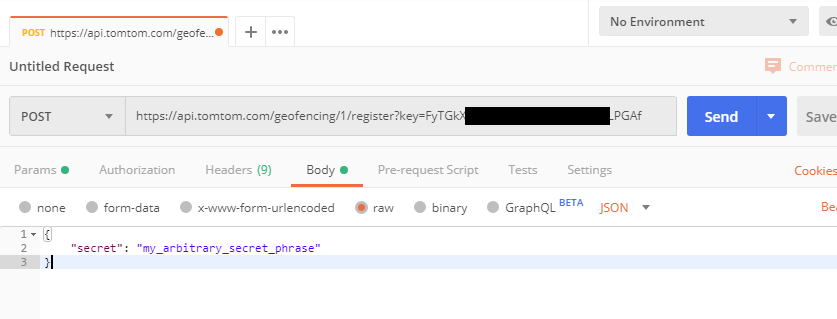
Be sure to change the header 'Content-type' to application/json, then use your own secret phrase and select JSON when filling in the body. When you click Send, you’ll get a response that holds the second key you need: the Admin key.
This service can also be used to generate a new Admin key, change the secret phrase, and set or read configuration options such as consentForStoringObjectsPositionsHistory. See the Configuration service documentation for more information.
Creating a Project
Now that we have both keys, we can start making use of the services to construct our fences. The first step is to create a project to which the fences and objects will be assigned. The base URL, the geofencing API, and the version remain the same, but the rest of the endpoint does change a bit. Here’s the endpoint to create a new project:
https://api.tomtom.com/geofencing/1/projects/project?key=yourapikey&Your_API_Key=Your_Admin_KeyIn addition to both the API and admin keys, this endpoint also includes the text "/projects/project" after the version.
If we send the request through Postman to create a project, the resulting body will contain the new "projectID" value.
In the first image we’re using Postman to create project:

The image below shows the result:
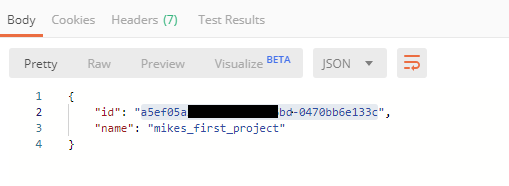
The process is the same for creating a fence or an object to track. After you create something with the API service, the response is that item along with any additional data that’s part of the new item. ID values are in UUID format: xxxxxxxx-xxxx-xxxx-xxxx-xxxxxxxxxxxxxxxx.
Creating a Fence
To perform an operation on a specific item, the endpoint needs to include the ID of the item. For example, when we create a fence, it's assigned to a specific project. So we use the Projects service endpoint followed by the projectId. Let's see the whole thing:
https://api.tomtom.com/geofencing/1/projects/project_ID/fence?key=Your_API_Key&adminKey=Your_Admin_KeyIn this endpoint you see "/projects/project_ID/fence", so a fence will be added to the project. In place of the "project_ID" you’d include the UUID for the project to which you want to assign the new fence. As with the creation of the project, additional info is needed to create the fence. The body for creating the fence will be something like this:
{
  "name": "fence_name",
  "type": "Feature",
  "geometry": {
    "radius": 50,
    "type": "Point",
    "shapeType": "Circle",
    "coordinates": [-67.137343, 45.137451]
  }
}
Instead of using Postman for this, we’ll use some JavaScript. Here's an async function you can use to create a fence for a project:
async function makeFence(projectId, config) {
    let response = await fetch('https://api.tomtom.com/geofencing/1/projects/${projectId}/fence?key=Your_API_Key&adminKey=Your_Admin_Key', {
        method: 'POST',
        headers: {
            'Content-Type': 'application/json'
        },
        body: JSON.stringify(config)
    });
    let result = response.json();
    return result;
}
And here’s the code you’d use to call it:
function createFenceTest() {
  var config = {
    "name": "mikes_first_fence",
    "type": "Feature",
    "geometry": {
       "radius": 50,
       "type": "Point",
       "shapeType": "Circle",
       "coordinates": [-67.137343, 45.137451]
    }
  }
  makeFence('a5ef05a2-f1de-4eb0-b6bd-0470bb6e133c', config)
  .then(function(data) {
      alert(JSON.stringify(data));
      myFence = data; // save the result for use elsewhere in the program
  });
}
Of course, this isn't production-ready code. It's meant to focus on the API call and the data it needs.
It's also possible to create a fence and assign it to multiple projects. To do that you’d leave the project ID out of the endpoint and instead create a "projects" property of the config:
var config = {
  "name": "mikes_first_fence",
  "projects": [id1, id2, id3...],
  "type": "Feature",
  "geometry": {
    "radius": 50,
    "type": "Point",
    "shapeType": "Circle",
    "coordinates": [-67.137343, 45.137451]
  }
}
This code creates a circular fence. Another interesting type of fence is the Corridor, which could be used to define an area for a vehicle delivery route. You’d create the route by specifying a fence with config information like this:
var config = {
  "name": "mikes_first_corridor",
  "type": "Feature",
  "geometry": {
    "radius": 50,
    "type": "LineString",
    "shapeType": "Corridor",
    "coordinates": [
      [-67.000000, 45.000000],
      [-68.000000, 46.000000],
      [-69.000000, 46.000000],
      [-69.000000, 47.000000]
    ]
  }
}
You use the "LineString" type to create a route, and the "radius" of 50 indicates the route should be 100 meters wide. The "coordinates" indicate where the center of the route should be drawn. These coordinates are provided only as demonstration. The fence starts at [-67, 45], goes diagonally to [-68, 46], then horizontally to [-69, 46], and vertically to [-69, 47] to finish it off. TomTom uses the GeoJSON format for many shape definitions, and supplies custom shapes as needed. See the following pages for more information:
GeoJSON draft version 6 Custom fence shapes
You can also create rectangle and polygon shapes, but be careful getting too detailed in the definition of a fence shape. The number of vertices affects the performance of the API, but also consider in your planning that the GPS accuracy of many devices is as low as 50 feet.
Creating Objects
So we have a project and we have the ability to create fences. What we need now are objects that might cross the fence and cause an action. The Objects service is used to create objects that will be tracked. See the Objects service documentation for details on the service.
An object has the following characteristics.
It is uniquely identifiable.
It can only be linked to a single Configuration at a time.
It has a certain connectivity capability.
It does not have to always be connected to the Geofencing service.
It has a position.
It may also have other user-defined properties.
The two most important points here are the connectivity and the location. An object has to be able to report its location to be useful in geofencing.
Let’s create a new object:
async function makeObject(config) {
  let response = await fetch(`https://api.tomtom.com/geofencing/1/objects/object?key=Your_API_Key&adminKey=Your_Admin_Key`, {
      method: 'POST',
      headers: {
          'Content-Type': 'application/json'
      },
      body: JSON.stringify(config)
  });
  let result = response.json();
  return result;
}

function createObjectTest() {
  var config = {
    "name": "mikes_first_object",
    "defaultProject": "4dee65b0-x55x-y4y4-f8f8-27231fd780fb"
  }
  makeObject(config)
  .then(function(data) {
    alert(JSON.stringify(data));
    myObject = data; // save the result for use elsewhere in the program
  });
}
The async makeObject function calls to the API's endpoint to create an object and pass in the configuration. The createObjectTest function prepares the data and calls makeObject. This time the projectID is not passed in separately because it's provided in the "defaultProject" argument.
Reporting and Transitions
The Report Service returns JSON data concerning a certain point. It will let you know whether the point is within or outside any fences in a project. The minimum information needed is the point and the project. You can also supply an object. If you do, you can leave out the project argument because the API will use the defaultProject for the object ID. Let’s take a look at a sample:
async function getReport(lat, lng, alt) {
  let response = await fetch(`https://api.tomtom.com/geofencing/1/report/4dee65b0-x55x-y4y4-f8f8-27231fd780fb?key=Your_API_Key&adminKey=Your_Admin_Key&point=${lat},${lng},${alt}`);
  let result = response.json();
  return result;
}

function getReportTest() {
  getReport(-67.5, 45.5, 0.0);
  .then(function(data) {
    alert(JSON.stringify(data));
    myReport = data; // save the result for use elsewhere in the program
  });
}
Once again, we use an async function to make the call to the API and return the result formatted in JSON. In this case, we don’t use a POST as we aren’t storing any information; we just want information on the fences surrounding (or not) the point we provided.
Now we get to the transitions—crossing from inside a fence to outside or vice versa. First, we need to report the locations of the objects. We use the same Report Service API to do this, except that now, to record a location, we use a POST. In this case the object id is required because the location needs to be associated with the object. So, here’s one final sample:
async function makeReport(lat, lng, alt, objId) {
  let response = await fetch(`https://api.tomtom.com/geofencing/1/report/4dee65b0-x55x-y4y4-f8f8-27231fd780fb?key=Your_API_Key&adminKey=Your_Admin_Key&point=${lat},${lng},${alt}&object=${objId}`, {
    method: 'POST',
    headers: {
      'Content-Type': 'application/json'
    }
  });
  let result = response.json();
  return result;
}

function createReportTest() {
  makeObject(-67.5, 45.5, 0.0, "67ab1b09-xxxx-yyyy-zzzz-6e17yx139f95")
  .then(function(data) {
    alert(JSON.stringify(data));
    myObject = data; // save the result for use elsewhere in the program
  });
}
When you use a POST like this, the Geofencing API will record this location and calculate any transitions that might have occurred if a point and its predecessor are on opposite sides of a fence. Don’t forget to set the configuration option “consentForStoringObjectsPositionsHistory” to true. You can then apply what you’ve learned here to the Transitions Service to get a complete history of the transitions. You can explore that service at Transitions service.
Wrap Up
Today we learned about Geofencing and its related services. We obtained an API key, registered the key with the Configuration Service, used the Project Service with Postman to create a project, and then added fences with the Fences Service. We used the Objects service to create an object with a default project and, finally, got a report on the location of the object and then reported it.
Note that TomTom provides a separate Location History API that handles secure collection and storage of object location information. The Location History service can potentially be used for managing vehicle fleets, handling optimal taxi pickup locations, and for delivering on-demand services. You can create powerful applications by using location history to track objects while also employing the geofencing services to capture object transitions into, out of, and between geofenced regions of interest.
To learn more about geofencing, check out these related articles: