Find the Quickest Way Through Complicated Routes with TomTom
&w=256&q=90)

In this article, we’ll explore a hands-on guide for using the Waypoint Optimization API to find the most ideal routes for a larger number of waypoints. We’ll see how waypoint optimization can be used to determine the fastest path for any set of stops on a route.
If your end users are fleet managers or are responsible for scheduling deliveries, it’s essential to provide them with the ideal sequences for stops. Without optimizing the stop — or waypoint — sequence, your users’ routes will be less efficient overall, leading to delays, increased costs, and other challenges.
With the TomTom Waypoint Optimization API, planning complicated routes doesn’t have to be a major ordeal. Using this API, we can easily find the most efficient order of stops to make between multiple locations while accounting for factors like traffic, means of travel, and vehicle load. This makes it easier for our end users to plan their routes in advance — which is crucial in the transport industry.
In this tutorial, we’ll build a simple React.js app that uses the TomTom Waypoint Optimization API alongside the TomTom Routing API to find the fastest, most efficient sequence of stops for a route that contains several destinations.

Prerequisites
This uses React.js and the TomTom Waypoint Optimization API, so some knowledge of React and APIs is required to follow along. And, if you don’t already have one, sign up for a TomTom developer account and obtain your API key.
You can find the complete source code for our app here.
Getting Started
To begin, we’ll create a React app. We’ll use the Create React App library, but you can use any React library you want. The methods in this article will work regardless of the library you're using.
In the directory of your choice, open your terminal and run the following:
# Run this to use npm
npx create-react-app tom-tom
# Or run this to use yarn
yarn create react-app tom-tom
cd tom-tom
yarn start
Once the React is up and running, install the packages needed for this tutorial:
yarn add @tomtom-international/web-sdk-maps
yarn add @tomtom-international/web-sdk-services
yarn add from-seconds
Creating the Map
The first step is to create a reusable map component that we will use to display the optimized routes. From inside the src folder, create a new file called Map.js and add the following code:
function Map({ data, zoom_level, travel_mode }) {
  return (
    <div className="map_wrapper">
      <div className="mapDiv" />
    </div>
  );
}
export default Map;
Notice that our Map component accepts three props:
data — This is an array of objects containing the coordinates of each destination.
travel_mode — This indicates the type of vehicle to be used for optimization.
zoom_level — This specifies the Map's initial zoom level.
We’ll need to select an element on the DOM to display the map. To do so in React, we'll use the useRef hook:
import { useRef } from "react";

function Map({ data, zoom_level, travel_mode }) {
  const mapElement = useRef();


  return (
    <div className="map_wrapper">
      <div ref={mapElement} className="mapDiv" />
    </div>
  );
}


export default Map;
Now that we’ve selected the map element on the page, let’s import our map SDK, as well as the useEffect and useState hooks to display our map and manage our state, respectively.
import "@tomtom-international/web-sdk-maps/dist/maps.css";
import * as ttservices from "@tomtom-international/web-sdk-services";
import tt from "@tomtom-international/web-sdk-maps";
import { fromSeconds } from "from-seconds";
import { useEffect, useState, useRef } from "react";
Finally, in a useEffect hook, we’ll call our Map method, which will ensure that our map renders whenever the component renders:
import { useEffect, useState, useRef } from "react";
function Map({ data, zoom_level, travel_mode }) {
const mapElement = useRef();
const [map, setMap] = useState(null);
const api_key = "your_api_key";
useEffect(() => {
let map = tt.map({
key: api_key,
container: mapElement.current,
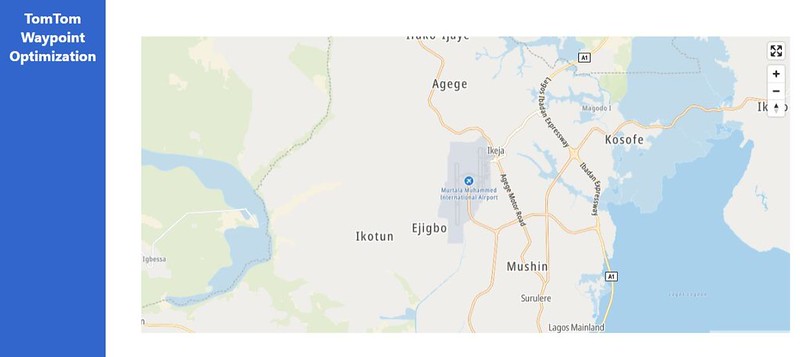
center: [3.319332056, 6.572997708], // Murtala Muhammed Airport
zoom: zoom_level,
});
map.addControl(new tt.FullscreenControl());
map.addControl(new tt.NavigationControl());
setMap(map);
return () => map.remove();
}, []);
return (
<div className="map_wrapper">
<div ref={mapElement} className="mapDiv" />
</div>
);
}
export default Map;We keep the entire map object in the map state after the map has been initialized, and we set the state of initialized to true. We do this so that we may add new methods to our map without React throwing an error.
To complete our Map component, we must give it a height and width. Open the scr/ App.css file, and apply the following layout styles:
body,
#root {
  overflow: hidden;
  height: 100vh;
  scroll-behavior: smooth;
}
.wrapper {
  display: flex;
  height: 100%;
}
.wrapper_inner {
  width: 90%;
  margin: 1rem auto;
}
main {
  overflow-y: auto;
  flex: 1 0 90%;
  margin: 1rem 0px;
}
aside {
  background: #36c;
  color: #fff;
  text-align: center;
  flex: 1 0 10%;
  padding: 1rem;
}
.map_wrapper {
  margin-top: 32px;
  height: 520px;
  overflow: hidden;
}
.mapDiv {
  margin-top: 16px;
  height: 100%;
}
Now, open the React app in your browser and the map should appear on the page.
Creating Markers
Now, let’s add markers to each location we’ll be delivering to.
The first step is to obtain the coordinates for each of the locations where we will be stopping. These data sets usually come from TomTom’s Route Planners or back-end services:
const data_set_lagos = [
    { lng: 3.319332056, lat: 6.572997708, name: "Murtala Muhammed Airport" },
    { lng: 3.38499846, lat: 6.5166646, name: "University of Lagos - Unilag" },
    { lng: 3.42166498, lat: 6.416665, name: "Eko Atlantic" },
    { lng: 3.40083173, lat: 6.499998, name: "Third Mainland Bridge" },
    { lng: 3.3666652, lat: 6.4499982, name: "Apapa" },
    { lng: 3.450664864, lat: 6.434831594, name: "Palms Shopping Mall" },
    { lng: 3.3999984, lat: 6.4499982, name: "EAS Airlines Flight 4226" },
    { lng: 3.416831666, lat: 6.442998228, name: "Dodan Barracks" },
   ];
We have different locations in Lagos, Nigeria listed above. We need to pass this data as a prop to our Map component. Make the following changes to src > App.js:
import Map from "./Map";
function App() {
  const data_set_lagos = [ // coordinates ];
  return (
    <div className="wrapper">
...
       <main>
        <div className="wrapper_inner">
          <div id="lagos">
            <Map data={data_set_lagos} zoom_level={11} travel_mode="truck" />
          </div>
        </div>
      </main>
    </div>
  );
}
export default App;
After we’ve passed the data to our Map component, we need to store it in a state in our Map.js file:
...
import { useEffect, useState, useRef } from "react";

function Map({ data, zoom_level, travel_mode }) {
  ...
  const [waypoints] = useState(data);
  ...
}


export default Map;
Next, we can use another useEffect hook to call our map object. Whenever the maps load, we call a function called create_marker, which will make a marker for each of our locations:
useEffect(() => {
    if (map) {
      map.on("load", () => {
        waypoints.forEach((location) => {
          create_marker(location);
        });
      });
    }
  }, [map]);
The only difference between this and the first useState is that this one is called anytime the initialized state is updated.
So, let’s create the create_marker function:
function create_marker(location) {
    const marker_el = document.createElement("div");
    marker_el.id = travel_mode;
    const popup = new tt.Popup({ offset: 20 }).setText(location.name);
    const marker = new tt.Marker({ element: marker_el, anchor: "bottom" })
      .setLngLat([location.lng, location.lat])
      .setPopup(popup)
      .addTo(map);

    return marker;
  }
As you can see, the create_marker() function only takes one argument — the location.
We create a div element with an id equal to travel_mode and use CSS to create the icon for each marker using that location:
#truck {
  background-image: url("url_of_icon");
  background-size: cover;
  width: 32px;
  height: 32px;
}
With the addition of markers, our preview now looks like this:

Optimizing the Route
The ability to take a set of up to 50 coordinates and provide the best possible waypoint order based on the options specified is where the TomTom Waypoint Optimization API shines. To optimize our route, we need to send the following POST request to the Waypoint API:
let URL = `https://api.tomtom.com/routing/waypointoptimization/1?key=${api_key}`;
const optimize_routes = () => {
    const data = {
      waypoints: waypoints.map((location) => {
        return {
          point: {
            latitude: location.lat,
            longitude: location.lng,
          },
        };
      }),
      options: {
        travelMode: travel_mode,
        vehicleMaxSpeed: 0,
        vehicleCommercial: true,
        vehicleLoadType: ["otherHazmatGeneral"],
        traffic: "live",
  departAt: "now",
        outputExtensions: ["travelTimes", "routeLengths"],
        waypointConstraints: {
          originIndex: 0,
          destinationIndex: 0,
        },
      },
    };
    fetch(URL, {
      method: "POST",
      headers: { "Content-type": "application/json;charset=UTF-8" },
      body: JSON.stringify(data),
    })
      .then((response) => response.json())
      .then((data) => {
        console.log(data);
      })
   };
You can see above that we’re sending the waypoints (coordinates) along with a lot of options, which help the Waypoint API pick the best possible way to optimize our routes.
Please see the Waypoint Optimization API documentationfor further information on each option, as well as extra options that can be added.
Following the POST request, the API will return an optimized route order and details about each route in that optimized order. We can then reorder our original waypoints using the new returned order:
let URL = `https://api.tomtom.com/routing/waypointoptimization/1?key=${api_key}`;
const optimize_routes = () => {
    const data = {
// options
     };
    fetch(URL, {
      method: "POST",
      headers: { "Content-type": "application/json;charset=UTF-8" },
      body: JSON.stringify(data),
    })
      .then((response) => response.json())
      .then((data) => {
        const optimized_locations = data.summary.legSummaries.map((summary) => {
          return { ...waypoints[summary.originIndex], ...summary };
        });
        console.log(optimized_locations);
      })
     };
Updating the Markers
We now have our optimized route and some information about each destination, such as the overall distance from one location to the next and the time it will take to arrive at the next destination.
Let’s display this information as popups on the marker we created earlier. Make the following changes to the Map.js file:
let URL = `https://api.tomtom.com/routing/waypointoptimization/1?key=${api_key}`;
const optimize_routes = () => {
    const data = {
// options
    };
    fetch(URL, {
      method: "POST",
      headers: { "Content-type": "application/json;charset=UTF-8" },
      body: JSON.stringify(data),
    })
      .then((response) => response.json())
      .then((data) => {
        const optimized_locations = data.summary.legSummaries.map((summary) => {
          return { ...waypoints[summary.originIndex], ...summary };
        });
        optimized_locations.forEach((location, index) => {
          const start_time = new Date(location.departureTime).toLocaleString();
          const arrival_time = new Date(location.arrivalTime).toLocaleString();
          const distance_in_seconds = fromSeconds(
            location.travelTimeInSeconds
          ).toHours();
          const start_at = location.originIndex;
          const end_at = location.destinationIndex;
          const popup = new tt.Popup({ offset: 50 }).setHTML(
            `<div class="popup">
            <h1>Location ${index}</h1>
            <br />
            <p>Current Point: ${waypoints[start_at].name}</p>
            <p>Departure Time: ${start_time}</p>
            <p>Next Stop: ${waypoints[end_at].name}</p>
            <p>Arrival Time:  ${arrival_time}<p>
            <p>Distance To next stop:  ${location.lengthInMeters / 1000}(km)</p>
            <p>Estimated Time To next stop:  ${
              distance_in_seconds.hours
            } Hours, ${distance_in_seconds.minutes} Minutes</p>
            </div> `
          );
          create_marker(location).setPopup(popup);
        });
      })
    };
Let’s put this to the test by adding a button that calls our optimize_routes function in our src > Map.js file:
...
function Map({ data, zoom_level, travel_mode }) {
...
    return (
    <div className="map_wrapper">
     <button
        className="btn"
        disabled={map == null ? true : false}
        onClick={optimize_routes}
      >
        Click here to get optimized route
      </button>


      <div ref={mapElement} className="mapDiv" />
    </div>
  );
}
export default Map;
Each marker now displays a detailed summary of the location once the popup is updated:

Creating the Route
Apart from just optimizing our routes and showing this information in a popup, we also need to create a route path that links each of our destinations. To do this, we must create our route using TomTom's Routing API, and then add the new route as another layer to our map.
Create a new function called create_route in the Map.js file and add the following code:
const create_route = (locations) => {
    ttservices.services
      .calculateRoute({
        key: api_key,
        locations,
      })
      .then((routeData) => {
        const features = routeData.toGeoJson().features;
        features.forEach((feature, index) => {
          map.addLayer({
            id: "route" + index,
            type: "line",
            source: {
              type: "geojson",
              data: feature,
            },
            paint: {
              "line-color": `red`,
              "line-opacity": 0.8,
              "line-width": 6,
              "line-dasharray": [1, 0, 1, 0],
            }
          });
        });
      });
  };
The above code takes our specified waypoints and draws a line for each one. We call this function immediately after we update our markers.
let URL = `https://api.tomtom.com/routing/waypointoptimization/1?key=${api_key}`;
const optimize_routes = () => {
const data = {
// options
};
fetch(URL, {
method: "POST",
headers: { "Content-type": "application/json;charset=UTF-8" },
body: JSON.stringify(data),
})
.then((response) => response.json())
.then((data) => {
const optimized_locations = data.summary.legSummaries.map((summary) => {
return { ...waypoints[summary.originIndex], ...summary };
});
optimized_locations.forEach((location, index) => {
...
create_marker(location).setPopup(popup);
});
create_route(optimized_locations); // call the create_route function
})
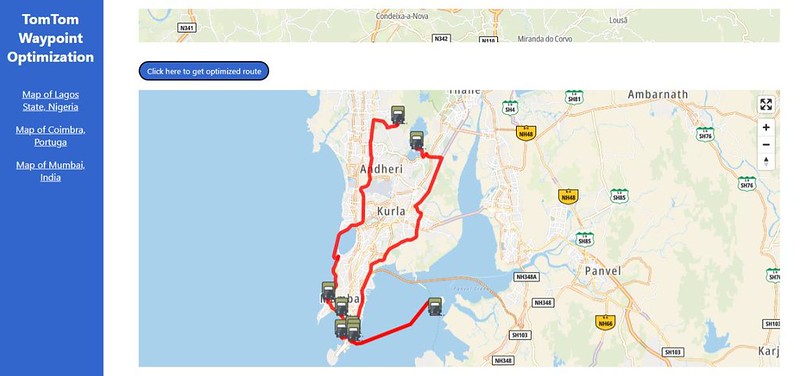
};There is now a line on the map that connects all of the destinations.

Finding the Fastest Path Across Several Destinations
Now that we have our reusable Map component set up, we can use it to determine the fastest path along any complex route. Let's use the cities of Coimbra in Portugal and Mumbai in India as examples.
Open src > App.js and make the following changes
...
import Map from "./Map";
function App() {
...
  const data_set_COIMBRA = [
    {
      lng: -8.43339493308,
      lat: 40.2016525267,
      name: "Monastery of Santa Clara-a-Velha",
    },
    { lng: -8.459417, lat: 40.207444, name: "University of Coimbra" },
   {
      lng: -8.404665048,
      lat: 40.201999192,
      name: "Estádio Cidade de Coimbra",
    },
    { lng: -8.4333316, lat: 40.192165898, name: "Quinta das Lágrimas" },
    { lng: -8.3402069725, lat: 40.2079008351, name: "Rio Mondego" },
    { lng: -8.422831642, lat: 40.205165846, name: "Old Cathedral of Coimbra" },
    { lng: -8.683, lat: 40.176, name: "Montemor-o-Velho Castle" },
  ];

const data_set_Mumbai = [
    {
      lng: 72.887351,
      lat: 19.1611,
      name: "Film City",
    },
    { lng: 72.835496658, lat: 18.926329628, name: "Reserve Bank of India" },
    {
      lng: 72.834705,
      lat: 18.921836,
      name: "Fozli Mango Museum",
    },
    {
      lng: 72.80583011,
      lat: 18.967662796,
      name: "Antilia (building)",
    },
    {
      lng: 72.833589,
      lat: 18.929681,
      name: "Bombay Stock Exchange",
    },
    { lng: 72.821348, lat: 18.950159, name: "India Tower" },
    {
      lng: 72.9092113631,
      lat: 19.1335144659,
      name: "Indian Institute of Technology Bombay",
    },
    { lng: 72.821496714, lat: 18.925996296, name: "Brabourne Stadium" },
    { lng: 72.93, lat: 18.95, name: "Elephanta Island" },
  ];

  return (
    <div className="wrapper">
      <aside>
        <h1>TomTom Waypoint Optimization</h1>
        <ul>
    ...
          <li>
            <a href="#coimbra">Map of Coimbra, Portuga</a>
          </li>
    <li>
            <a href="#mumbai">Map of Mumbai, India</a>
          </li>
        </ul>
      </aside>
      <main>
        <div className="wrapper_inner">
          ...
          <div id="coimbra">
            <Map data={data_set_COIMBRA} zoom_level={10} travel_mode="car" />
          </div>
    <div id="mumbai">
            <Map data={data_set_Mumbai} zoom_level={10} travel_mode="truck" />
          </div>
        </div>
      </main>
    </div>
  );
}
export default App;
Below is a live preview of the optimized routes for Coimbra.

And that of Mumbai:
Conclusion
When we’re working with many waypoints, orchestrating the best sequence of stops can be challenging. Fortunately, it can be streamlined by using the TomTom Waypoint Optimization API. Once we have determined the best sequence, we’re able to construct an efficient route much more easily — and even in advance.
In this article, we learned how to use this API and React to create a simple app that can be used to find the most efficient sequence of stops to make during a trip that requires many stops. By calculating the fastest route, your users can use your maps to travel more efficiently, boosting productivity and reducing unnecessary costs.
You can learn more about creating efficient routes with TomTom maps by checking out the TomTom Waypoint Optimization API and trying the TomTom Routing API for yourself!
* Required field. By submitting your contact details to TomTom, you agree that we can contact you about marketing offers, newsletters, or to invite you to webinars and events. We could further personalize the content that you receive via cookies. You can unsubscribe at any time by the link included in our emails. Review our privacy policy.