9 Easy Ways to Use Maps in your Apps
&w=256&q=90)

You've added a map to your app. Now what? We'll show you some simple, powerful capabilities of the Maps SDK with examples for mobile and web developers.
Creating and customizing maps with TomTom has never been easier, no matter your skill level or preferred language.
For this article, we compiled a list of nine simple, yet incredibly powerful capabilities of TomTom’s Maps SDK for both developers and designers.
The examples used are supported in a number of languages — Java, JavaScript, and Swift — so there’s something here for everyone. And because TomTom Maps SDK patterns are similar across all platforms, these examples translate easily to your language of choice.
To follow along with the code examples, you’ll need to register for access to the TomTom Developer Portal and get an API key.
Embed the SDK in Your iOS App
After setting up Cocoapods, a dependency manager for Swift and Objective-C projects, integrating the TomTom Maps SDK module is as simple as including the following line in your podfile and executing pod install from the console.
pod 'TomTomOnlineSDKMaps' To initialize a map, import the TomTomOnlineSDKMaps module into your project file and paste in your API key found on your TomTom Developer dashboard.
let mapConfig = TTMapConfigurationBuilder.create().withMapKey(<Key>).build()
self.mapView = TTMapView(frame: view.bounds, mapConfiguration: mapConfig)
For more information and detailed examples, check out the official Maps SDK For iOS Examples repository.
Display a Map Centered on a Place
Setting a map’s initial view is simple. The following Swift example illustrates how to center a map on Amsterdam, with a zoom level approximately equal to 45%.
let cameraPosition = TTCameraPositionBuilder.create(withCameraPosition: TTCoordinate.AMSTERDAM()).withZoom(10).build()
mapView.setCameraPosition(cameraPosition)
On vector maps, the withZoom function accepts an integer between 0 and 22, where 0 returns a view of the entire earth.
For a more detailed explanation of zoom levels, take a look at Understanding Map Tile Grids and Zoom Levels.
Show Where I am Right Now
Location tracking is disabled by default so to display and track a user's current position, first enable it. The following is a Java example.
tomtomMap.setMyLocationEnabled(true); To get the user’s current location, simply call getUserLocation on tomtomMap.
Location location = tomtomMap.getUserLocation(); In case a device does not yet have a position fix, the getUserLocation function might return NULL. To circumvent an error in this case, you can override the onLocationChanged callback.
Search for a Place and Show a Marker on the Map
To add a marker to a map, we need coordinates. Luckily, TomTom makes georeferencing simple with Search API.
Go to the API Explorer, click “Try it out” and paste an address into the query input. For this example, let’s use the following address: “100 Century Center Ct 210, San Jose, CA 95112, USA”.
Create an array with the returned coordinates (lng,lat) to add it to your map.
var speedyPizzaCoordinates = [-121.91595, 37.36729];
var marker = new tt.Marker().setLngLat(speedyPizzaCoordinates).addTo(map);
For more information, check out Displaying Multiple Locations Using TomTom's Maps SDK.
Customize Markers
There are a number of ways to customize markers. One of the most basic is to create a popup that contains information about a place.
Let's customize the marker we made in the last point by giving it a popup and label.
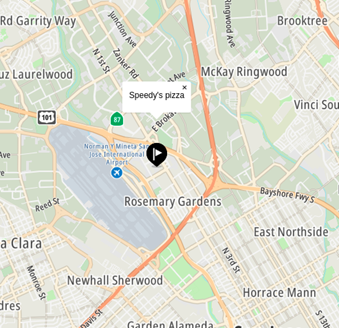
On an existing tt.Marker object, define a popup's position in popupOffsets, set a label with HTML, and instantiate the popup on the existing marker with the option to toggle.
var popupOffsets = {
  top: [0, 0],
  bottom: [0, -70],
  'bottom-right': [0, -70],
  'bottom-left': [0, -70],
  left: [25, -35],
  right: [-25, -35]
}

var popup = new tt.Popup({offset: popupOffsets}).setHTML("<b>Speedy's pizza</b>");
marker.setPopup(popup).togglePopup();
Turn Layer Visibility On and Off
Layered maps can provide users with the ability to visualize a wide range of data on a single map.
For an application where multiple details are relevant to a single location — think land registries or geological studies — the ability to toggle layer visibility is critically important to user experience.
The following is an example of how to define a layer and toggle its visibility.
On a predefined tt.Map object contained in the var map, add a new layer by calling addLayer and defining its properties as required — make sure to choose a distinct ID.
Layers are fully customizable via Layer properties. Explore TomTom documentation to experiment with layer customization.
map.addLayer({
    'id': layerId,
    'type': 'fill',
    'source': {...},
    'layout': {},
    'paint': {...}
}, 'layer description');
Map layers are visible by default but can be toggled using setLayoutProperty.
map.setLayoutProperty(layerId, 'visibility', 'none'); For more information, check out Manipulating and Styling Map Layers Beyond the Basics. And to see examples of layer manipulation in functional applications, check out the Taxi cars dispatcher and Traffic Tutorial.
Draw Circles and Polygons on a Map
Geofencing is useful for creating bounds on a map. A common use of geofencing is demonstrating points of interest within a certain radius. For example, when searching for real estate, a user may wish to view all schools within a specified distance from a property. Geofencing can also be useful for situations like vehicle tracking, geomarketing, generating notifications, and more.
TomTom provides an easy-to-use Geofences Creator app which helps developers visually create and reference fences using the Geofencing API.
Start Geofences Creator.
Enter your API key and click, “Save & Continue”.
Click “Generate an admin key” and type a password.
Click “Generate admin key” and copy the key.
Select “Geofences creator” for the Project ID and click “Save & Finish”.
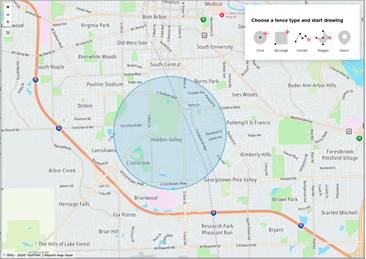
Select a fence type.
To increase the circle's radius, click a point on the map and drag the cursor away from this point. Click the map once more to commit the circle’s size.
A popup appears, allowing you to give your new fence a name and provide extra fence details in JSON format.
Click “Save”.
Your new Geofence is now re-fencible using its Project ID, "Geofences creator".
Check out What is Geofencing? for a detailed implementation of geofencing in Python.
Get Information About Places on a Map
TomTom’s Search API is a powerful endpoint that returns information about places.
Reverse GeocodeThe Search API’s Reverse Geocode endpoint takes a comma separated string (“lat,lng”) and returns a street address, street element, or geography.
Reverse geocoding can be useful for translating a device’s GPS feed into a human-readable address or place name.
One of the most common applications of reverse geocoding is turn-by-turn navigation, where location data is converted into audible directions. Another example is returning the speed limit of a road, given a set of coordinates.
The endpoint has the following three required parameters.
versionNumber (version): 2
Query (URL encoded string, “lat,lng”): "37.8328%2c-122.27669"
ext (return type): .xml
An example GET request should look like this, /search/2/reverseGeocode/37.8328%2c-122.27669.xml?key=***
Points of InterestThe Points of Interest Search (poiSearch) endpoint requires the same three parameters as the Geocode endpoint. It returns detailed information for any points of interest associated with your search term.
The poiSearch endpoint returns 10 responses by default but can return up to a maximum of 100. In most cases, this endpoint is best paired with a point of reference and radius, which constrains the search to a defined area.
For interactive examples and details on optional parameters for both the poiSearch and reverseGeocode endpoints, try out the API Explorer.
Create a Static Map Image
Static maps are useful in a variety of ways, including offline navigation.
Let’s deconstruct a bare minimum request URL for this endpoint, which produces a PNG of Amsterdam with a zoom level of 10.
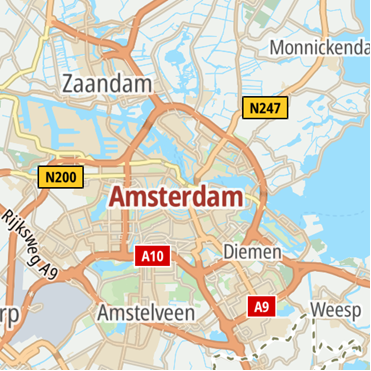
https://api.tomtom.com/map/1/staticimage?zoom=10¢er=4.899886%2C%2052.379031&key=***
https://api.tomtom.com/map/1/staticimage — This endpoint has just one required parameter, the versionNumber, which is the “1” at the end of the base URL.
zoom=10 — Zoom takes an integer between 0 and 22, where 0 would render the entire world.
center=4.899886%2C%2052.379031 — Center is the point of focus supplied as a comma-separated URL encoding string containing latitude and longitude of a location, in this case Amsterdam.
key=*** — The URL ends with your API key.
Discover TomTom
These are just some of the features you can easily incorporate into your applications. We encourage you to check out TomTom’s API Explorer to discover the full range of possibilities.
To start exploring today, register on the TomTom Developer Portal and check out these related articles: