FAQ
I get a 'not enough disk space' error message when I try to update my device
A problem in our 15.5 software release can cause a device that is being updated to a newer version to fail the update with an error message stating that there is not enough disk space to install the update. The way to fix the problem is to first install the update without the map, and delete the existing map in the process.
The update can then be run again, but this time with the map included. Follow these steps to accomplish this:
- Download the image you want to install from the release page on our Developer Portal
- Unpack the downloaded zipfile to an SD card
- Locate the file ‘update-locations’ on the SD card: /boot/2/bridge/update-locations
- Remove the file from the folder, BUT KEEP IT SAFE ON YOUR COMPUTER FOR LATER
- Put the following file in its place
- The file has no extension: update-locations
- The file has the following content
1{2 "schema": "2",3 "files": [{ "file": "package-list.system" }]4} - Insert the SD card in TomTom Bridge and press ‘Software update’
- The device will now update to the build version on the SD card and because the update-locations file does not refer to the map package list anymore the map is removed.
- After the update, the device will give a ‘no maps found’-error, but will have been updated to the software version that was put on the SD card.
- Remove the SD card from the TomTom Bridge and put it back in your computer
- Go back to /boot/2/bridge/ on the SD card and replace the custom update-locations file with the original one from the release zip
- Put the SD card back in the Bridge and run the updater again
- This time, the process will take longer due to the large amount of map data that is installed, but afterwards, the device should boot into a state with both the latest map and software running on the device
When I insert an SD card into Bridge it does not get recognised properly
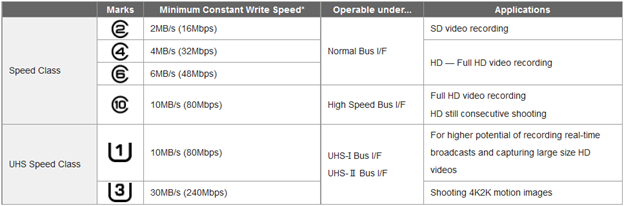
Devices that are running software version 15.6 or below may have difficulties detecting certain types of (higher speed) SD cards. From 16.1 onward, we have full support for all speed classes. Older builds will accept all default speed (Normal Bus) cards (class 2, 4, 6), but may struggle with other speed types.
If your device is running 15.6 or lower, and the inserted micro SD card is not recognised, we recommend upgrading the device to the latest software version (or at least 16.1), using a default speed class 2, 4 or 6 card.
How do I install an apk from Google Play Store (or any other source) on TomTom Bridge?
Since TomTom Bridge does not support Google services, you can’t directly install applications from the store. Assuming the application you are trying to download and install is not itself relying on Google Services, the application should run normally on Bridge. You just need to use an alternative route to install it.
First, you need to change the security settings of the Bridge to allow it to accept applications from an unknown source. Go to Settings -> Security -> Unknown sources. Make sure the checkbox next to this is selected.
Now, if you insert a micro SD card into the slot, TomTom Bridge will prompt you to install any application (file with extension ‘apk’) that it finds on the card, one at the time.
If you can only access the apk by downloading and installing from Google Play, you need to do that on a device (tablet or phone) that does support Google services, extract the apk from that device, and copy it to a micro SD card. In order to do that, you need to install a so-called ‘apk extractor’ on your phone, of which many can be found on Google Play as well.
https://play.google.com/store/apps/details?id=com.infofledge.apkextractor&hl=en is one example.
After installing the application you want to run on TomTom Bridge on your phone, open the file extractor and look for the appropriate app. Selecting it will cause the apk you need to be created. Follow the instructions in the application to retrieve the file and copy it to the SD card. After inserting the card into Bridge, you will be prompted to install the application.
How do I import tracks into TomTom Bridge?
Importing tracks can be useful if you want a route that covers the same roads, such as a fixed bus route.
You can push the routes to the device programmatically, but to quickly demonstrate the feature, you can simply copy a track to TomTom Bridge by connecting it to your pc via usb and copy the file to the root of the device, where it will be easy to find. Next, you share the file with the navigation application via a file browser, after which it should become available as a pre-set route in ‘My Routes’ in the main menu of the navigation.
In order to be able to do this, you need to have a file browser installed on TomTom Bridge. A good free example is the ‘open intents’ browser, ‘org.openintents.filemanager_2.0.5.apk’
https://play.google.com/store/apps/details?id=org.openintents.filemanager&hl=en
Open the application, and browse to the location of the file (if you just copied to the ‘root’ of the device memory, you can simply scroll down and you should find the file there:
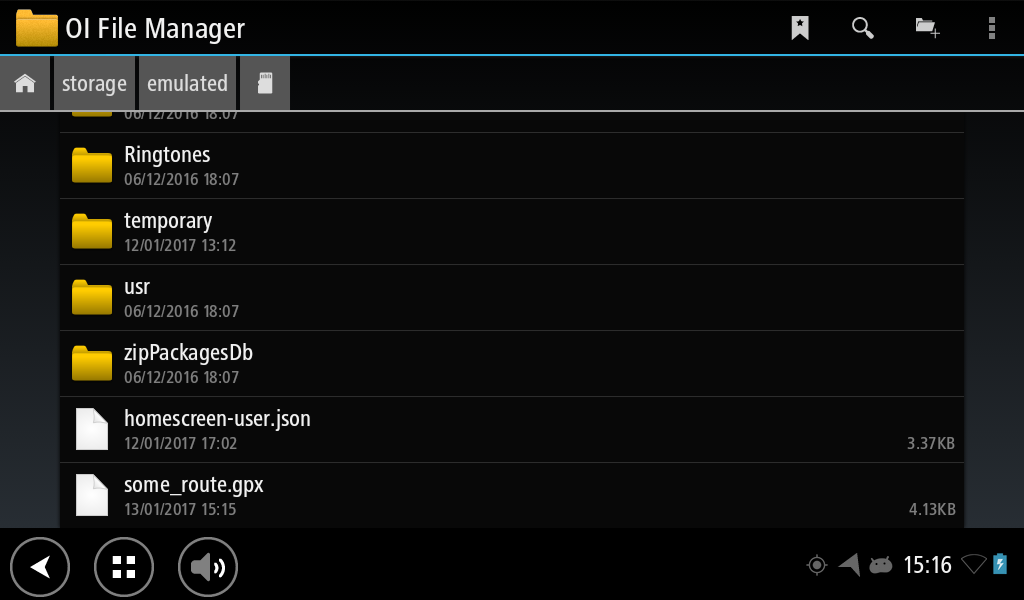
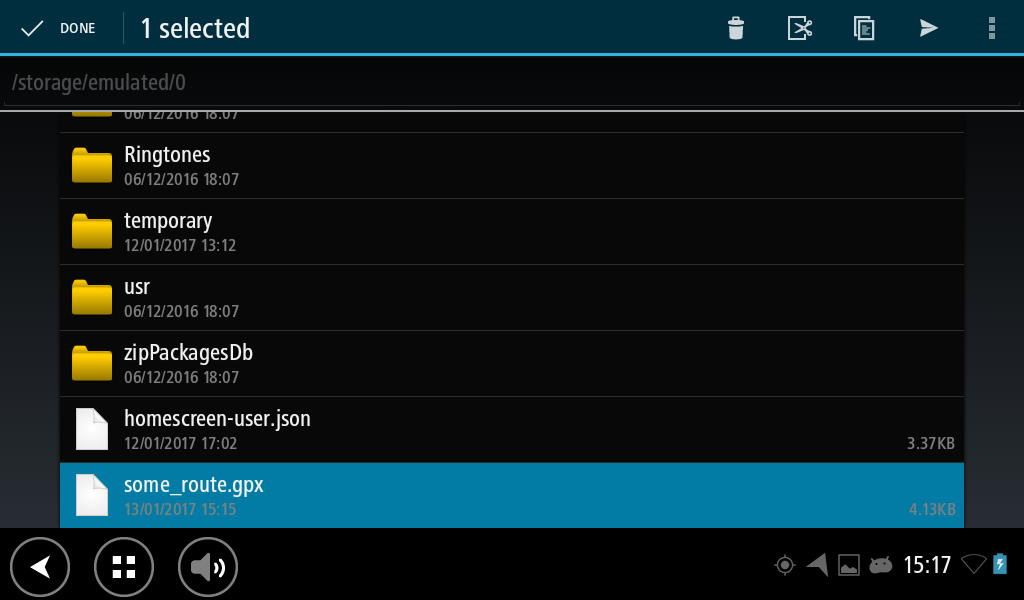
If you long-press on the file you want to import as a route, the options become available to you. Select the ‘arrow’-button in the top right corner. This will bring up a pop-up screen where you are given the option to share the file with a number of applications (usually ‘Navigation’ or ‘Bluetooth’). The TomTom navigation will be one of them:
After selecting the ‘import into navigation’ option, you should see a dialogue informing you that the file is being imported, after which you should see the following message:
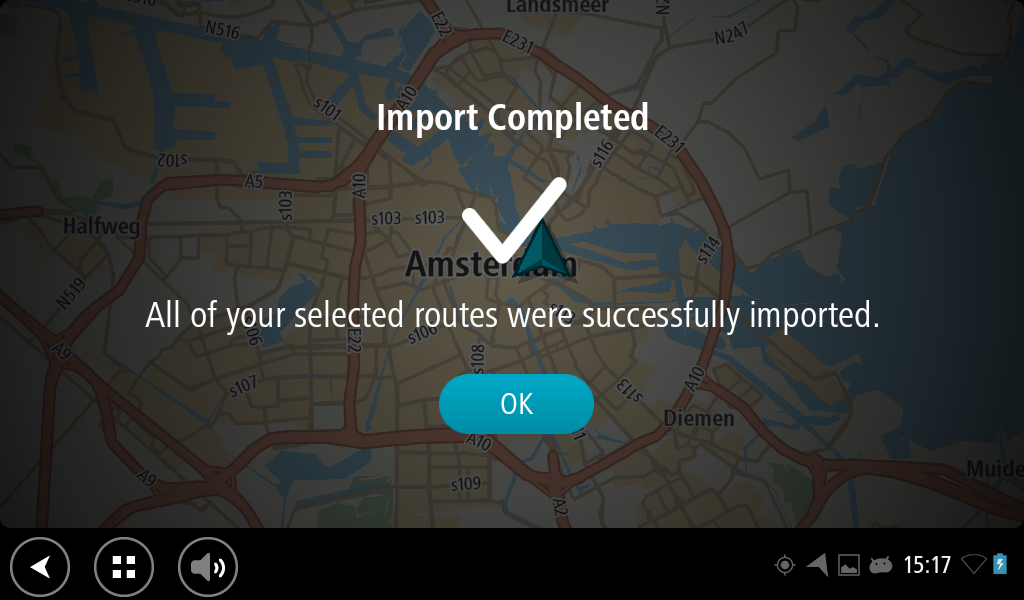
This means the file is now available from the navigation menu under the section ‘my routes’.
How to set up ADB via WiFi
Assuming you have ADB via USB working on your computer, and you have both devices properly connected to WiFi, you can set up ADB via WiFi:
- Run: adb shell ifconfig wlan0
- This will give you the ip address used for WiFi by Bridge
- You can also find this on the device via (Settings -> WiFi -> select active connection)
- Switch ADBD to network mode by running: adb tcpip 5555
- Device should respond with message: restarting in TCP mode port: 5555
- Now disconnect the USB connection between the device and the PC
- Connect to the device via WiFi by running: adb connect <ip-address>:5555
- <ip-address> is the TomTom Bridge ip value you retrieved earlier
- run: adb devices
- you should see the device listed with IP address and port 5555
- You can now connect to the device via WiFi. Note that a reboot will put adbd back into USB mode.
What are NDS maps and how do I use them on TomTom Bridge?
What is NDS?
NDS stands for “Navigation Data Standard” and is the new automotive-grade mapping standard TomTom and TomTom BRIDGE products will be using moving forward. The NDS standard will allow us to bring the latest technologies with regards to maps and navigation to the BRIDGE products.
How do I update my device to the new NDS map format?
In order to update, please install the latest map and software via our Updater as provided on our developer portal. Please beware the new map standard also comes with a new state-of-the art map visualization embedded in our software. Both the latest software and map need to be updated simultaneously.
How do I configure which countries/regions I want to install?
Configuring map regions can be managed in the package list. An explanation is available on our developer portal. By installing fewer map regions, the disk space taken by the map can be reduced significantly. In addition, TTS voices can also be removed dependent on language requirements.
Who can configure which map regions can be installed?
Only integrators can configure which map regions to install via the package list. There is no end-user setting available for this.
I’m currently using the Map Library SDK for my application, do I need to change anything?
Yes, when you’re using our Map Library SDK, please beware you need to rebuild your application against the latest available MapLib SDK (version 13 or later) before updating to NDS. This is due to the fact that we have a new map visualization engine.
What are incremental map updates?
When switching to NDS, weekly incremental map updates will become available to the end-user for specific attributes (like speed limits and direction of traffic flow). Those become available through the Navigation application.
How do I set my network policy for incremental map updates?
There’s an API available as part of the NavApp SDK to set those to 1) none, 2) Wi-Fi network only ( default setting), or 3) all networks including cellular.
What is the approximate size of incremental map updates?
The size of the incremental map update is very much dependent on the region installed and whether the updates are installed every week. As a reference, incremental map updates for the whole European map could be around 10MB a week. Be aware that the first update will be larger since all updates will be installed at once.
How long do I receive incremental map updates?
Incremental map updates are only provided for a limited number of cycles to prevent data fragmentation. Afterwards, a new base map needs to be installed before incremental map updates can be received again.
Do I still need to perform map updates when enabling incremental map updates?
Yes, incremental map updates only contain a limited set of attributes. The quarterly map updates contain all attributes including updated geometry.
Can I upgrade directly to NDS from an any given software release?
As of our 16.4 release, you can update directly to NDS. In case you use an older version than 16.4 software, first update to a version between 16.4 – 17.3 and then update to NDS.
Is there still a difference between non-truck and truck maps?
When switching to NDS maps, there’s no difference anymore between truck and non-truck maps. When available in the region, all maps have integrated truck data. If you would like to lock-down the vehicle profile for the end-user, you can use the NavApp SDK to restrict the vehicle profile.
Can I downgrade my device from NDS maps back to TTC maps?
Yes, it is possible to downgrade your device back to the 17.3 or 17.2 release. You cannot downgrade to older releases than those. Please beware you need to downgrade both the map and the software.
What is the available RAM memory for third party applications using the new NDS configuration?
With this new software, there's approximately 200 MB RAM memory available for third party applications.
How do I upgrade my TomTom Bridge to Android 6 and what are the consequences of doing so?
How do I update my device to Android 6?
In order to update to Android 6 Marshmallow, please install the latest available software via our Updater as provided on our developer portal (indicated by Android 6).
Which map standard is compatible with Android 6?
The TomTom BRIDGE Android 6 version is only compatible with NDS maps. For more information about NDS, please see the dedicated “FAQ NDS” section.
Can I upgrade directly to Android 6 from any given software version?
As of our 16.4 release, you can update directly to Android 6. In case you use an older version than 16.4 software, first update to a version between 16.4 – 17.3 and then update to Android 6.
Can I downgrade back to Android 4.3?
It is important to note that once the upgrade to Android 6 has been done a device cannot be downgraded to 4.3. For that reason it is essential to test your solution thoroughly before rolling out the update.
Which NavApp SDK version can be used on Android 6?
If you're targeting API level 23, then NavApp SDK API level 9 or later has to be used.