&w=256&q=90)

In this tutorial, we’ll explore how to integrate TomTom maps into a Gatsby site using React. We’ll see how to display data from an external source on the map, and how to build routes to and from specific destinations.
These days, maps are an essential feature of many web applications. More platforms are starting to offer services that use location technology. TomTom enables you to integrate location-based features into your web applications through its software development kits (SDKs) and APIs with just a few lines of code and minimal development time.
The TomTom Maps SDK integrates capably with many popular front-end frameworks — including Gatsby, an open-source static website generator that you can use to build progressive web apps that are secure and optimized for speed. Pairing the TomTom Maps SDK with Gatsby enables you to create optimized, interactive maps with ease.
In this tutorial, we’ll demonstrate how to integrate TomTom maps into a Gatsby site using modern React practices like refs. We’ll also see how to display data from an external source on the map. Finally, we’ll explore how to build routes to and from specific destinations that can be altered based on the type of goods being transported.
Prerequisites
To follow this tutorial, you’ll need to have:
A basic understanding of React.
Node.js installed on your computer.
A developer account with TomTom and an API key to authorize your request to use the service.
Setting Up a New Gatsby App
To create a new Gatsby app, we need the Gatsby command-line interface (CLI) installed on your computer. This will enable you to run the commands for developing Gatsby sites.
To install the CLI, open up a terminal on your machine and run the following command. It installs the CLI globally or updates your version to the most recent release.
npm install -g gatsby-cliNext, use the cd command to navigate to where you want to create your Gatsby site. For example:
cd DesktopTo create the Gatsby site, we’ll use a Gatsby starter template. This premade template enables us to get started with development quickly. In this tutorial, we’ll use Gatsby’s official hello world starter.
Inside the directory for your site, run this command (replacing name-of-your-project-here with your project name):
npx gatsby new name-of-your-project-here https://github.com/gatsbyjs/gatsby-starter-hello-worldWhen installation is complete, you should see this message:

Go to the directory you created for the site and run gatsby develop, which will launch a development server where you can preview your site. You can view it at http://localhost:8000 in a web browser. The result should look like this:
Adding a TomTom Map
With the Gatsby app now up and running, we’re set to add a TomTom map to our site. First, we’ll need the TomTom Maps Web SDK installed in our project.
In the terminal, in the root directory of the site, run the command below to install the SDK and its dependencies:
npm install @tomtom-international/web-sdk-mapsWith the SDK installed, it’s time to write out the code to display a TomTom map. Open the index.js file within the src/pages folder of your Gatsby app. Clear all the code inside it and populate it with the following code:
import * as React from "react"
import { useEffect, useRef } from "react"

// TomTom SDK
import * as tt from "@tomtom-international/web-sdk-maps"
import "@tomtom-international/web-sdk-maps/dist/maps.css"
This imports the resources we’ll need to display a TomTom map on a React site, including the useEffect and useRef React hooks along with the TomTom maps JavaScript SDK and its default stylesheet.
Next, we define the functional component Home where the application will live.
export default function Home() {
  const API_KEY = "YOUR_API_KEY"
  const AMSTERDAM = { lon: 4.896029, lat: 52.371807 }

  const map = useRef()
const mapContainer = useRef()

  useEffect(() => {
    map.current = tt.map({
      key: API_KEY,
      container: mapContainer.current.id,
      center: AMSTERDAM,
      zoom: 10,
      language: "en-GB",
    })

    map.current.addControl(new tt.FullscreenControl())
    map.current.addControl(new tt.NavigationControl())

    return () => {
      map.current.remove()
    }
    //eslint-disable-next-line
  }, [])

  return (
    <div className="">
      <div className="container">
        <nav className="nav">
          <h1> TomTom Maps in Gatsby</h1>
        </nav>
        <div ref={mapContainer} className="map" id="map" />
      </div>
    </div>
  )
}
There’s quite a lot going on in the code above, so let’s break it down.
First, the variables API_KEY and AMSTERDAM store the value of the TomTom API key, which you’ll need to use the service. It also includes the longitude and latitude coordinates of Amsterdam in the Netherlands, our sample location, so the map can be centered around it.
Remember to replace YOUR_API_KEY with the API key from your TomTom developer account.
The useRef hook defines the variables map and mapContainer, which stores references to our map and the DOM element it’s embedded within. This is necessary because React works with something called the virtual DOM, which is a virtual representation of the real DOM. We can’t render a TomTom map to a piece of React’s virtual DOM — we have to work with actual DOM elements, which can only be accessed through refs.
These variables are defined as refs and not regular JavaScript variables because in React the entire component is re-rendered whenever a variable is updated, leading to data loss in the component. Since we don’t want to lose this data, we wrap them in refs so that their value persists between component re-renders and you can update their values without a re-render.
The useEffect hook initiates a TomTom map on page load by calling the tt.map function with the necessary configurations. These configurations include our API key, the container parameter that takes the ID of the HTML element the map is to be embedded in, and the center parameter that centers the map around Amsterdam. Note how all it takes to initialize a TomTom map is calling a function!
Finally, the return statement returns the HTML for the browser to display.
At this stage, we’ve now successfully added a TomTom map to our Gatsby site. However, the site would be a bit bleak if it were viewed right now. To solve this, we’ll create a new CSS file in the src folder called styles.css. Note that if you wish to name yours something else, you’ll need to ensure it is imported correctly into your React component.
Once we’ve created the file, we populate it with the following CSS styles:
* {
  padding: 0;
  margin: 0;
  box-sizing: border-box;
}
.container {
  width: 100vw;
  height: 100vh;
  display: flex;
  flex-direction: column;
  justify-content: space-around;
  align-items: center;
  position: relative;
}

.nav {
  display: flex;
  justify-content: space-around;
  align-items: center;
  width: 100%;
  height: 10%;
  background-color: #000;
  color: #ffffff;
}

.nav h1 {
  padding-top: 0.3125rem;
  padding-bottom: 0.3125rem;
  margin-right: 1rem;
  font-size: 1.25rem;
  text-decoration: none;
  white-space: nowrap;
}


.map {
  width: 100%;
  height: 90%;
}
Now, import the stylesheet at the top of the index.js file, which applies styles to make it look better than un-styled HTML.
// CSS styles
import "../styles.css"
With the development server running, save the new changes and go to localhost:8000 in a web browser. When the page updates, it should look like this:

Adding Markers to a TomTom Map
TomTom lets us display a range of information on a map, including geofences, navigation routes, images, and videos. It also lets us display markers, which are customizable icons that add information and interactivity to our maps.
To demonstrate, let’s use markers to show the locations of some top-rated restaurants in Amsterdam. In the src folder, create a JSON file called stores.json, and enter the following code:
[
{
"coordinates": [
4.88427,
52.37243
],
"address": "Reestraat 8, 1016 DN Amsterdam"
},
{
"coordinates": [
4.87631,
52.36366
],
"address": "Eerste Helmersstraat 33, 1054 CZ Amsterdam"
},
{
"coordinates": [
4.94036,
52.36357
],
"address": "Javaplein 23, 1095 CJ Amsterdam"
},
{
"coordinates": [
4.92089,
52.38213
],
"address": "Gedempt Hamerkanaal 201, 1021 KP Amsterdam"
},
{
"coordinates": [
4.91191,
52.36619
],
"address": "Plantage Middenlaan 30A, 1018 DG Amsterdam"
},
{
"coordinates": [
4.87896,
52.37257
],
"address": "Rozengracht 133A, 1016 LV Amsterdam"
}
]
Here, we have an array of objects, where each object has the property of a coordinate. This coordinate is an array that stores the longitude and latitude coordinates of the location — here, a restaurant — and its street address. These coordinates are obtained from the Fuzzy Search service in TomTom’s API Explorer, which returns geolocational data of an address, such as longitude and latitude coordinates and points of interest (POIs).
At the top of the index.js file, below the import statements, import the JSON file:
Import stores from "../stores.json"Now, to display the markers on the page, paste the code below in the useEffect hook just above the return statement.
stores.map((store) => {
      const address = store?.address
      const location = store?.coordinates
      return new tt.Marker()
        .setLngLat(location)
        .setPopup(new tt.Popup({ offset: 35 }).setHTML(address))
        .addTo(map.current)
    })
The code above uses the JavaScript map method to iterate over the array from the JSON file that stores the details of the restaurants. For each restaurant it does the following:
Retrieves its address and coordinates.
Creates a new marker by calling the tt.Marker class.
Sets that marker around the restaurant’s geographical location by passing the restaurant’s longitude and latitude coordinates to the setLngLat method.
Calls the setPopup method, which will display a cancelable popup that shows the restaurant address when the marker is clicked.
Attaches the marker to the map.
Viewed in a browser, the restaurant locations are now displayed as markers.

Clicking on a marker displays the popup.

Routing
Among the many features TomTom offers to developers through its SDKs, routing is one of the most valuable and easy to implement. For example, in a ride-sharing application, how can drivers identify the best routes to their destination? Or for someone working in deliveries, how can they optimize their daily route? In both of these instances, access to information on the route is vital.
TomTom’s Calculate Route service solves this with the Routing API, which determines possible routes between two locations based on specific parameters, like the type of vehicle, the load it’s carrying, and the driver’s estimated time of arrival.
To demonstrate routing with TomTom, let’s make a delivery route between two restaurants that will be altered if the vehicle is carrying hazardous kitchen products, like propane for grills.
First, we need to install TomTom’s web services SDK, which lets us integrate TomTom services on our project, as they aren’t offered by the TomTom Maps Web SDK.
In the terminal, within the root directory of your site, run this command:
npm install @tomtom-international/web-sdk-servicesOnce it’s installed, add this to the top of your index.js file to import it.
import * as tts from "@tomtom-international/web-sdk-services"You can now start writing out the code to calculate the route.
In the Home component, just above the useEffect hook where the map is initialized, declare the function createRoute:
function createRoute() {
    ...
}
Next, within the function, insert the following object:
const routeOptions = {
      key: API_KEY,
      locations: [
        [4.87631, 52.36366],
        [4.91191, 52.36619],
      ],
      travelMode: "truck",
      vehicleEngineType: "electric",
      vehicleCommercial: true,
    }
This object contains the configurations that are being passed to the Calculate Route service, like the API key that authorizes the service, the longitude and latitude coordinates of the two restaurants the route is to be constructed around, the type of vehicle on the route (here, a truck), or the engine type of the vehicle.
Below the routeOptions object, insert this code:
tts.services.calculateRoute(routeOptions).then(response => {
      console.log(response.toGeoJson())
      console.log(response)
      var geojson = response.toGeoJson()
      map.current.addLayer({
        id: "route",
        type: "line",
        source: {
          type: "geojson",
          data: geojson,
        },
        paint: {
          "line-color": "#a51414",
          "line-width": 8,
        },
      })

      var bounds = new tt.LngLatBounds()
      geojson.features[0].geometry.coordinates.forEach(function (point) {
        bounds.extend(tt.LngLat.convert(point)) // creates a bounding area
      })
      map.current.fitBounds(bounds, {
        duration: 300,
        padding: 50,
        maxZoom: 14,
      }) // zooms the map to the searched route
    })
Here, the tts.services.calculateRoute function calls the calculate route service, passing the routeOptions object as an argument. This creates the route, draws its path on the map, and zooms in on it.
Next, we need to be able to call the service on our site. Insert this code into the HTML that the Home component returns:
<button
    className="btn"
    onClick={e => {
    e.preventDefault()
        createRoute()
    }}
    >
      calculate route
</button>

Add these CSS styles to the styles.css file:

.btn {
  position: fixed;
  bottom: 4rem;
  left: 50%;
  border-radius: 0.5rem;
  transform: translate(-50%, 0);
  border: none;
  padding: 1.2rem 1rem;
  background: #000;
  color: #fff;
  font-size: 1.3rem;
  cursor: pointer;
}
Now, clicking the calculate route button will now call the Calculate Route service and construct a route between the two restaurant markers on the map.
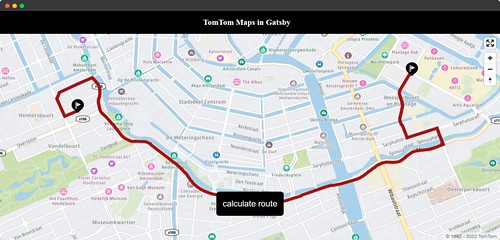
To prove that the route between the two markers changes based on the type of load specified in the truck, add this property to the routeOptions object:
vehicleLoadType: ["otherHazmatHarmfulToWater"]This property lets you specify what type of goods are in the vehicle. Passing on that value to the array tells the Calculate Route service that the truck is loaded with goods that are water pollutants. As a result, the service constructs a different route the vehicle can take to avoid proximity to water.
Here’s the result:

Wrapping Up
In this tutorial, we built a web application with Gatsby that displays a TomTom map and constructs an alterable route between two marker locations using TomTom’s Maps Web SDK.
If you want to integrate such features into your application, there’s no better location technology provider than TomTom. Sign up for a free developer account to integrate TomTom’s location services into your application today. Happy mapping!
* Required field. By submitting your contact details to TomTom, you agree that we can contact you about marketing offers, newsletters, or to invite you to webinars and events. We could further personalize the content that you receive via cookies. You can unsubscribe at any time by the link included in our emails. Review our privacy policy.